How to Run Your First Spring Boot Application in Spring Tool Suite?
Feb 07, 2025 pm 12:11 PMSpring Boot simplifies the creation of robust, scalable, and production-ready Java applications, revolutionizing Java development. Its "convention over configuration" approach, inherent to the Spring ecosystem, minimizes manual setup, allowing developers to focus on business logic instead of boilerplate code. The Spring Tool Suite (STS), a dedicated IDE for Spring development, significantly enhances the Spring Boot experience.
Before starting, ensure you have:
- A Java Development Kit (JDK) installed.
- Spring Tool Suite (STS) installed and configured (download from: http://www.miracleart.cn/link/5dc624e80d9ab94e3229ec29f675c19d).
- Basic understanding of Java and Spring concepts.
Creating and Configuring a Spring Boot Project in STS:
Step 1: Project Creation
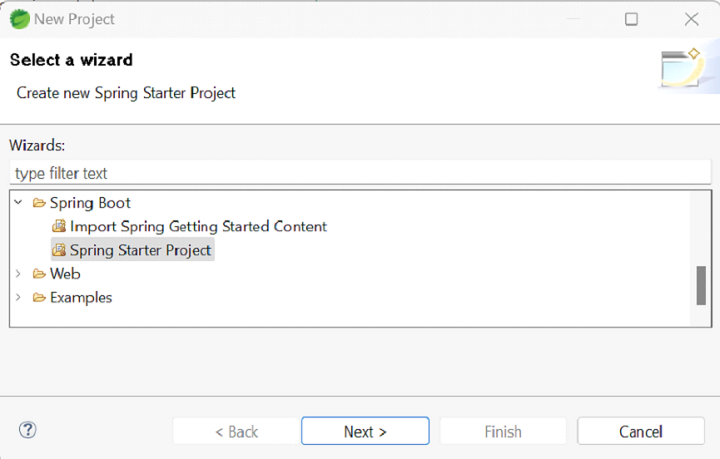
- In STS, select "File" > "New" > "Spring Starter Project".

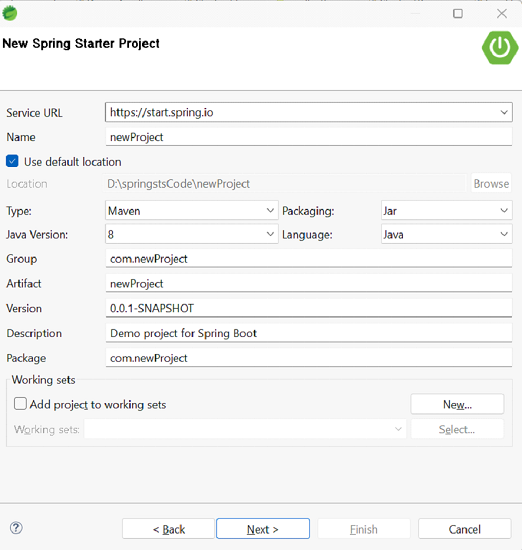
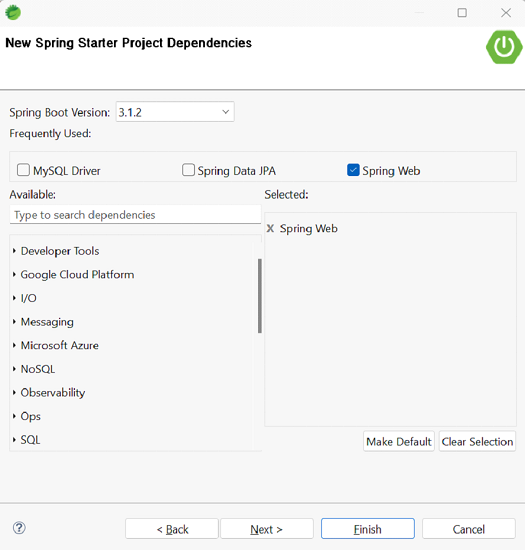
- In the "New Spring Starter Project" dialog, name your project, choose a build tool (Maven or Gradle), select the Spring Boot version, and add necessary dependencies (e.g., "Web" for a web application).


- Click "Finish" to generate the project.
Step 2: Project Structure
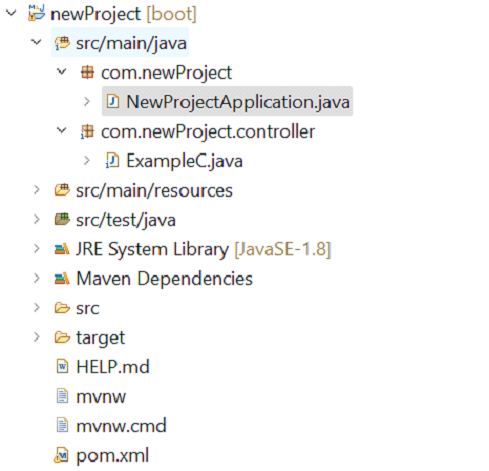
Familiarize yourself with the project structure:
-
src/main/java: Contains your Java source code. -
src/main/resources: Holds resource and configuration files. -
src/test/java: Contains your test classes.
Step 3: First Spring Boot Application
The Application.java file (located in src/main/java within your default package) contains the main application bootstrap. It uses SpringApplication.run() to start the application.
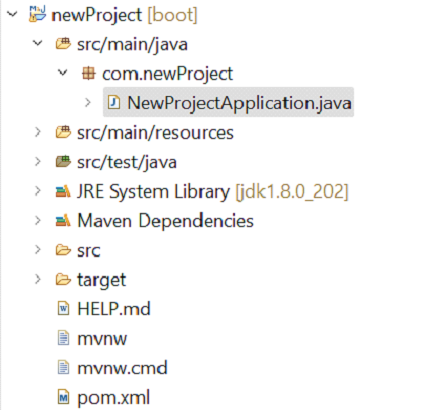
The Application.java class typically looks like this:
package com.newProject;

import org.springframework.boot.SpringApplication;
import org.springframework.boot.autoconfigure.SpringBootApplication;

@SpringBootApplication
public class NewProjectApplication {

   public static void main(String[] args) {
      SpringApplication.run(NewProjectApplication.class, args);
   }

}
Step 4: Running the Application
- Right-click
Application.javain the Package Explorer. - Select "Run As" > "Spring Boot App".
- Observe the console output showing the application startup process.
- Access the default welcome page in your browser at
http://localhost:8080(or the port specified inapplication.properties).

Step 5: Adding a Controller
- Create a
controllerpackage within yournewProject>src/main/javadirectory.
- Create a class (e.g.,
ExampleC) within thecontrollerpackage. Use annotations@Controller,@RequestMapping, and@ResponseBodyas shown below.
package com.newProject.controller;

import org.springframework.web.bind.annotation.RequestMapping;
import org.springframework.stereotype.Controller;
import org.springframework.web.bind.annotation.ResponseBody;

@Controller
public class ExampleC {
   @RequestMapping("/firstApp")
   @ResponseBody
   public String firstSpringApp(){
      return "Welcome!";
   }
}
- Access the result at
http://localhost:8080/firstApp.
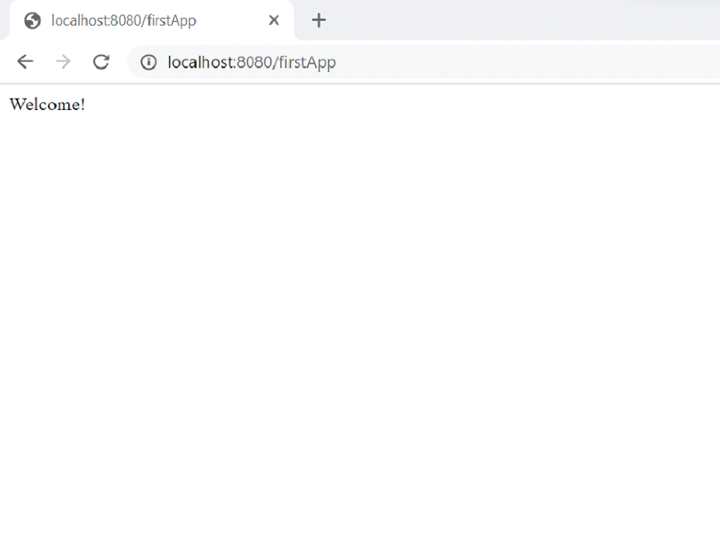
Conclusion:
This guide demonstrates creating and running a basic Spring Boot application using STS. By following these steps and understanding the project structure, you can leverage the power and ease of the Spring framework to build more complex applications.
The above is the detailed content of How to Run Your First Spring Boot Application in Spring Tool Suite?. For more information, please follow other related articles on the PHP Chinese website!

Hot AI Tools

Undress AI Tool
Undress images for free

Undresser.AI Undress
AI-powered app for creating realistic nude photos

AI Clothes Remover
Online AI tool for removing clothes from photos.

Clothoff.io
AI clothes remover

Video Face Swap
Swap faces in any video effortlessly with our completely free AI face swap tool!

Hot Article

Hot Tools

Notepad++7.3.1
Easy-to-use and free code editor

SublimeText3 Chinese version
Chinese version, very easy to use

Zend Studio 13.0.1
Powerful PHP integrated development environment

Dreamweaver CS6
Visual web development tools

SublimeText3 Mac version
God-level code editing software (SublimeText3)

Hot Topics
 How to iterate over a Map in Java?
Jul 13, 2025 am 02:54 AM
There are three common methods to traverse Map in Java: 1. Use entrySet to obtain keys and values at the same time, which is suitable for most scenarios; 2. Use keySet or values to traverse keys or values respectively; 3. Use Java8's forEach to simplify the code structure. entrySet returns a Set set containing all key-value pairs, and each loop gets the Map.Entry object, suitable for frequent access to keys and values; if only keys or values are required, you can call keySet() or values() respectively, or you can get the value through map.get(key) when traversing the keys; Java 8 can use forEach((key,value)->
 Comparable vs Comparator in Java
Jul 13, 2025 am 02:31 AM
In Java, Comparable is used to define default sorting rules internally, and Comparator is used to define multiple sorting logic externally. 1.Comparable is an interface implemented by the class itself. It defines the natural order by rewriting the compareTo() method. It is suitable for classes with fixed and most commonly used sorting methods, such as String or Integer. 2. Comparator is an externally defined functional interface, implemented through the compare() method, suitable for situations where multiple sorting methods are required for the same class, the class source code cannot be modified, or the sorting logic is often changed. The difference between the two is that Comparable can only define a sorting logic and needs to modify the class itself, while Compar
 How to handle character encoding issues in Java?
Jul 13, 2025 am 02:46 AM
To deal with character encoding problems in Java, the key is to clearly specify the encoding used at each step. 1. Always specify encoding when reading and writing text, use InputStreamReader and OutputStreamWriter and pass in an explicit character set to avoid relying on system default encoding. 2. Make sure both ends are consistent when processing strings on the network boundary, set the correct Content-Type header and explicitly specify the encoding with the library. 3. Use String.getBytes() and newString(byte[]) with caution, and always manually specify StandardCharsets.UTF_8 to avoid data corruption caused by platform differences. In short, by
 Using std::chrono in C
Jul 15, 2025 am 01:30 AM
std::chrono is used in C to process time, including obtaining the current time, measuring execution time, operation time point and duration, and formatting analysis time. 1. Use std::chrono::system_clock::now() to obtain the current time, which can be converted into a readable string, but the system clock may not be monotonous; 2. Use std::chrono::steady_clock to measure the execution time to ensure monotony, and convert it into milliseconds, seconds and other units through duration_cast; 3. Time point (time_point) and duration (duration) can be interoperable, but attention should be paid to unit compatibility and clock epoch (epoch)
 How does a HashMap work internally in Java?
Jul 15, 2025 am 03:10 AM
HashMap implements key-value pair storage through hash tables in Java, and its core lies in quickly positioning data locations. 1. First use the hashCode() method of the key to generate a hash value and convert it into an array index through bit operations; 2. Different objects may generate the same hash value, resulting in conflicts. At this time, the node is mounted in the form of a linked list. After JDK8, the linked list is too long (default length 8) and it will be converted to a red and black tree to improve efficiency; 3. When using a custom class as a key, the equals() and hashCode() methods must be rewritten; 4. HashMap dynamically expands capacity. When the number of elements exceeds the capacity and multiplies by the load factor (default 0.75), expand and rehash; 5. HashMap is not thread-safe, and Concu should be used in multithreaded
 JavaScript Data Types: Primitive vs Reference
Jul 13, 2025 am 02:43 AM
JavaScript data types are divided into primitive types and reference types. Primitive types include string, number, boolean, null, undefined, and symbol. The values are immutable and copies are copied when assigning values, so they do not affect each other; reference types such as objects, arrays and functions store memory addresses, and variables pointing to the same object will affect each other. Typeof and instanceof can be used to determine types, but pay attention to the historical issues of typeofnull. Understanding these two types of differences can help write more stable and reliable code.
 What is the 'static' keyword in Java?
Jul 13, 2025 am 02:51 AM
InJava,thestatickeywordmeansamemberbelongstotheclassitself,nottoinstances.Staticvariablesaresharedacrossallinstancesandaccessedwithoutobjectcreation,usefulforglobaltrackingorconstants.Staticmethodsoperateattheclasslevel,cannotaccessnon-staticmembers,
 What is a ReentrantLock in Java?
Jul 13, 2025 am 02:14 AM
ReentrantLock provides more flexible thread control in Java than synchronized. 1. It supports non-blocking acquisition locks (tryLock()), lock acquisition with timeout (tryLock(longtimeout, TimeUnitunit)) and interruptible wait locks; 2. Allows fair locks to avoid thread hunger; 3. Supports multiple condition variables to achieve a more refined wait/notification mechanism; 4. Need to manually release the lock, unlock() must be called in finally blocks to avoid resource leakage; 5. It is suitable for scenarios that require advanced synchronization control, such as custom synchronization tools or complex concurrent structures, but synchro is still recommended for simple mutual exclusion requirements.


