

How Springboot reads custom pro files and injects static variables
May 30, 2023 am 09:07 AM
Springboot reads the pro file and injects static variables
mailConfig.properties
#服務(wù)器
mail.host=smtp.qq.com
#端口號(hào)
mail.port=587
#郵箱賬號(hào)
mail.userName=hzy_daybreak_lc@foxmail.com
#郵箱授權(quán)碼
mail.passWord=vxbkycyjkceocbdc
#時(shí)間延遲
mail.timeout=25000
#發(fā)送人
mail.emailForm=hzy_daybreak_lc@foxmail.com
#發(fā)件人
mail.personal=華夏衣裳
#主題
mail.subject=同袍用戶激活
#內(nèi)容模板
mail.html=您的郵箱驗(yàn)證碼為:
MailConfig.java
/*
 * @(#)MailConfig.java    Created on 2019年9月11日
 * Copyright (c) 2019 ZDSoft Networks, Inc. All rights reserved.
 * $Id$
 */
package com.hxyc.config.properties;

import org.springframework.beans.factory.annotation.Value;
import org.springframework.context.annotation.Configuration;
import org.springframework.context.annotation.PropertySource;
import org.springframework.stereotype.Component;

/**
 * @author huangzy
 * @version $Revision: 1.0 $, $Date: 2019年9月11日 上午10:29:35 $
 */
@Configuration
@PropertySource(value = "classpath:config/mailConfig.properties", encoding = "UTF-8")
@Component
public class MailConfig {
    public static String host;
    public static Integer port;
    public static String userName;
    public static String passWord;
    public static String emailForm;
    public static String timeout;
    public static String personal;
    public static String html;
    public static String subject;

    /**
     * @return Returns the host.
     */
    public static String getHost() {
        return host;
    }

    /**
     * @param host
     *            The host to set.
     */
    @Value("${mail.host}")
    public void setHost(String host) {
        MailConfig.host = host;
    }

    /**
     * @return Returns the port.
     */
    public static Integer getPort() {
        return port;
    }

    /**
     * @param port
     *            The port to set.
     */
    @Value("${mail.port}")
    public void setPort(Integer port) {
        MailConfig.port = port;
    }

    /**
     * @return Returns the userName.
     */
    public static String getUserName() {
        return userName;
    }

    /**
     * @param userName
     *            The userName to set.
     */
    @Value("${mail.userName}")
    public void setUserName(String userName) {
        MailConfig.userName = userName;
    }

    /**
     * @return Returns the passWord.
     */
    public static String getPassWord() {
        return passWord;
    }

    /**
     * @param passWord
     *            The passWord to set.
     */
    @Value("${mail.passWord}")
    public void setPassWord(String passWord) {
        MailConfig.passWord = passWord;
    }

    /**
     * @return Returns the emailForm.
     */
    public static String getEmailForm() {
        return emailForm;
    }

    /**
     * @param emailForm
     *            The emailForm to set.
     */
    @Value("${mail.emailForm}")
    public void setEmailForm(String emailForm) {
        MailConfig.emailForm = emailForm;
    }

    /**
     * @return Returns the timeout.
     */
    public static String getTimeout() {
        return timeout;
    }

    /**
     * @param timeout
     *            The timeout to set.
     */
    @Value("${mail.timeout}")
    public void setTimeout(String timeout) {
        MailConfig.timeout = timeout;
    }

    /**
     * @return Returns the personal.
     */
    public static String getPersonal() {
        return personal;
    }

    /**
     * @param personal
     *            The personal to set.
     */
    @Value("${mail.personal}")
    public void setPersonal(String personal) {
        MailConfig.personal = personal;
    }

    /**
     * @return Returns the html.
     */
    public static String getHtml() {
        return html;
    }

    /**
     * @param html
     *            The html to set.
     */
    @Value("${mail.html}")
    public void setHtml(String html) {
        MailConfig.html = html;
    }

    /**
     * @return Returns the subject.
     */
    public static String getSubject() {
        return subject;
    }

    /**
     * @param subject
     *            The subject to set.
     */
    @Value("${mail.subject}")
    public void setSubject(String subject) {
        MailConfig.subject = subject;
    }

}
springboot static property injection solution
The first way
Assign attributes (objects) through the springboot component initialization life cycle
@Component
public class DSHWechatApiUtil extends DSHBaseController {
    @Autowired
    private IThirdPartyAuthDao thirdPartyAuthDao;
    private static IThirdPartyAuthDao staticThirdPartyAuthDao;

    @PostConstruct
    public void init() {
        staticThirdPartyAuthDao = thirdPartyAuthDao;
    }
    public static JSONObject getAuthorizerToken(String componentAccessToken, String authorizerAppid, String authorizerRefreshToken) {
        JSONObject returnObject = new JSONObject();
        try {
            if (DSHUtils.isEmpty(componentAccessToken)) {
                componentAccessToken = staticThirdPartyAuthDao.selectWechatValue(DSHConstants.WECHAT_PARAMS.COMPONENT_ACCESS_TOKEN);
            }
        } catch (Exception e) {
            e.printStackTrace();
        }
        return returnObject;
    }
}
You can see that when the DSHWechatApiUtil tool class component is initialized, the method marked with the @PostConstruct annotation is called. Static variables are assigned values.
The second way
Through @Value() annotation
@Value() annotation will not inject attributes into static variables. By thinking in the first way, Then we must find a way to assign values ??when this component is initialized.
The first method is certainly possible. First write a property, then assign the value to the property through the @Value() annotation, and finally assign the value to the static property through the @PostConstruct annotation.
Here we have to use another method. The method here is to assign values ??through the set method. The attribute is statically modified, and the get method is also statically modified, but the set method cannot be statically modified. Use the @Value() annotation to modify the set method.
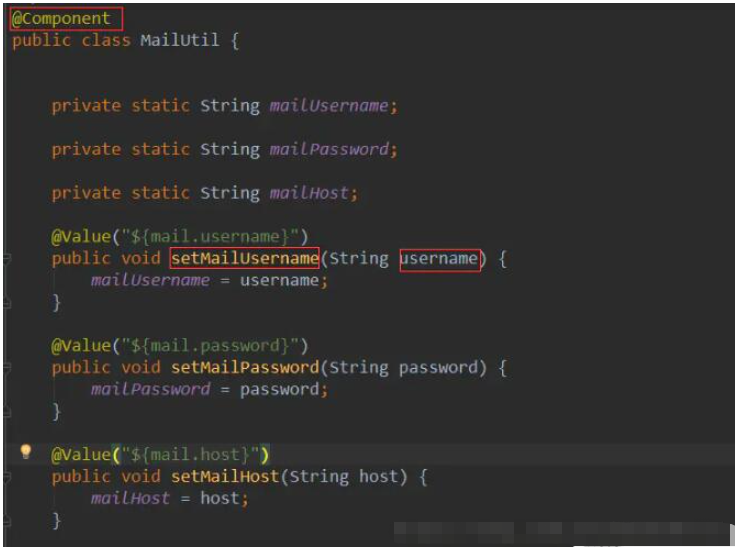
This will allow successful injection.
The third way
The third way is similar to the second way.
@ConfigurationProperties(prefix = ProjectConfig.PROJECT_PREFIX)
public class ProjectConfig {
    public static final String PROJECT_PREFIX = "project";
    /**
     * 系統(tǒng)版本號(hào)
     */
    private String version;
    /**
     * 項(xiàng)目名稱
     */
    private String name;
    /**
     * 版權(quán)年份
     */
    private String copyrightYear;
    /**
     * 實(shí)例演示開關(guān)
     */
    private static boolean demoEnabled;
    /**
     * 獲取地址ip開關(guān)
     */
    private static boolean addressEnabled;
    public String getVersion() {
        return version;
    }
    public void setVersion(String version) {
        this.version = version;
    }
    public String getName() {
        return name;
    }
    public void setName(String name) {
        this.name = name;
    }
    public String getCopyrightYear() {
        return copyrightYear;
    }
    public void setCopyrightYear(String copyrightYear) {
        this.copyrightYear = copyrightYear;
    }
    public boolean isDemoEnabled() {
        return demoEnabled;
    }
    public void setDemoEnabled(boolean demoEnabled) {
        ProjectConfig.demoEnabled = demoEnabled;
    }
    public static boolean isAddressEnabled() {
        return addressEnabled;
    }
    public void setAddressEnabled(boolean addressEnabled) {
        ProjectConfig.addressEnabled = addressEnabled;
    }
}
As shown in the above code, as long as the set method is set to non-static, then this configuration class The static properties can be injected successfully.
The above is the detailed content of How Springboot reads custom pro files and injects static variables. For more information, please follow other related articles on the PHP Chinese website!

Hot AI Tools

Undress AI Tool
Undress images for free

Undresser.AI Undress
AI-powered app for creating realistic nude photos

AI Clothes Remover
Online AI tool for removing clothes from photos.

Clothoff.io
AI clothes remover

Video Face Swap
Swap faces in any video effortlessly with our completely free AI face swap tool!

Hot Article
Hot Tools

Notepad++7.3.1
Easy-to-use and free code editor

SublimeText3 Chinese version
Chinese version, very easy to use

Zend Studio 13.0.1
Powerful PHP integrated development environment

Dreamweaver CS6
Visual web development tools

SublimeText3 Mac version
God-level code editing software (SublimeText3)


 iPhone 15 Pro Max vs iPhone 14 Pro Max: What are the comparisons and differences between them?
Sep 19, 2023 pm 08:29 PM
iPhone 15 Pro Max vs iPhone 14 Pro Max: What are the comparisons and differences between them?
Sep 19, 2023 pm 08:29 PM
iPhone 15 Pro vs. iPhone 14 Pro: Specs Comparison Here is a spec comparison between iPhone 15 Pro Max and iPhone 14 Pro Max: iPhone 15 Pro Max iPhone 14 Pro Max Display size 6.7 inches 6.7 inches Display technology Super Retina 2,000 nits Dimensions 6.29x3.02x0.32 inches 6.33x3.06x0.31 inches Weight 221 grams 240 grams
 How to start Xiaomi Mi Band 8pro
Jan 14, 2024 am 08:51 AM
How to start Xiaomi Mi Band 8pro
Jan 14, 2024 am 08:51 AM
Many users don’t know how to turn on the Xiaomi Mi Band 8 when they first come into contact with it. In fact, the method is very simple. We only need to find the USB data cable and connect the watch to the power supply, and then charge it for a while. You can press the button to turn on. How to turn on Xiaomi Mi Band 8pro 1. First install the watch, that is, connect the theme and the strap on both sides. 2. Then when we turn on the watch for the first time, we need to connect the charging cable. The connection method is at the bottom of the watch. 3. Wait for the watch to vibrate to power on, and then connect to your phone. >>>
 Comparison and difference analysis between SpringBoot and SpringMVC
Dec 29, 2023 am 11:02 AM
Comparison and difference analysis between SpringBoot and SpringMVC
Dec 29, 2023 am 11:02 AM
SpringBoot and SpringMVC are both commonly used frameworks in Java development, but there are some obvious differences between them. This article will explore the features and uses of these two frameworks and compare their differences. First, let's learn about SpringBoot. SpringBoot was developed by the Pivotal team to simplify the creation and deployment of applications based on the Spring framework. It provides a fast, lightweight way to build stand-alone, executable
 Three cameras with 20x zoom, Honor selects Xiaopai Smart Camera Pro innovation is coming
Aug 23, 2024 pm 09:44 PM
Three cameras with 20x zoom, Honor selects Xiaopai Smart Camera Pro innovation is coming
Aug 23, 2024 pm 09:44 PM
Have you installed cameras in your home? In recent years, home camera products have suddenly become a hit. I asked my friends around me, and boy, every house has one, and some even have more than one. However, with the popularity of the product, it has also brought some complaints during use. For example, you can only see one place at the same time, and if you want to see other places, you have to adjust the pan/tilt and rotate the camera back and forth. There is a certain blind spot and time difference when viewing the picture; or when you want to take a closer look at a certain location in your home, you find that the picture is blurry and you cannot see it at all. Clarity; etc... The experience is greatly compromised. Honor Select and Xiaopai Technology jointly launched the Honor Select Xiaopai Smart Camera Pro featuring "three lenses and dual images". Provides new solutions to industry and user pain points
 Which one is worth buying, Xiaomi Mi Pad 6 or Pro?
Feb 07, 2024 pm 08:36 PM
Which one is worth buying, Xiaomi Mi Pad 6 or Pro?
Feb 07, 2024 pm 08:36 PM
Many users are not sure which one is worth buying, Xiaomi Mi Pad 6 or Mi Pad 6. From the configuration point of view, the higher configuration of Pro is definitely recommended, but it also depends on the price and their own budget, and the different product positioning groups are also different. Which one is worth buying, Xiaomi Mi Pad 6 or Pro? Answer: Xiaomi Mi Pad 6 Pro will be better, both in terms of performance and camera battery life. 1. Processor Xiaomi Pad 6: Snapdragon 870 Xiaomi Mi Pad 6 Pro: more powerful first-generation Snapdragon 8+ processor 2. Battery size Xiaomi Mi Pad 6: 8840mAh, 67W second charge Xiaomi Mi Pad 6 Pro: 8600mAh, 33W The fast-charging Xiaomi Mi Pad 6 will have better battery life, but charging will be slower. 3. Take photos with Xiaomi Mi Pad 6
 Samsung S25 Ultra details exposed: same width as iPhone 16 Pro Max, but with a larger screen
Aug 23, 2024 pm 09:33 PM
Samsung S25 Ultra details exposed: same width as iPhone 16 Pro Max, but with a larger screen
Aug 23, 2024 pm 09:33 PM
According to news on August 22, as the release of Samsung’s new generation flagship mobile phone S25 Ultra approaches, more and more details are beginning to emerge. The well-known blogger @ibinguniverse revealed more specifications of the S25 Ultra on Weibo today. The most eye-catching one is that its body width is the same as the Apple iPhone 16 Pro Max, both 77.6mm. 1. Thanks to Samsung’s further optimization of the frame design, the screen size of the S25 Ultra has been increased to 6.86 inches while maintaining the same width as the iPhone 16 Pro Max, providing users with a more immersive visual experience. The blogger further pointed out in the comment area that the black edges of the S25 Ultra are better than those of the iPhone 16 Pro Max&
 Xiaomi Pro14 release date
Jan 05, 2024 pm 02:50 PM
Xiaomi Pro14 release date
Jan 05, 2024 pm 02:50 PM
Xiaomi pro14 is already on the market, and its configuration is very good for a business office notebook. There are three processor configurations to choose from, and the price is not particularly high. Many friends don’t know the specific launch time of Xiaomi Pro14. Xiaomi Pro14 launch time A: Xiaomi Pro14 Ryzen Edition will be available for pre-order on November 10, 2021, with an initial price starting from 5,299 yuan. Xiaomi Notebook Pro 14 will be released on July 4, 2022, and will officially go on sale at midnight on July 8. Xiaomi pro14 introduction 1. The screen is equipped with a 14-inch 2.5K Super Retina screen with a resolution of 2560x1600, a screen-to-body ratio of up to 88%, a 100% sRGB color gamut, and a refresh rate of 120Hz. 2. Appearance adopts 6 series
 SpringBoot+Dubbo+Nacos development practical tutorial
Aug 15, 2023 pm 04:49 PM
SpringBoot+Dubbo+Nacos development practical tutorial
Aug 15, 2023 pm 04:49 PM
This article will write a detailed example to talk about the actual development of dubbo+nacos+Spring Boot. This article will not cover too much theoretical knowledge, but will write the simplest example to illustrate how dubbo can be integrated with nacos to quickly build a development environment.
