

How to access the BIOS or UEFI in Windows 10?
Jun 29, 2025 am 12:31 AM
To enter the BIOS or UEFI setup interface of Windows 10, the most direct way is to restart through system settings and select the corresponding options. The specific operations are: 1. Open the "Start Menu" or press the Win key, click the power icon, and click "Restart" while holding the Shift key to enter the recovery environment; 2. Select Troubleshooting > Advanced Options > UEFI Firmware Settings, click "Restart" to enter the UEFI setting interface of the motherboard. In addition, you can also use traditional methods to press the corresponding shortcut keys when booting, such as Lenovo/ThinkPad using F1, F2 or Enter, Dell using F2 or Esc, HP using Esc or F10, Asus ASUS using F2 or Del, Acer using F2 or Del, and Apple Mac (Boot Camp) using Option key to switch the boot disk when booting. If you are not sure which key to press, you can view the BIOS mode and motherboard manufacturer by pressing Win R and query the correct method based on the brand. It is recommended to use the "UEFI Firmware Settings" in Windows settings.

To enter the BIOS or UEFI setup interface of Windows 10, the most direct way is to restart through the system settings and select the corresponding option, rather than relying on the traditional hotkey pressing when booting. Of course, the specific operation is also related to your device model.
Restart into UEFI through Windows settings
Windows 10 provides a shortcut that allows you to avoid pressing F2, Del and other keys when booting:
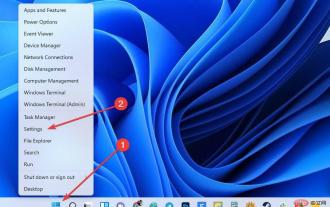
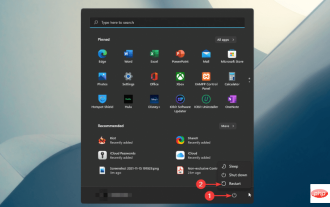
- Open the Start Menu or press the Win key and click the power icon .
- Press and hold Shift key while clicking "Restart" and the computer will enter the recovery environment.
- After entering, select Troubleshooting > Advanced Options > UEFI Firmware Settings .
- Click "Restart" and the system will directly enter the UEFI setting interface of the motherboard.
This method is suitable for most modern Windows devices, especially those using the Quick Start feature, and can effectively avoid the problem of missing key timing.
Common BIOS/UEFI shortcut keys (traditional method)
Although the above method is more reliable, some users are still used to pressing the shortcut keys when powering on. The corresponding buttons for computers of different brands are different:
- Lenovo/ ThinkPad : F1, F2 or Enter (some models)
- Dell : F2 or Esc
- HP : Esc or F10
- Asus ASUS : F2 or Del
- Acer : F2 or Del
- Apple Mac (Boot Camp) : Press and hold the Option key to switch the startup disk when booting
Note: These buttons usually need to be pressed when the power-on screen appears. If you wake up with the "Sleep" or "Sleep" state, this stage may not be triggered. It is recommended to turn on and try again after completely shutting down .
If you don't know which key to press?
If you are not sure which key corresponds to your device, you can check it in the system:
- Press Win R to open the run window, enter
msinfo32and press Enter. - In the System Information window that opens, find BIOS Mode and motherboard manufacturer .
- According to the motherboard brand, go to the official website to check the manual or search for "How to enter the BIOS of the motherboard with XXX motherboard".
This will enable you to find the correct keys more targetedly.
Basically these are the methods. It is generally not that the operation is complicated, but that the right time is not found or the key is wrong. Remember, give priority to the "UEFI firmware settings" in Windows settings, which is much more reliable than booting up to grab time.
The above is the detailed content of How to access the BIOS or UEFI in Windows 10?. For more information, please follow other related articles on the PHP Chinese website!

Hot AI Tools

Undress AI Tool
Undress images for free

Undresser.AI Undress
AI-powered app for creating realistic nude photos

AI Clothes Remover
Online AI tool for removing clothes from photos.

Clothoff.io
AI clothes remover

Video Face Swap
Swap faces in any video effortlessly with our completely free AI face swap tool!

Hot Article
Hot Tools

Notepad++7.3.1
Easy-to-use and free code editor

SublimeText3 Chinese version
Chinese version, very easy to use

Zend Studio 13.0.1
Powerful PHP integrated development environment

Dreamweaver CS6
Visual web development tools

SublimeText3 Mac version
God-level code editing software (SublimeText3)
Hot Topics


 Ventoy secure boot settingsSecure Boot
Jun 18, 2024 pm 09:00 PM
Ventoy secure boot settingsSecure Boot
Jun 18, 2024 pm 09:00 PM
Ventoy is a USB boot tool that can directly boot ISO/WIM/IMG/VHD(x)/EFI and other types of files in the USB flash drive. It is very easy to use. Laptops have secure boot turned on by default. If they are not turned off or cannot be turned off, they cannot be booted from a USB device. Ventoy also supports secure boot. The principle is to inject a GRUB installation certificate into the current computer. As long as your computer After being injected once, any USB disk PE booted based on grub can pass. The official description of Ventoy is a GIF image. The playback speed is too fast and you may not be able to remember it. The editor has divided the GIF image to make it easier to understand. Ventoy secure boot has EnrollKey and Enro
 Acer laptop disables secure boot and removes password in Bios
Jun 19, 2024 am 06:49 AM
Acer laptop disables secure boot and removes password in Bios
Jun 19, 2024 am 06:49 AM
I repaired an Acer laptop and had to turn off secure boot when entering PE. I recorded how to turn off secure boot and remove the password from Bios. Turn on the computer and when the screen is not on, keep pressing the F2 key to enter the BIOS. On Acer laptops, turn off Secure Boot and press the arrow keys to switch to Boot. If SecureBoot is gray and unclickable, switch to the Security page, select SetSupervisorPassword and press Enter to set the password. Then switch to Boot, SecureBoot can be selected as Disabled, and press F10 to save. Modify and clear the BIOS password on your Acer notebook. Switch to the Security menu and select SetSupervisorPasswo.
 How to increase VRAM in Windows 11
May 05, 2023 pm 04:25 PM
How to increase VRAM in Windows 11
May 05, 2023 pm 04:25 PM
Are you receiving warnings about your computer's graphics card memory when using graphics-intensive software or a new game? To prevent these issues and run resource-intensive games or applications smoothly, you need a graphics card and RAM that meet its specifications. Whether your computer is old or has graphics issues for no apparent reason, you can fix the problem by adjusting a few parameters in certain situations. The method we will cover in this article is to increase VRAM in Windows 11, which is one of the most effective ways to get the most out of your computer, especially your graphics card. But before we get into it, let's see what VRAM is and what it does. So, without further ado, let’s get started. Why increase video memory? What aspects of gaming and graphics software do we need to point out?
 How to adjust the speed of your computer fan in Windows 11?
May 06, 2023 pm 06:55 PM
How to adjust the speed of your computer fan in Windows 11?
May 06, 2023 pm 06:55 PM
You may have had to shut down the system at least once due to overheating, or it may have shut down on its own. We've all been there. But what if you could manually control the fan in Windows 11 for optimal results? Most people would be excited by the idea of ??manually controlling fan speed, but it's not that straightforward. You have to find the right app that is both compatible and offers the option to not only view but also control the speed. In the following sections, we'll list various ways to obtain the right tools from OEM or third-party sources, as well as fan control in Windows 11 via the BIOS. What should I know about fan control in Windows 11? Although the built-in settings should be able to
 Fix: VAN 1067 error when running Valorant on Windows 11
May 22, 2023 pm 02:41 PM
Fix: VAN 1067 error when running Valorant on Windows 11
May 22, 2023 pm 02:41 PM
The operating system looks much better than its predecessor and has gamer-oriented features like AutoHDR and DirectStorage, but Valorant players have had some trouble launching the game. This is not the first issue faced by gamers earlier, Valorant not opening on Windows 11 is another issue plaguing them but we have covered the ways to fix it. Now it seems that Valorant players who switched to Windows 11 are facing issues due to Secure Boot and TPM2.0 services, which causes the game menu to only show an exit option while running. Many users are getting the VAN1067 error, but it shouldn't be a cause for alarm
 Enable Secure Boot in Windows 11 User Mode: 3 Tips
May 06, 2023 pm 06:25 PM
Enable Secure Boot in Windows 11 User Mode: 3 Tips
May 06, 2023 pm 06:25 PM
Secure Boot is a security feature integrated into most current hardware and UEFI firmware that provides a secure environment for booting any Windows system. This utility prevents malware from hijacking the device during the boot process. This feature works like a security door, which can be tricky when you enable Secure Boot for Windows 11 in user mode. If your system uses an older boot framework and Secure Boot is not enabled, the Secure Boot state is not supported. Even if your motherboard includes a secure boot option. Let's look at some possible solutions. This solution perfectly solves the problem of Secure Boot not supported on all devices including HP, Dell and Lenovo laptops or ASRock and Gyg
 Dell computer bios interface to set USB disk startup items
Feb 10, 2024 pm 10:09 PM
Dell computer bios interface to set USB disk startup items
Feb 10, 2024 pm 10:09 PM
How do you set up a USB drive if your computer is a Dell laptop? Many friends have found that Dell laptops will not display the USB disk option by pressing the boot hotkey, so they need to enter the BIOS to set up the USB disk boot, so what if they don't know how to operate it? Now follow the editor’s steps to demonstrate how to set up a USB flash drive on a Dell laptop. Many friends assemble Dell computers, but don't know how to use the USB boot tool after entering the USBPE interface. Many friends don't know that they need to enter the BIOS interface to set up USB boot, so pressing the boot hotkey will not appear. what should we do? Let’s see how Dell sets up USB boot! Set up Dell laptop to reinstall system bootable from USB disk
 The system has posted in safe mode ASUS motherboard
Jun 19, 2024 am 07:35 AM
The system has posted in safe mode ASUS motherboard
Jun 19, 2024 am 07:35 AM
After the computer is turned on, it prompts The system has posted in safe mode. You can set it in the BIOS to ignore the F1 error. Although it does not prompt, it directly enters the BIOS when it is turned on. Sometimes F1 is useless every time it is turned on. Then you need to restart the BIOS, and then exit the BIOS to enter the system. . thesystemhaspostedinsafemode=The system is in safe mode. This problem is relatively common on ASUS motherboards. As long as you turn off the XMP of the memory and adjust the memory frequency back to normal, you can boot normally without the thesystemhaspostedinsafemode error. Updating the latest motherboard BIOS should be OK.
