


In WordPress we often have to stick with plain PHP when creating plugins. This leads to PHP and HTML code getting mixed up in a single page, which isn’t a good practice. Separation of concerns is a design principle that states that we should split up a program into different parts, namely the logic and the presentation. In this tutorial, we will be taking a look at one solution to this problem: WordPress MVC. It’s a plugin that adds MVC support to WordPress so we can write our plugins the MVC way.
Key Takeaways
- WordPress MVC is a plugin that introduces the Model-View-Controller (MVC) architecture to WordPress, enabling developers to separate logic and presentation in plugin development.
- To use WordPress MVC, you must install and activate the WP MVC plugin, which then allows you to scaffold new plugins using specific MVC commands in the command line.
- The tutorial demonstrates building a sample plugin called “AnimeList” which includes creating custom database tables, forms for adding and editing entries, and managing data presentation on both admin and public sides.
- WordPress MVC enhances code organization and maintainability by structuring code into models (data handling), views (output presentation), and controllers (request handling), which is particularly useful for complex or large-scale WordPress projects.
- The tutorial covers the entire workflow from setting up the MVC environment in WordPress, generating the necessary MVC components for a plugin, to adding custom styles and scripts, showcasing a practical implementation of MVC in WordPress plugin development.
What Is MVC?
Before we move on, it’s important that we are all on the same page. If you already know what MVC is, feel free to skip to the next section.
Ok so what is MVC? MVC stands for Model View Controller. The Model represents the data that our application utilizes. It’s the part that does the talking to the database. The View deals with the presentation. It’s where we put in HTML code and basic presentation logic. Lastly there’s the Controller whose main job is to tie those two together. Examples include validating and sanitizing user input. It’s basically responsible for controlling the overall flow of the application.
Installation and Setup
WP MVC is a plugin which we need to install in order to make MVC work with WordPress. You can download the plugin here and install it like you would usually install a plugin in WordPress. Once that’s done, login to WordPress and activate it from your plugins page.
Building a Plugin the MVC Way
Before we move on, I’ll give you a brief overview of what we will be building in this tutorial. We will build a plugin that will list out all the anime that is created in the admin side of the website. Pretty much like what this site does. In the admin side, we will have an interface where we can add, list, edit or delete anime shows. In the public side, we will have them presented in a grid view in a specific page.
Now we’re ready to build a new plugin. You can do that by navigating to the path where you installed the WP MVC plugin.
cd path/to/plugins/wp-mvc
Then add execution permissions to the wpmvc file. This is the file that we will be using to generate a new plugin.
chmod +x wpmvc
Next, we can now generate a new plugin. Execute the following command to do that.
./wpmvc generate plugin AnimeList
This will create a new plugin under the wp-content/plugins directory of your WordPress installation. For me, it created an anime-list directory. Open that directory and then open the anime_list_loader.php file. This file contains the functions that will get executed upon activating or deactivating the plugin. As we will need to save a lot of custom data, we will have to create a custom table instead of using the options API to store things in the database. To do that, we have to add the code that will create the new table upon plugin activation. Add the following code inside the activate method.
global $wpdb;

$sql = '
CREATE TABLE '. $wpdb->prefix . 'animelists (
  id int(11) NOT NULL auto_increment,
  title varchar(255) NOT NULL,
  poster varchar(255) NOT NULL,
  plot TEXT NOT NULL,
  genres TEXT default NULL,
  PRIMARY KEY  (id)
)';

dbDelta($sql);
In the code above, we are creating a table which has the id, title, poster, plot and genres field using a raw SQL query. The dbDelta function is then used to execute the SQL query.
Next, under the deactivate method, we have to clean up our mess. The code below removes the table from the WordPress database.
require_once ABSPATH.'wp-admin/includes/upgrade.php';

global $wpdb;

$sql = 'DROP TABLE ' . $wpdb->prefix . 'anime_lists';
$wpdb->query($sql);
Normally this isn’t the way you would like to do it. Some users might still need the data that your plugin has acquired over time. Even if they deactivate your plugin. But to keep things simple, we won’t handle that here.
Now is a good time to activate your new plugin from the WordPress admin page. If everything worked correctly, that should have created a wp_anime_lists table in your WordPress database.
Next, execute the following command:
./wpmvc generate scaffold AnimeList AnimeList
The command above generates the views, controllers and model for the model that you specify. The first AnimeList is the name of the plugin and the second one is the name of the model. Note that wpmvc uses a naming convention here. A model should always be in singular form and the table is plural form. And every capital letter in the name of the model means that it should be separated with underscores. The name of the model should be based on the name of the table. So using the rules above, if the name of the table is anime_lists, the model should be named AnimeList. Underscores are turned into CamelCasing and plural is converted to singular form.
Next, open up the add.php file and edit.php under the app/views/admin/anime_lists/ and add the following code:
cd path/to/plugins/wp-mvc
On the edit.php file:
chmod +x wpmvc
What we did above was to create the forms for adding new anime shows and editing existing one’s. This utilizes the form helpers which is built-in to wpmvc. To break it down, first we create a new form and then supply the name of the model as its argument. In this case the name of the model is AnimeList.
./wpmvc generate plugin AnimeList
Next, we output each of the columns that we have added in the table using the input method. This method takes up the name of the field as its first argument. By default, wpmvc determines what type of field it would output by checking the data type. So if the data type is varchar, it will output a text input. If the data type is text it will output a textarea and so on.
global $wpdb;

$sql = '
CREATE TABLE '. $wpdb->prefix . 'animelists (
  id int(11) NOT NULL auto_increment,
  title varchar(255) NOT NULL,
  poster varchar(255) NOT NULL,
  plot TEXT NOT NULL,
  genres TEXT default NULL,
  PRIMARY KEY  (id)
)';

dbDelta($sql);
If you want to use another input type, you can specify an array containing the type of input as a second argument:
require_once ABSPATH.'wp-admin/includes/upgrade.php';

global $wpdb;

$sql = 'DROP TABLE ' . $wpdb->prefix . 'anime_lists';
$wpdb->query($sql);
Finally, we close off the form using the end method. This takes up the label of the button as its argument.
./wpmvc generate scaffold AnimeList AnimeList
At this point we can now add a few anime shows. WP MVC automatically handles adding a new menu on the WordPress dashboard named after the name of the model. In this case the name of the new menu should be ‘Anime Lists’. From there you can start adding new items using the ‘a(chǎn)dd new’ sub-menu.
Next we need to update the code which lists the existing items. You can find it on the following path:
<h2>Add Anime List</h2>

<?php echo $this->form->create($model->name); ?>
<?php echo $this->form->input('title'); ?>
<?php echo $this->form->input('poster'); ?>
<?php echo $this->form->input('plot'); ?>
<?php echo $this->form->input('genres'); ?>
<?php echo $this->form->input('producer'); ?>
<?php echo $this->form->end('Add'); ?>
By default, it contains the following code:
<h2>Edit Anime List</h2>

<?php echo $this->form->create($model->name); ?>
<?php echo $this->form->input('title'); ?>
<?php echo $this->form->input('poster'); ?>
<?php echo $this->form->input('plot'); ?>
<?php echo $this->form->input('genres'); ?>
<?php echo $this->form->input('producer'); ?>
<?php echo $this->form->end('Update'); ?>
This results to an error returned for every row in the table since we don’t have a name field in the anime_lists table. To solve this issue, all we have to do is use the fields that we have on the wp_anime_lists table:
<?php echo $this->form->create($model->name); ?>
Once you’ve updated the file, the result should now look like this:
Now we can proceed with the public facing side of the website.
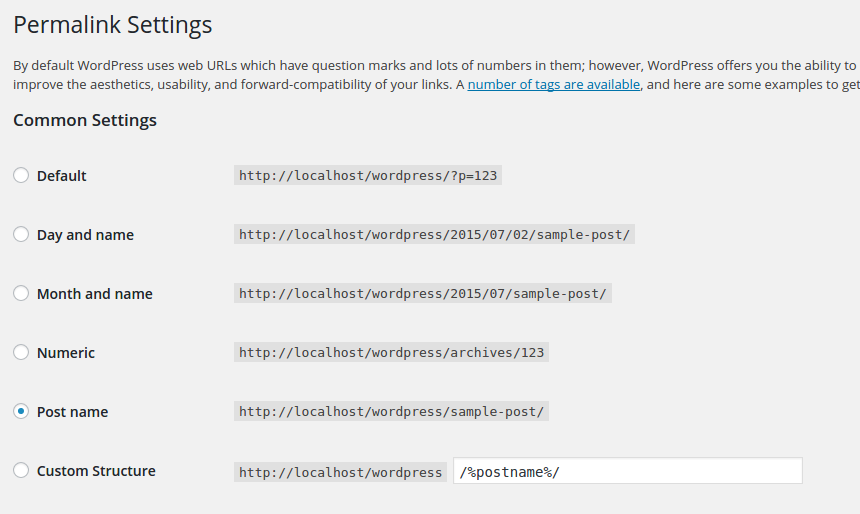
Before we move on, it’s important to know that every time we use the command line to generate models, controllers and views. WP MVC also assigns a new page for that model. So for the AnimeLists model, it creates the anime_lists page. Don’t forget to enable mod_rewrite in your Apache configuration, add the WordPress .htaccess file, and set the permalinks settings to use post name.
For your convenience, here’s the .htaccess file that I’m using:
<?php echo $this->form->input('title'); ?>
<?php echo $this->form->input('poster'); ?>
<?php echo $this->form->input('plot'); ?>
<?php echo $this->form->input('genres'); ?>
<?php echo $this->form->input('producer'); ?>
Once you’re done with that, you can now check if you can access the page. By default, you wouldn’t see anything in there. That’s what were going to work on.
cd path/to/plugins/wp-mvc
First, open the app/controllers/anime_lists_controller.php file. This is the controller for the anime_lists page. By default, it should contain the following code:
chmod +x wpmvc
This is fine if you want to stick with the defaults that are added from the base public controller (MvcPublicController). But if you want to customize things a little bit, you have to override the index method with the following:
./wpmvc generate plugin AnimeList
What we’re doing above is to get the default parameters supplied in the base controller by using $this->params. We then assign it to a variable so that we can override the default values. By default, the controller selects 10 items from the database per page. If I only want to select 6, I can do that by setting the per_page parameter to 6:
global $wpdb;

$sql = '
CREATE TABLE '. $wpdb->prefix . 'animelists (
  id int(11) NOT NULL auto_increment,
  title varchar(255) NOT NULL,
  poster varchar(255) NOT NULL,
  plot TEXT NOT NULL,
  genres TEXT default NULL,
  PRIMARY KEY  (id)
)';

dbDelta($sql);
That’s really all we need to customize. The rest of the code just creates a collection using the paginate method in the model. This collection is then used to pass the ‘objects’ (anime shows), and then set the pagination into the view.
require_once ABSPATH.'wp-admin/includes/upgrade.php';

global $wpdb;

$sql = 'DROP TABLE ' . $wpdb->prefix . 'anime_lists';
$wpdb->query($sql);
Now open up the view that’s responsible for rendering the anime_lists page. It’s at app/views/anime_lists/index.php. Once opened, add the following code:
./wpmvc generate scaffold AnimeList AnimeList
This loops through all the objects that we have passed earlier from the controller. Inside the loop, we render the view which displays the details for each object. The render_view method takes up the name of the view as its first argument, and the data that we want to pass in as the second.
<h2>Add Anime List</h2>

<?php echo $this->form->create($model->name); ?>
<?php echo $this->form->input('title'); ?>
<?php echo $this->form->input('poster'); ?>
<?php echo $this->form->input('plot'); ?>
<?php echo $this->form->input('genres'); ?>
<?php echo $this->form->input('producer'); ?>
<?php echo $this->form->end('Add'); ?>
Finally, we output the pagination.
<h2>Edit Anime List</h2>

<?php echo $this->form->create($model->name); ?>
<?php echo $this->form->input('title'); ?>
<?php echo $this->form->input('poster'); ?>
<?php echo $this->form->input('plot'); ?>
<?php echo $this->form->input('genres'); ?>
<?php echo $this->form->input('producer'); ?>
<?php echo $this->form->end('Update'); ?>
Next, open up the _item.php file on the same directory and then add the following code:
<?php echo $this->form->create($model->name); ?>
This shows the details for each object. As you can see from the above code, we can directly access each of the fields from the $object variable. We’re also using a helper function called the mvc_public_url to generate a URL which points to the individual pages for each object. This method takes up an array which contains the name of the controller and the ID of the object.
<?php echo $this->form->input('title'); ?>
<?php echo $this->form->input('poster'); ?>
<?php echo $this->form->input('plot'); ?>
<?php echo $this->form->input('genres'); ?>
<?php echo $this->form->input('producer'); ?>
This generates a URL similar to the following:
<?php echo $this->form->input('is_awesome', array('type' => 'checkbox')); ?>
Next, we also have to update the individual object page. To do that, open up the show.php file. Still on the same directory.
<?php echo $this->form->end('Add'); ?>
Not much difference here. It’s basically the same as the output in the previous view. Only this time we also output the plot.
app/controllers/admin/admin_anime_lists_controller.php
We are also adding a link to the main anime_lists page:
<?php

class AdminAnimeListsController extends MvcAdminController {

    var $default_columns = array('id', 'name');

}

?>
To make things a little bit pleasing to the eye. Let’s add some css for the public facing side of the website. You can add stylesheets on the app/public/css directory. Just name the file anime-lists.css and add the following code:
cd path/to/plugins/wp-mvc
In order to use the stylesheet that we’ve just created. Create a bootstrap.php file under the app/config directory of your plugin. Then we add the following code:
chmod +x wpmvc
The code above should look familiar. It’s how we usually add custom scripts and styles to WordPress. Only this time we’re using another helper function called mvc_css_url. This function takes up the machine-friendly name of the plugin (Hint: copy the folder name of your plugin) and the file name of the stylesheet.
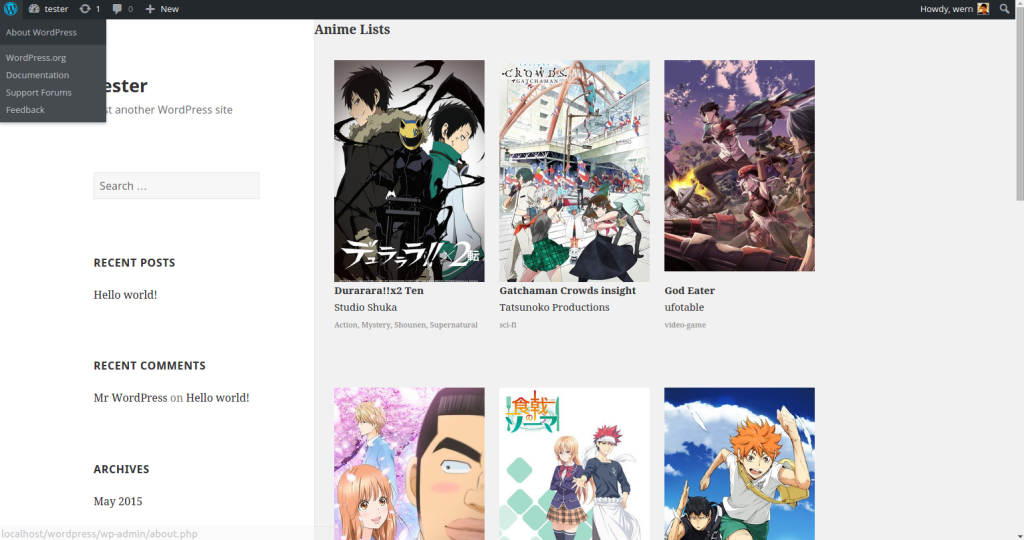
Once you’re done with that, and you’ve added some items in the admin side. The final output should look like this:
You can check out the code used in this plugin on this GitHub Repo.
Conclusion
That’s it! In this tutorial you have learned about how to implement MVC in WordPress by creating a plugin which utilizes it. We have only scratched the surface in this tutorial. Be sure to check out the WP MVC documentation to learn more. How about you? Do you know or use any other MVC solutions for WordPress? Let us know in the comments.
Frequently Asked Questions about WordPress MVC
What is the difference between WordPress MVC and traditional WordPress development?
Traditional WordPress development involves using PHP to create themes and plugins, while WordPress MVC (Model-View-Controller) is a design pattern that separates the application logic into three interconnected components. This separation allows developers to manage complex applications more efficiently. The Model handles the data and business logic, the View manages the display of data, and the Controller handles user input. This structure makes the code more organized, reusable, and easier to maintain.
How can I start using WordPress MVC?
To start using WordPress MVC, you need to install a WordPress MVC framework. There are several options available, such as WP MVC, Typerocket, or Rareloop. Once installed, you can start creating models, views, and controllers for your WordPress application. These frameworks provide detailed documentation and tutorials to help you get started.
What are the benefits of using WordPress MVC?
WordPress MVC offers several benefits. It provides a clean and organized structure for your code, making it easier to maintain and update. It also promotes code reusability, as you can use the same model or view across different parts of your application. Moreover, it separates the business logic from the presentation layer, allowing developers and designers to work independently.
Is WordPress MVC suitable for all types of WordPress projects?
WordPress MVC is particularly beneficial for complex projects that require a high level of organization and scalability. However, for simple websites or blogs, traditional WordPress development might be more straightforward and efficient.
Can I use WordPress MVC with existing WordPress themes and plugins?
Yes, you can use WordPress MVC with existing themes and plugins. However, you might need to modify the code to fit the MVC structure. It’s also possible to create your own MVC-based themes and plugins.
Is it difficult to learn WordPress MVC?
If you’re familiar with the MVC design pattern and have experience with PHP, learning WordPress MVC should be relatively straightforward. However, if you’re new to MVC or PHP, it might take some time to get used to the structure and syntax.
Can I use WordPress MVC for e-commerce websites?
Yes, WordPress MVC can be used for e-commerce websites. It can handle complex functionalities and large databases, making it suitable for online stores.
How does WordPress MVC handle database operations?
In WordPress MVC, the Model is responsible for handling database operations. It communicates with the database, performs queries, and returns the results. This separation of concerns makes the code cleaner and easier to manage.
Can I use WordPress MVC with other programming languages?
WordPress MVC is based on PHP, which is the primary language used for WordPress development. However, you can use other languages for certain parts of your application, such as JavaScript for the front-end.
What resources are available to learn WordPress MVC?
There are several resources available to learn WordPress MVC. You can start with the official documentation of the MVC framework you’re using. There are also online tutorials, courses, and forums where you can learn and get help from the community.
The above is the detailed content of Getting Started with WordPress MVC. For more information, please follow other related articles on the PHP Chinese website!

Hot AI Tools

Undress AI Tool
Undress images for free

Undresser.AI Undress
AI-powered app for creating realistic nude photos

AI Clothes Remover
Online AI tool for removing clothes from photos.

Clothoff.io
AI clothes remover

Video Face Swap
Swap faces in any video effortlessly with our completely free AI face swap tool!

Hot Article
Hot Tools

Notepad++7.3.1
Easy-to-use and free code editor

SublimeText3 Chinese version
Chinese version, very easy to use

Zend Studio 13.0.1
Powerful PHP integrated development environment

Dreamweaver CS6
Visual web development tools

SublimeText3 Mac version
God-level code editing software (SublimeText3)


 How to diagnose high CPU usage caused by WordPress
Jul 06, 2025 am 12:08 AM
How to diagnose high CPU usage caused by WordPress
Jul 06, 2025 am 12:08 AM
The main reasons why WordPress causes the surge in server CPU usage include plug-in problems, inefficient database query, poor quality of theme code, or surge in traffic. 1. First, confirm whether it is a high load caused by WordPress through top, htop or control panel tools; 2. Enter troubleshooting mode to gradually enable plug-ins to troubleshoot performance bottlenecks, use QueryMonitor to analyze the plug-in execution and delete or replace inefficient plug-ins; 3. Install cache plug-ins, clean up redundant data, analyze slow query logs to optimize the database; 4. Check whether the topic has problems such as overloading content, complex queries, or lack of caching mechanisms. It is recommended to use standard topic tests to compare and optimize the code logic. Follow the above steps to check and solve the location and solve the problem one by one.
 How to minify JavaScript files in WordPress
Jul 07, 2025 am 01:11 AM
How to minify JavaScript files in WordPress
Jul 07, 2025 am 01:11 AM
Miniving JavaScript files can improve WordPress website loading speed by removing blanks, comments, and useless code. 1. Use cache plug-ins that support merge compression, such as W3TotalCache, enable and select compression mode in the "Minify" option; 2. Use a dedicated compression plug-in such as FastVelocityMinify to provide more granular control; 3. Manually compress JS files and upload them through FTP, suitable for users familiar with development tools. Note that some themes or plug-in scripts may conflict with the compression function, and you need to thoroughly test the website functions after activation.
 How to optimize WordPress without plugins
Jul 05, 2025 am 12:01 AM
How to optimize WordPress without plugins
Jul 05, 2025 am 12:01 AM
Methods to optimize WordPress sites that do not rely on plug-ins include: 1. Use lightweight themes, such as Astra or GeneratePress, to avoid pile-up themes; 2. Manually compress and merge CSS and JS files to reduce HTTP requests; 3. Optimize images before uploading, use WebP format and control file size; 4. Configure.htaccess to enable browser cache, and connect to CDN to improve static resource loading speed; 5. Limit article revisions and regularly clean database redundant data.
 How to prevent comment spam programmatically
Jul 08, 2025 am 12:04 AM
How to prevent comment spam programmatically
Jul 08, 2025 am 12:04 AM
The most effective way to prevent comment spam is to automatically identify and intercept it through programmatic means. 1. Use verification code mechanisms (such as Googler CAPTCHA or hCaptcha) to effectively distinguish between humans and robots, especially suitable for public websites; 2. Set hidden fields (Honeypot technology), and use robots to automatically fill in features to identify spam comments without affecting user experience; 3. Check the blacklist of comment content keywords, filter spam information through sensitive word matching, and pay attention to avoid misjudgment; 4. Judge the frequency and source IP of comments, limit the number of submissions per unit time and establish a blacklist; 5. Use third-party anti-spam services (such as Akismet, Cloudflare) to improve identification accuracy. Can be based on the website
 How to use the Transients API for caching
Jul 05, 2025 am 12:05 AM
How to use the Transients API for caching
Jul 05, 2025 am 12:05 AM
TransientsAPI is a built-in tool in WordPress for temporarily storing automatic expiration data. Its core functions are set_transient, get_transient and delete_transient. Compared with OptionsAPI, transients supports setting time of survival (TTL), which is suitable for scenarios such as cache API request results and complex computing data. When using it, you need to pay attention to the uniqueness of key naming and namespace, cache "lazy deletion" mechanism, and the issue that may not last in the object cache environment. Typical application scenarios include reducing external request frequency, controlling code execution rhythm, and improving page loading performance.
 How to enqueue assets for a Gutenberg block
Jul 09, 2025 am 12:14 AM
How to enqueue assets for a Gutenberg block
Jul 09, 2025 am 12:14 AM
When developing Gutenberg blocks, the correct method of enqueue assets includes: 1. Use register_block_type to specify the paths of editor_script, editor_style and style; 2. Register resources through wp_register_script and wp_register_style in functions.php or plug-in, and set the correct dependencies and versions; 3. Configure the build tool to output the appropriate module format and ensure that the path is consistent; 4. Control the loading logic of the front-end style through add_theme_support or enqueue_block_assets to ensure that the loading logic of the front-end style is ensured.
 How to add custom fields to users
Jul 06, 2025 am 12:18 AM
How to add custom fields to users
Jul 06, 2025 am 12:18 AM
To add custom user fields, you need to select the extension method according to the platform and pay attention to data verification and permission control. Common practices include: 1. Use additional tables or key-value pairs of the database to store information; 2. Add input boxes to the front end and integrate with the back end; 3. Constrain format checks and access permissions for sensitive data; 4. Update interfaces and templates to support new field display and editing, while taking into account mobile adaptation and user experience.
 How to add custom rewrite rules
Jul 08, 2025 am 12:11 AM
How to add custom rewrite rules
Jul 08, 2025 am 12:11 AM
The key to adding custom rewrite rules in WordPress is to use the add_rewrite_rule function and make sure the rules take effect correctly. 1. Use add_rewrite_rule to register the rule, the format is add_rewrite_rule($regex,$redirect,$after), where $regex is a regular expression matching URL, $redirect specifies the actual query, and $after controls the rule location; 2. Custom query variables need to be added through add_filter; 3. After modification, the fixed link settings must be refreshed; 4. It is recommended to place the rule in 'top' to avoid conflicts; 5. You can use the plug-in to view the current rule for convenience
