 Computer Tutorials
 Computer Knowledge
 How to have files automatically copied to another folder on Windows 11/10
How to have files automatically copied to another folder on Windows 11/10
Feb 19, 2024 am 11:24 AMIn this article, we will show you how to automatically copy files to another folder on Windows 11/10. Creating backups is necessary to avoid data loss. Data loss can occur due to many reasons such as hard drive corruption, malware attack, etc. You can manually backup your data by using copy and paste method or using third-party tools. Did you know you can automatically back up data on your Windows computer? We'll show you how to do this in this article.
How to make files automatically copied to another folder on Windows 11/10
How to automatically copy files and folders to another destination folder on Windows 11/10 using Task Scheduler? This article will provide you with detailed guidance.
Please follow the steps below:
Let's see how to do this.
Open Notepad and create a batch file
First, you need to create a script to copy the files in the source folder to the target folder. To do this, we will use the xCopy command, whose syntax is as follows.
X復(fù)制“源文件夾的路徑”“目標(biāo)文件夾的路徑”/e/y
In the above command, the /e parameter is used to open all subfolders in the source folder. This parameter also copies empty subfolders.
When Windows finds the same file in the target folder, an overwrite confirmation prompt will pop up. To avoid a large number of prompts, we can use the /y parameter to disable overwriting confirmation prompts.
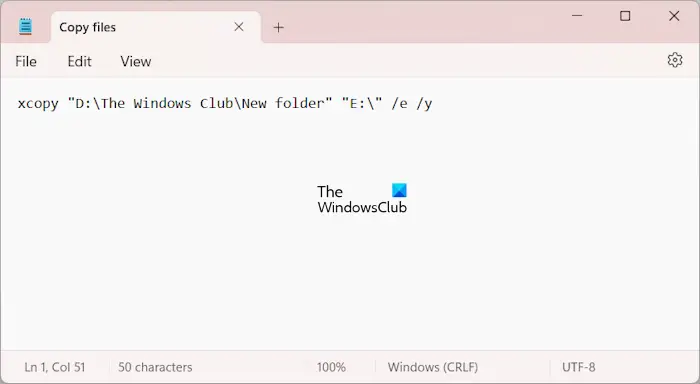
Make sure you specify the paths to the source and destination folders accurately when entering the command, otherwise the command will fail to execute. For example, to copy from "D:\The Windows Club\New Folders" to USB flash drive E, use the correct command.
X復(fù)制“D:The Windows ClubNew Folders”“E:”/e/y
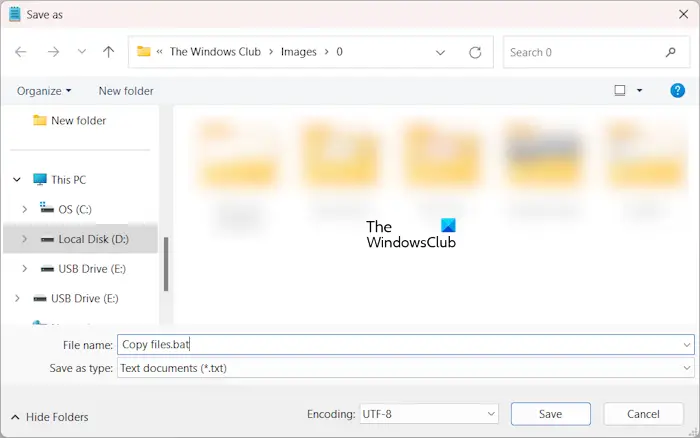
Now, go to File>Save As. Name the file to save it and write .bat at the end of the file name. When finished, click Save.
Use the task scheduler to call the batch file
Now, the next step is to call the batch file using the task scheduler. The instructions below will guide you in doing this.
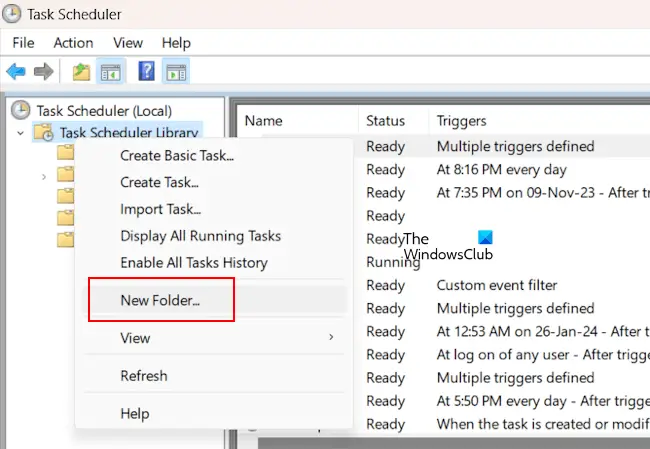
Open the task scheduler. Expand the Task Scheduler Library folder. Now, right-click on the Task Scheduler Library folder and select New Folder. Name this folder "Custom Tasks" or give it a name of your choice.
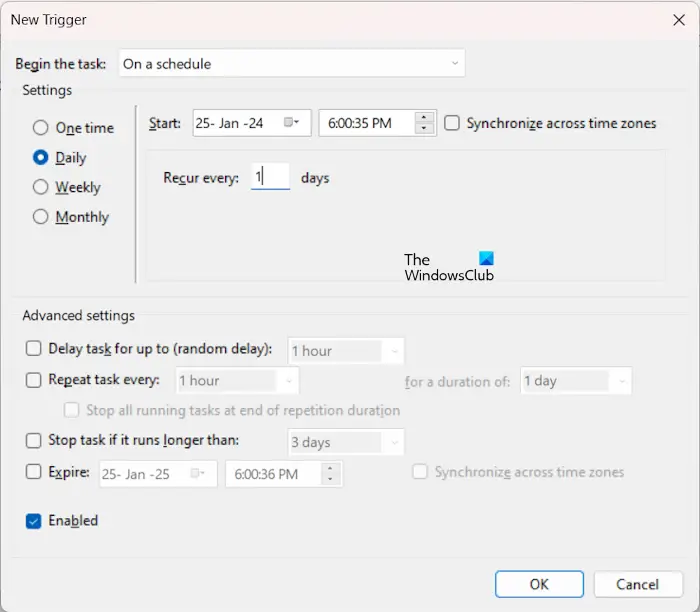
Now, right-click on the custom task folder or a folder you have created and select Create Task. Give your task a name, such as Copy Files under the General tab. Now, select the triggers folder and click New. Set the frequency of tasks according to your requirements. For example, if you want to automatically copy files every day, select Daily. When finished, click OK.
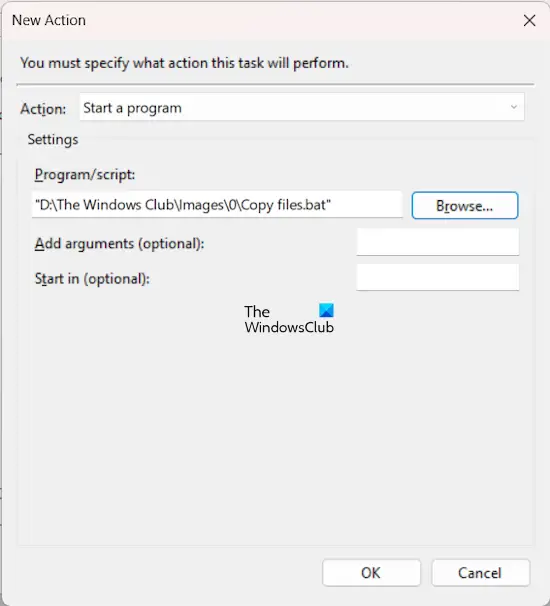
Now, go to the Actions tab and click New. Select Start a program in the Action drop-down list. Click Browse and select the batch file from your computer. Click OK.
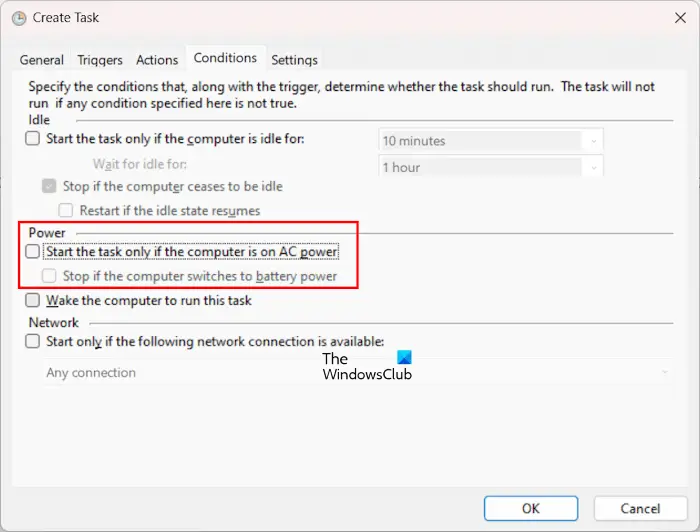
An automated task has been created to copy your files from the source folder to the destination folder. But if you are a laptop user, this automatic task will only run when your laptop is connected to the charger. If your laptop is on battery, this task will not run. To prevent this from happening, go to the Conditions tab and uncheck the following checkbox:
- Start the task only when the computer is on AC power
- Stop if computer switches to battery power.
This task will not run if your computer is in hibernation mode. To cause your computer to wake from sleep mode and run an automated task, select the Wake computer to run this task check box. Now, click OK.
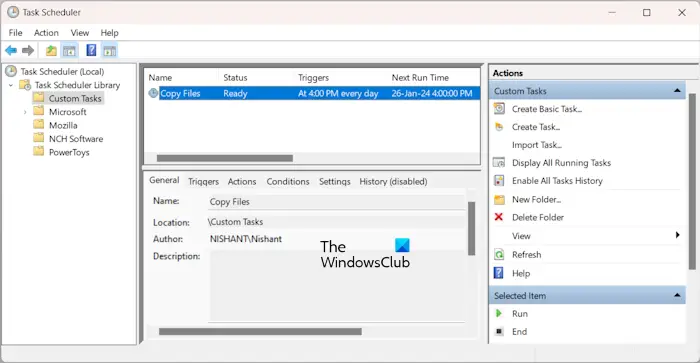
After performing the above steps, the task will be added to the custom tasks folder in Task Scheduler, and you will see its status as Ready. If the status shows Disabled, right-click and select Enable. From now on, the task will run at the desired time.
Please note that if you create a task that automatically copies files to an external hard drive, the hard drive should be connected to your computer.
that's all.
How to copy files to other folders in Windows 11?
The easiest way to copy files to another folder in Windows 11 is to use the copy and paste method. Select the files you want to copy and press Ctrl C key. Now, open the folder to which you want to copy these files. Once the folder is open, press Ctrl V key.
How to repeat a task every day in Task Scheduler?
To repeat a task in Task Scheduler every day, you must create a Daily trigger. When you create this trigger, set a time when you want the task to start. You can also set this setting if you want the task to repeat every other day, every 3 days, etc.
Read next: Schedule Shutdown or Restart using the Task Scheduler in Windows.
The above is the detailed content of How to have files automatically copied to another folder on Windows 11/10. For more information, please follow other related articles on the PHP Chinese website!

Hot AI Tools

Undress AI Tool
Undress images for free

Undresser.AI Undress
AI-powered app for creating realistic nude photos

AI Clothes Remover
Online AI tool for removing clothes from photos.

Clothoff.io
AI clothes remover

Video Face Swap
Swap faces in any video effortlessly with our completely free AI face swap tool!

Hot Article

Hot Tools

Notepad++7.3.1
Easy-to-use and free code editor

SublimeText3 Chinese version
Chinese version, very easy to use

Zend Studio 13.0.1
Powerful PHP integrated development environment

Dreamweaver CS6
Visual web development tools

SublimeText3 Mac version
God-level code editing software (SublimeText3)

Hot Topics
 Windows can't access shared folder on network
Jun 30, 2025 pm 04:56 PM
When encountering the "Windowscan'taccesssharedfolderonnetwork", you can usually solve the problem through the following steps: 1. Turn on the network discovery and file sharing function and turn off password protection; 2. Make sure that the target computer is enabled to share and set the correct permissions; 3. Check the firewall rules and service status to ensure that it allows shared access; 4. Use the credential manager to add network credentials for long-term and stable connection.
 Windows 'Getting Windows ready, Don't turn off your computer' stuck
Jun 30, 2025 pm 05:18 PM
When you encounter Windows stuck in the "GettingWindowsready, Don't turnoff your computer" interface, you should first confirm whether it is really stuck; 1. Observe whether the hard disk indicator light is flashing, 2. Check whether the fan sound has changed, 3. Wait at least 30 to 60 minutes to ensure that the system has enough time to complete the update operation.
 How to run an app as an administrator in Windows?
Jul 01, 2025 am 01:05 AM
To run programs as administrator, you can use Windows' own functions: 1. Right-click the menu to select "Run as administrator", which is suitable for temporary privilege hike scenarios; 2. Create a shortcut and check "Run as administrator" to achieve automatic privilege hike start; 3. Use the task scheduler to configure automated tasks, suitable for running programs that require permissions on a scheduled or background basis, pay attention to setting details such as path changes and permission checks.
 Windows clipboard history not working
Jun 30, 2025 pm 05:14 PM
When the Windows clipboard history is not working, you can check the following steps: 1. Confirm that the clipboard history function is enabled, the path is "Settings>System>Clipboard", and if it is not enabled, Win V will not respond; 2. Check whether the copy content type is limited, such as large images, special formats or file paths may not be saved; 3. Ensure that the system version supports it, Windows 101809 and above, and some enterprise versions or LTSC do not support it; 4. Try to restart the ClipboardUserService service or end the clipups.exe process; 5. Clear the clipboard cache or reset the settings, close and then turn on the "Clipboard History" or run the "echooff|clip" command to clean up the cache
 How to fix a stuck Windows restart screen?
Jun 30, 2025 pm 05:10 PM
Don't rush to reinstall the system when the computer is stuck in the Windows restart interface. You can try the following methods first: 1. Force shutdown and then restart. Apply to the situation where the update is stuck. Repeat two or three times or can skip the lag; 2. Enter the safe mode to check, select Start repair or system restore through troubleshooting. If you can enter safe mode, it may be a driver or software conflict; 3. Use the command prompt to repair the system files, enter the three commands sfc and dism in the recovery environment to repair the damaged files; 4. Check the recently installed hardware or driver, unplug the non-essential devices or uninstall the new driver to eliminate incompatibility issues. In most cases, the above steps can solve the phenomenon of restart lag. If it really doesn’t work, consider reinstalling the system and paying attention to backing up data in advance.
 Windows stuck on 'undoing changes made to your computer'
Jul 05, 2025 am 02:51 AM
The computer is stuck in the "Undo Changes made to the computer" interface, which is a common problem after the Windows update fails. It is usually caused by the stuck rollback process and cannot enter the system normally. 1. First of all, you should wait patiently for a long enough time, especially after restarting, it may take more than 30 minutes to complete the rollback, and observe the hard disk light to determine whether it is still running. 2. If there is no progress for a long time, you can force shut down and enter the recovery environment (WinRE) multiple times, and try to start repair or system restore. 3. After entering safe mode, you can uninstall the most recent update records through the control panel. 4. Use the command prompt to execute the bootrec command in the recovery environment to repair the boot file, or run sfc/scannow to check the system file. 5. The last method is to use the "Reset this computer" function
 How to fix SYSTEM_SERVICE_EXCEPTION on Windows?
Jun 30, 2025 pm 05:11 PM
When encountering SYSTEM\_SERVICE\_EXCEPTION error, 1. Update or roll back the graphics card driver, try to update the driver with the device manager, download and install the official website, or use DDU to completely uninstall and reinstall; 2. Check the memory stick, detect abnormalities through the task manager and Windows memory diagnostic tool, and clean the memory stick or change the slot test if necessary; 3. Repair the system files, run the sfc/scannow and DISM commands with administrator permissions, and check Windows Update; 4. Uninstall recently installed software or updates, especially antivirus software or virtual machine tools. If the above method is invalid, it may be a hardware problem that needs further detection.
 How to fix a corrupted user profile in Windows?
Jun 30, 2025 pm 05:11 PM
Corruption of user profile can be solved by creating a new account, using system tools to repair, manually migrating data, and modifying the registry. After confirming the problem, you can try the following methods in turn: 1. Create a new local account to determine whether it is the original account problem; 2. Use sfc/scannow and DISM tools to repair the system files; 3. Create a new user through the administrator account and manually migrate the old account files (including the hidden AppData directory); 4. Advanced users can try to locate the ProfileList item in the registry editor, check and repair the abnormal ProfileImagePath entry, and backup the registry before the operation.


