
 Computer Tutorials
Computer Knowledge
Change the virtual memory to another drive letter in win7
Computer Tutorials
Computer Knowledge
Change the virtual memory to another drive letter in win7
Change the virtual memory to another drive letter in win7
Feb 11, 2024 pm 04:15 PM
php editor Banana will introduce you to a technique related to Win7 system: how to change the virtual memory to another drive letter. In Win7 system, virtual memory is a mechanism used to expand system memory, which can improve the operating efficiency of the system. By default, virtual memory is stored on the system disk (usually the C drive), but if the system disk space is insufficient or higher performance is required, we can change the virtual memory to another drive letter. This article will give you a detailed introduction to how to operate and what to pay attention to.
The new computer needs to adjust the settings. It was found after comparing with the old computer.
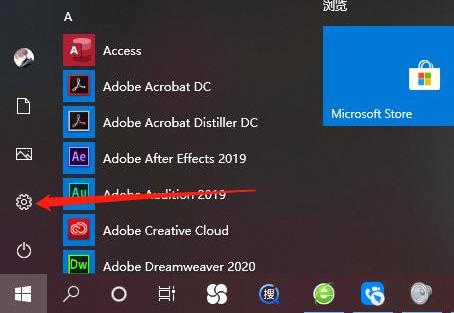
Start menu and click Settings
Then click "System"
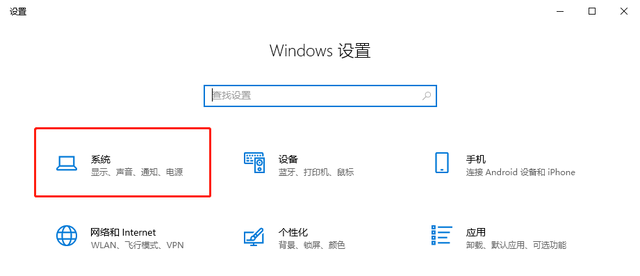
System Settings
In "Scale and Layout", change "Text, Application Item Size" to 100%
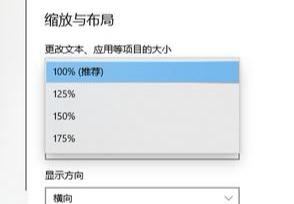
Scale and Layout
Some After the system is installed on a new computer, it may default to a display ratio of "125%" or "150%", which may cause blurring when opening web pages. Therefore, we recommend adjusting the display ratio to 100% for a clearer web page display.
First open the "Control Panel"

Control Panel
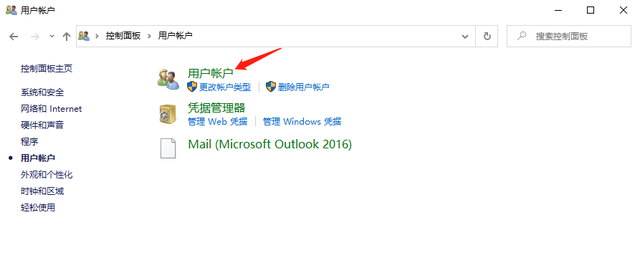
Open the "User Account"
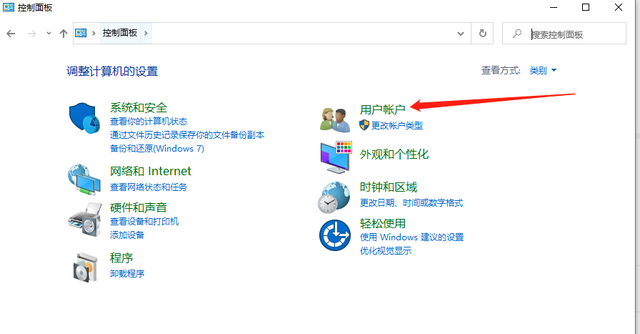
Control Panel Interface
Click "User Account"
User Account Interface
Open "Change User Account Control Settings"
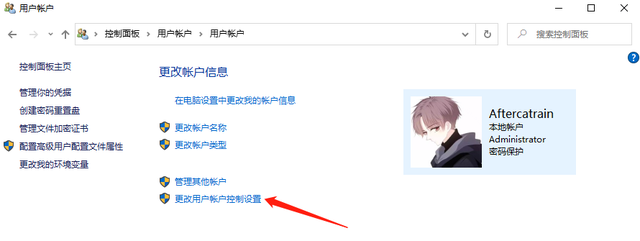
User Account Settings
Pull the slider to the bottom of "Never notify" and finally click OK.
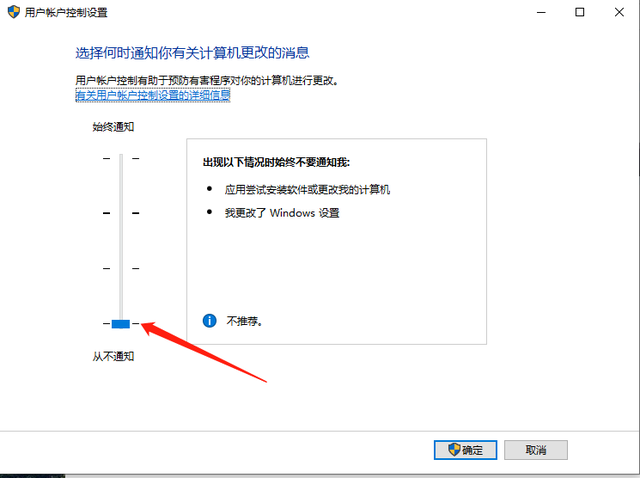
User Account Control Settings Interface
If you do not set this, the following prompt will pop up every time you open the application, which is very cumbersome.
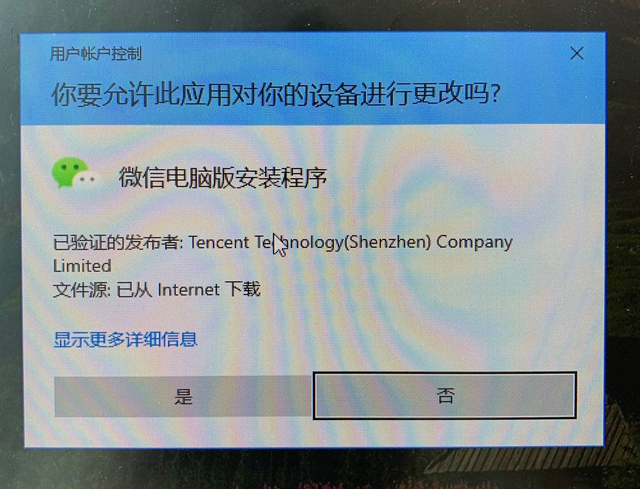
When opening the application
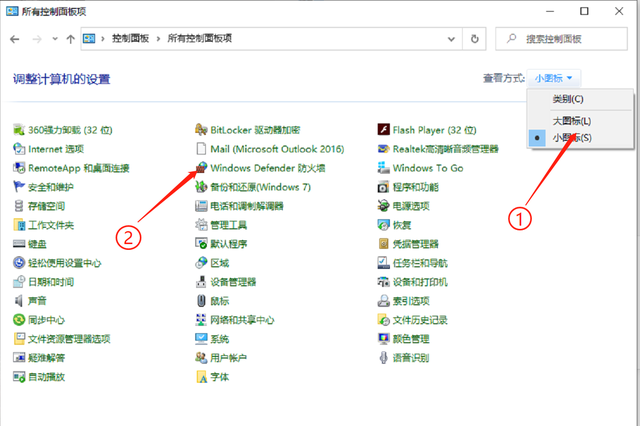
Open the "Control Panel" and change the "View by" to "Small Icons" in the upper right corner. Then open "Windows Defender Firewall"
Control Panel interface
Click "Turn Windows Defender Firewall on or off"
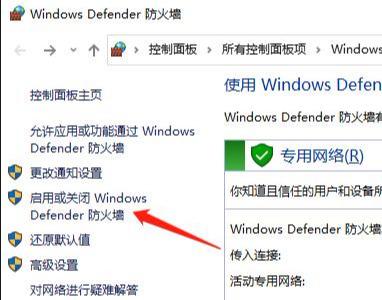
Windows Defender Firewall
Turn off all firewalls and click OK
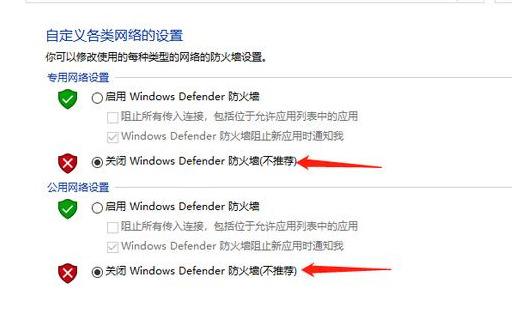
Firewall settings
If you do not turn it off, you will often receive interceptions during use.
Return to the "Control Panel" interface and click "Power Options"
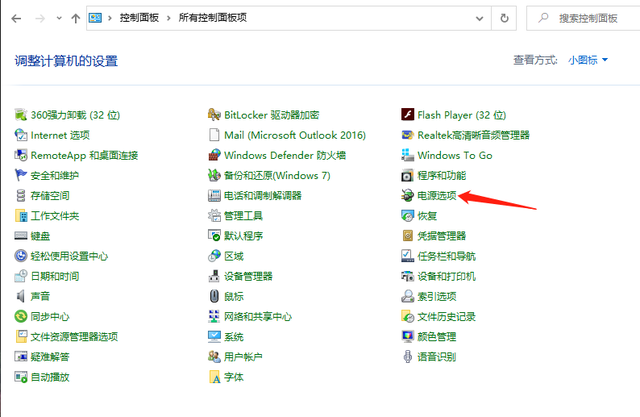
Control Panel
Select "High Performance" in "Power Plan", which can effectively improve the performance of our computer. After the system is installed, the default is generally, "Balanced (Recommended)"
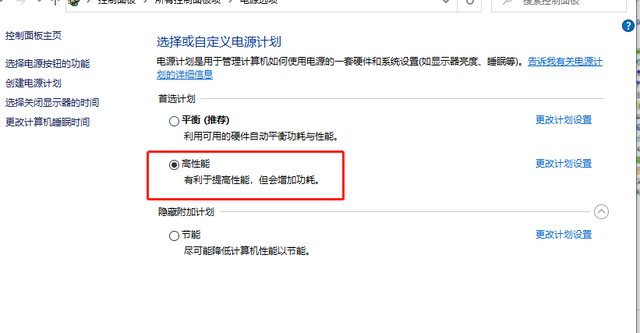
Power supply Plan
Finally click OK
On the desktop, right-click "This Computer", select "Manage", and open "Computer Management" interface
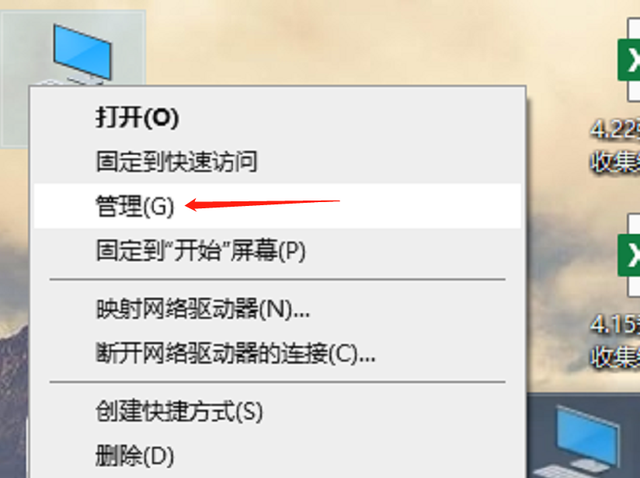
Desktop
Click "Services and Applications", double-click on the right page to open "Services"
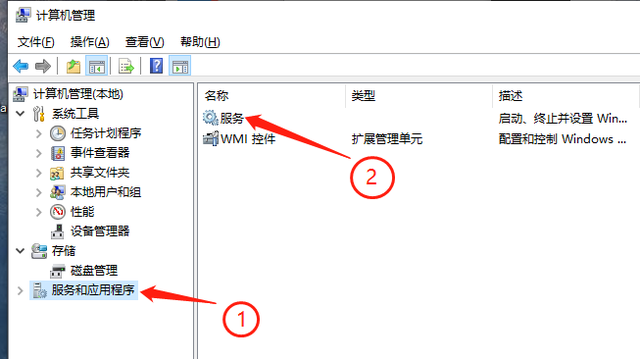
Computer Management
Find "Windows updata", double-click to open the
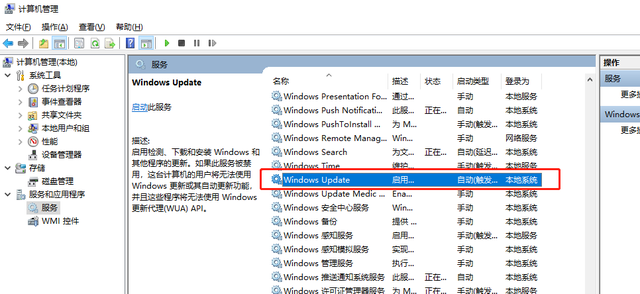
Service interface
Change the "Startup type" to "Disabled", then click OK to save.
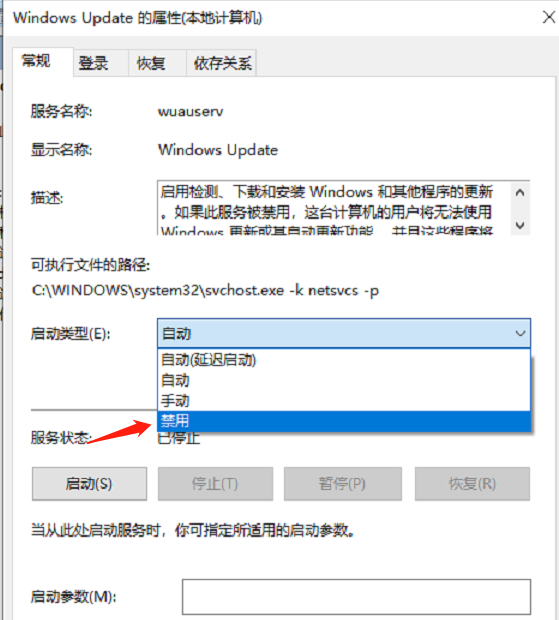
Property settings
In addition to "Windows updata", "Windows Search" and "IP Helper" are also set to "disabled" as above

Windows Search

IP Helper
"IP Helper" is not very useful, and it also takes up resources and is prone to some minor problems.
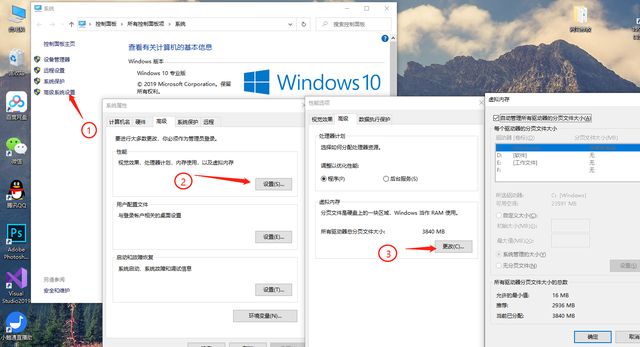
As shown in the figure, right-click "This Computer", open "Advanced System Settings", select "Advanced", and open "Performance" "Settings"-Advanced-click "Change" in Virtual Memory
Uncheck the first checkbox, then select non-C drive as the drive, and set the custom size "Initial size" to " 2048", which is 2G, set the "Maximum value" to "20480", which is 20G, and click OK.
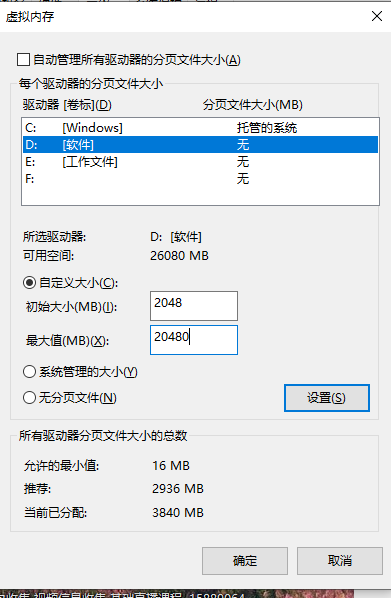
Virtual memory setting page
After these few steps of settings, my new computer is as easy to use as the old computer. Come and give it a try.
Buy a computer and learn knowledge, please follow me!
The above is the detailed content of Change the virtual memory to another drive letter in win7. For more information, please follow other related articles on the PHP Chinese website!

Hot AI Tools

Undress AI Tool
Undress images for free

Undresser.AI Undress
AI-powered app for creating realistic nude photos

AI Clothes Remover
Online AI tool for removing clothes from photos.

Clothoff.io
AI clothes remover

Video Face Swap
Swap faces in any video effortlessly with our completely free AI face swap tool!

Hot Article
Hot Tools

Notepad++7.3.1
Easy-to-use and free code editor

SublimeText3 Chinese version
Chinese version, very easy to use

Zend Studio 13.0.1
Powerful PHP integrated development environment

Dreamweaver CS6
Visual web development tools

SublimeText3 Mac version
God-level code editing software (SublimeText3)
Hot Topics


 How to install WinNTSetup into Win11 system_How to install WinNTSetup into Win11 system
May 08, 2024 am 11:19 AM
How to install WinNTSetup into Win11 system_How to install WinNTSetup into Win11 system
May 08, 2024 am 11:19 AM
First download the latest Win11 system ISO image, and then in Win10 system, you can directly right-click on the downloaded ISO image file and select [Load]; if it is under WinPE, WinXP, or Win7 system, you need to use the virtual optical drive tool to load the ISO Image; or you can directly decompress the ISO image file without using a virtual optical drive. Then run WinNTSetup. The software interface is as shown in the figure: First locate the location of the install.wim file. You can find the install.wim file in the sources directory of the Win11 ISO image loaded or decompressed by the virtual optical drive. Then set the location of the boot disk and installation disk. Generally, you are going to put W
 What should I do if the Win7 taskbar does not display the icon? How to solve the problem of the computer taskbar icon disappearing
Jun 09, 2024 pm 01:49 PM
What should I do if the Win7 taskbar does not display the icon? How to solve the problem of the computer taskbar icon disappearing
Jun 09, 2024 pm 01:49 PM
Recently, many users using Win7 system have found that the icons in the taskbar suddenly disappeared, which makes the operation very inconvenient and they do not know how to solve the problem. This article will introduce to you how to solve the problem of disappearing taskbar icons in Win7 system. Bar! Cause Analysis When encountering such a situation, there are generally two situations: one is that the taskbar on the computer does not really disappear, but is just hidden, and the other is that the taskbar does disappear. Method 1: 1. There is a situation that you need to confirm first, that is, when the mouse is placed at the bottom of the screen, the taskbar will be displayed. You can directly click the mouse on the taskbar and select "Properties". 2. In the dialog box that opens, click & on the "Hide taskbar" option.
 How to enter bios after assembling a computer? How to enter bios when assembling a computer?
May 07, 2024 am 09:13 AM
How to enter bios after assembling a computer? How to enter bios when assembling a computer?
May 07, 2024 am 09:13 AM
How to enter bios after assembling a computer? Before entering the BIOS, you need to make sure that the computer is completely shut down and powered off. Here are several common ways to enter the BIOS: 1. Use shortcut keys: Most computer manufacturers will display a prompt message at startup telling you which key to press to enter the BIOS settings. Usually the F2, F10, F12 or Delete key. After pressing the appropriate keys, you should be able to see a screen with information about your computer's hardware and BIOS settings. 2. Use the button on the motherboard: Some computer motherboards have a dedicated button for entering BIOS settings. This button is usually labeled "BIOS" or "UEFI". After pressing the button you should be able to see
 How to clear all desktop background images in Win7? Tips for deleting personalized background images in Win7
Jun 02, 2024 am 09:01 AM
How to clear all desktop background images in Win7? Tips for deleting personalized background images in Win7
Jun 02, 2024 am 09:01 AM
In Win7 system, many users want to delete personalized desktop background images, but do not know how to delete them. This article will show you how to delete personalized background images in Win7 system. 1. First, open the control panel interface of the Win7 system and click to enter the "Appearance and Personalization" settings; 2. Then, in the opened interface, click the "Change Desktop Background" setting; 3. Then, click below "Desktop background" option; 4. Then, select Select all, and then click Clear all. Of course, you can also use it under "Customize", right-click the theme you want to delete, and then click &q on the shortcut menu
 How to install Windows system on tablet computer
May 03, 2024 pm 01:04 PM
How to install Windows system on tablet computer
May 03, 2024 pm 01:04 PM
How to flash the Windows system on BBK tablet? The first way is to install the system on the hard disk. As long as the computer system does not crash, you can enter the system and download things, you can use the computer hard drive to install the system. The method is as follows: Depending on your computer configuration, you can install the WIN7 operating system. We choose to download Xiaobai's one-click reinstallation system in vivopad to install it. First, select the system version suitable for your computer, and click "Install this system" to next step. Then we wait patiently for the installation resources to be downloaded, and then wait for the environment to be deployed and restarted. The steps to install win11 on vivopad are: first use the software to check whether win11 can be installed. After passing the system detection, enter the system settings. Select the Update & Security option there. Click
 How to upgrade Win11 system on old computers_Tutorial on upgrading Win11 system on old computers
May 07, 2024 pm 08:07 PM
How to upgrade Win11 system on old computers_Tutorial on upgrading Win11 system on old computers
May 07, 2024 pm 08:07 PM
1. First we need to download the win11 image file. 2. Put the downloaded win11 image into another disk. 3. Then we find the win11 image file among the searched image files. 4. Then when we come to this interface, we select install.wim to proceed to the next step. 5. Then select the Windows 11 system and click OK to restore the image file. 6. Then we wait for pe to download and install. Wait patiently. After the download is completed, click restart according to the prompts. 7. Then come to this interface, we select the second xiaobaiPE. After selecting, the win11 system will be automatically installed for us. After the installation is completed, click to restart the computer immediately according to the prompts. 8. Finally, the system installation is completed, and we come to
 What you need to know when reinstalling the system from a USB flash drive: How to set up the BIOS correctly
May 06, 2024 pm 03:00 PM
What you need to know when reinstalling the system from a USB flash drive: How to set up the BIOS correctly
May 06, 2024 pm 03:00 PM
Reinstalling the system is a problem that many computer users often encounter. Whether it is due to system crash, poisoning or wanting to upgrade the system, reinstalling the system is a good choice. However, many people encounter various problems when reinstalling the system, such as not knowing how to set up the BIOS, not knowing how to choose a suitable installation disk, etc. Today, we will talk about some things you must know when reinstalling the system from a USB flash drive, and teach you how to set up the BIOS correctly and successfully complete the system reinstallation. Tool materials: System version: Windows1020H2 Brand model: Lenovo Xiaoxin Air14 Software version: Pocket machine One-click reinstallation of system software v1.0 1. Preparation 1. Prepare a U disk with a capacity of no less than 8GB, preferably USB3. 0, so the speed will be faster
 Does the newly assembled computer keyboard light not light up?
May 07, 2024 pm 04:40 PM
Does the newly assembled computer keyboard light not light up?
May 07, 2024 pm 04:40 PM
Does the newly assembled computer keyboard light not light up? The motherboard model should be UEFIbios. First find a keyboard with PS2 port, enter bios, turn off UEFI boot, and change to Legacy mode. If there is fast boot, turn off options like FastBoot, UEFI boot, turn on fast boot, and enter the system. USB interface detection may be turned off before, and USB devices can be used to assemble the computer after entering the system. The mouse and keyboard lights do not light up when the computer is turned on? If the keyboard light does not come on, there is a high possibility of memory failure, or it may be caused by static electricity on the motherboard or the motherboard is faulty. Use an eraser to wipe the gold finger of the memory graphics card, and remove and insert the memory several times. The problem remains. There are dual memory sticks and a single memory stick is used for testing. The problem persists. Re-plug the various cables inside and outside the chassis, and then unplug the connector on the motherboard.
