
 <\/p>
<\/p> <\/p>
<\/p>
 Database
Mysql Tutorial
How to build a complete permission structure based on springboot+bootstrap+mysql+redis
Database
Mysql Tutorial
How to build a complete permission structure based on springboot+bootstrap+mysql+redis
How to build a complete permission structure based on springboot+bootstrap+mysql+redis
May 27, 2023 am 09:43 AM
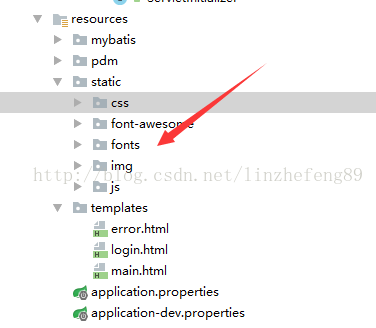
First, introduce the encapsulated bootstrap script into our existing project. The directory is as follows:
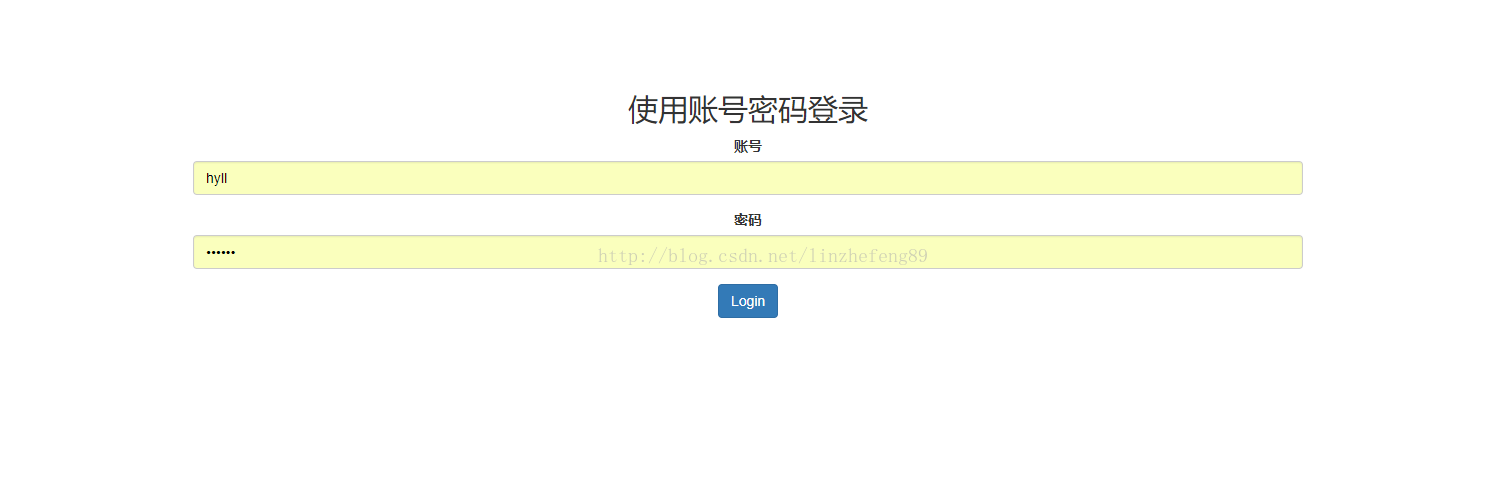
At this point, the introduction of our bootstraop framework is completed, then based on the bootstrap framework We now start to develop our first bootstrap page login page. Open our templates file and find our login.html page at the bottom. Re-edit the page code as follows:
<!DOCTYPE html>
<html xmlns:th="http://www.thymeleaf.org">
<head>
<meta content="text/html;charset=UTF-8"/>
<meta name="viewport" content="width=device-width, initial-scale=1.0"/>
<title>登錄頁面</title>
<link rel="stylesheet" th:href="@{/css/bootstrap.min.css}"/>
<style type="text/css">
body {
padding-top: 50px;
}
.starter-template {
padding: 40px 15px;
text-align: center;
}
</style>
</head>
<body>
<!--/
<nav class="navbar navbar-inverse navbar-fixed-top">
<div class="container">
<div class="navbar-header">
<a class="navbar-brand" href="#">Spring Security演示</a>
</div>
<div id="navbar" class="collapse navbar-collapse">
<ul class="nav navbar-nav">
<li><a th:href="@{/}"> 首頁 </a></li>
</ul>
</div>.nav-collapse
</div>
</nav>
-->
<div class="container">
<div class="starter-template">
<p th:if="${param.logout}" class="bg-warning">已成功注銷</p><!-- 1 -->
<p th:if="${param.error}" th:text="${session.SPRING_SECURITY_LAST_EXCEPTION.message}=='Bad credentials'?'賬號/密碼錯誤!':${session.SPRING_SECURITY_LAST_EXCEPTION.message}" class="bg-danger">
</p> <!-- 2 -->
<h2>使用賬號密碼登錄</h2>
<form name="form" th:action="@{/login}" action="/login" method="POST"> <!-- 3 -->
<div class="form-group">
<label for="username">賬號</label>
<input type="text" class="form-control" name="username" id="username" value="" placeholder="賬號" />
</div>
<div class="form-group">
<label for="password">密碼</label>
<input type="password" class="form-control" name="password" id="password" placeholder="密碼" />
</div>
<input type="submit" id="login" value="Login" class="btn btn-primary" />
</form>
</div>
</div>
</body>
</html>Reload and run us In the program, we will see that our new page effect is as follows:
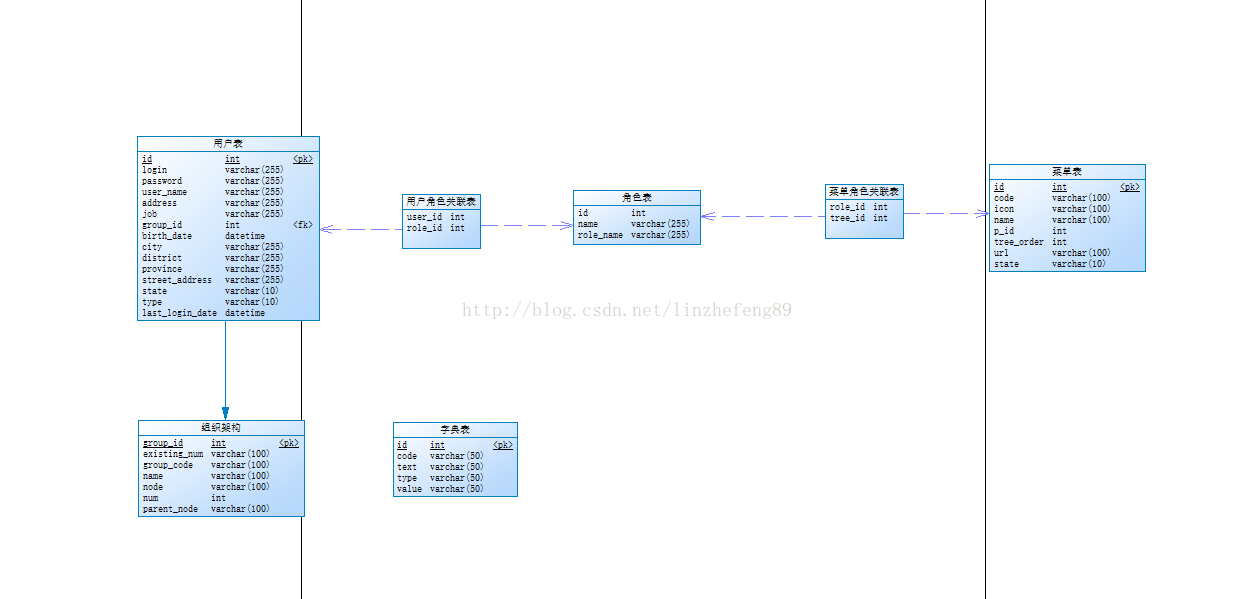
At this point, our login homepage has been completed, and then we will develop the main homepage after our successful login. html, when we write our homepage, we need to redesign our database, so our existing table structure cannot support our entire business system, so we redesign our database as shown below:
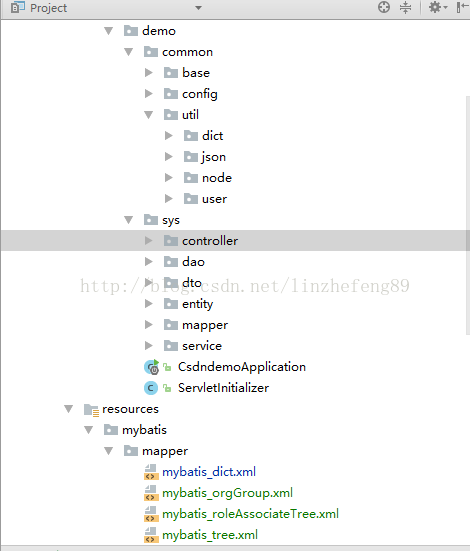
Then we directly generate our database execution script and execute it in our database. At the same time, we use the tools we developed in the previous chapter to quickly generate our code and according to our Permission structure to modify our code. The following is the structure of the modified code:
In our project, there are some CSS or js that we often use. We don’t want to reference each page once, so we create a global reference to our project (create a new folder include under templates and create an includebase.html file) as follows:
<html xmlns:th="http://www.thymeleaf.org">
<link th:href="@{/css/bootstrap.min.css}" rel="stylesheet"/>
<link th:href="@{/css/bootstrap-table.css}" rel="stylesheet"/>
<link th:href="@{/font-awesome/css/font-awesome.min.css}" rel="stylesheet"/>
<link th:href="@{/css/bootstrap-datetimepicker.css}" rel="stylesheet"/>
<link th:href="@{/css/bootstrapValidator.min.css}" rel="stylesheet"/>
<link th:href="@{/css/fileinput.css}" rel="stylesheet"/>
<link th:href="@{/css/fileinput-rtl.css}" rel="stylesheet"/>
<link th:href="@{/css/theme.css}" rel="stylesheet"/>
<link th:href="@{/css/zTreeStyle/metro.css}" rel="stylesheet"/>
<script th:src="@{/js/sockjs.min.js}"></script>
<script th:src="@{/js/stomp.min.js}"></script>
<script th:src="@{/js/jquery.js}"></script>
<script th:src="@{/js/distpicker/distpicker.data.js}"></script>
<script th:src="@{/js/distpicker/distpicker.js}"></script>
<script th:src="@{/js/websocket/socketUtil.js}"></script>
<script th:src="@{/js/bootstrap.min.js}"></script>
<script th:src="@{/js/bootstrap/nav/nav.js}"></script>
<script th:src="@{/js/bootstrap/tab/bootstrap-tab.js}"></script>
<script th:src="@{/js/bootstrap/tree/tree.js}"></script>
<script th:src="@{/js/bootstrap/alert/alert.js}"></script>
<script th:src="@{/js/bootstrap/table/bootstrap-table.js}"></script>
<script th:src="@{/js/bootstrap/date/bootstrap-datetimepicker.js}"></script>
<script th:src="@{/js/bootstrap/validator/bootstrapValidator.min.js}"></script>
<script th:src="@{/js/bootstrap/upload/fileinput.min.js}"></script>
<script th:src="@{/js/bootstrap/upload/plugins/sortable.js}"></script>
<script th:src="@{/js/bootstrap/upload/locales/zh.js}"></script>
<script th:src="@{/js/bootstrap/upload/theme.js}"></script>
<script th:src="@{/js/bootstrap/ztree/jquery.ztree.all-3.5.min.js}"></script>
<script th:src="@{/js/bootstrap/checkbox/checkbox.js}"></script>
<script th:src="@{/js/ajaxutil/ajaxUtil.js}"></script>
<script th:src="@{/js/dict/dictUtil.js}"></script>
<script th:src="@{/js/bootstrap/date/date.prototype.format.js}"></script>
<script th:src="@{/js/bootstrap/util/number.pick.util.js}"></script>
</html>
Through the rapid generation, modification and configuration of the above code, we can officially develop our home page after successful login. The home page code is as follows:
<html xmlns:th="http://www.thymeleaf.org"
xmlns:sec="http://www.thymeleaf.org/thymeleaf-extras-springsecurity4">
<head th:include="include/includebase"></head>
<link th:href="@{css/sb-admin.css}" rel="stylesheet"/>
<script th:inline="javascript">
$(function () {
// 頁面加載完成以后開啟websocket的連接
var options = new Array();
options.sockurl = '/ricky-websocket';
options.stompClienturl = '/ricky/topic/greetings';
options.login = [[${#authentication.name}]];
options.success = function(greeting){
var r = eval("("+JSON.parse(greeting.body).content+")")
alert(r);
// $("#greetings").append("<tr><td>" + JSON.parse(greeting.body).content + "</td></tr>");
}
$.fn.socketConnect(options);
// 初始化nav
$.fn.bootstrapNav({index:'main',navTitle:'XXXX管理系統(tǒng)'});
// 初始化標(biāo)簽頁
$("#tabContainer").tabs({
data: [{
id: '99999999',
text: '首頁',
url: "home",
closeable: false
}],
showIndex: 0,
loadAll: false
})
//
$.fn.bootstrapTree({url:"/user/mainTree",treeId:'menu_tree',tabId:"tabContainer"});
$.fn.dictUtil("/dict/loadDict");
});
</script>
<body >
<div id="wrapper">
<!-- Navigation -->
<nav class="navbar navbar-inverse navbar-fixed-top" role="navigation">
<!-- Brand and toggle get grouped for better mobile display -->
<div class="navbar-header" id="navbar_header">
</div>
<!-- Top Menu Items -->
<ul class="nav navbar-right top-nav">
<li class="dropdown">
<a href="#" class="dropdown-toggle" data-toggle="dropdown"><i class="fa fa-envelope"></i> <b class="caret"></b></a>
<ul class="dropdown-menu message-dropdown">
<li class="message-preview">
<a href="#">
<div class="media">
<span class="pull-left">
<img class="media-object lazy" src="/static/imghw/default1.png" data-src="http://placehold.it/50x50" alt="" />
</span>
<div class="media-body">
<h5 class="media-heading"><strong>John Smith</strong>
</h5>
<p class="small text-muted"><i class="fa fa-clock-o"></i> Yesterday at 4:32 PM</p>
<p>Lorem ipsum dolor sit amet, consectetur...</p>
</div>
</div>
</a>
</li>
<li class="message-footer">
<a href="#">Read All New Messages</a>
</li>
</ul>
</li>
<li class="dropdown">
<a href="#" class="dropdown-toggle" data-toggle="dropdown"><i class="fa fa-user"></i> <font th:text="${#authentication.name}"></font> <b class="caret"></b></a>
<ul class="dropdown-menu">
<li>
<a href="#" ><i class="fa fa-fw fa-gear"></i> 修改密碼 </a>
</li>
<li class="divider"></li>
<li>
<a href="/logout" ><i class="fa fa-fw fa-power-off"></i>退 出</a>
</li>
</ul>
</li>
</ul>
<!-- Sidebar Menu Items - These collapse to the responsive navigation menu on small screens -->
<div class="collapse navbar-collapse navbar-ex1-collapse">
<ul class="nav navbar-nav side-nav" id="menu_tree">
</ul>
</div>
<!-- /.navbar-collapse -->
</nav>
<div id="page-wrapper" style="border-radius:5px 5px 0 0;">
<div id="tabContainer"></div>
</div>
</div>
<!--
<div th:text="${#authentication.name}">
The value of the "name" property of the authentication object should appear here.
</div>
這是一個登陸成功以后的首頁
<div class="row">
<div class="col-md-12">
<table id="conversation" class="table table-striped">
<thead>
<tr>
<th>Greetings</th>
</tr>
</thead>
<tbody id="greetings">
</tbody>
</table>
</div>
</div>
-->
</body>
</html>The above is the detailed content of How to build a complete permission structure based on springboot+bootstrap+mysql+redis. For more information, please follow other related articles on the PHP Chinese website!

Hot AI Tools

Undress AI Tool
Undress images for free

Undresser.AI Undress
AI-powered app for creating realistic nude photos

AI Clothes Remover
Online AI tool for removing clothes from photos.

Clothoff.io
AI clothes remover

Video Face Swap
Swap faces in any video effortlessly with our completely free AI face swap tool!

Hot Article
Hot Tools

Notepad++7.3.1
Easy-to-use and free code editor

SublimeText3 Chinese version
Chinese version, very easy to use

Zend Studio 13.0.1
Powerful PHP integrated development environment

Dreamweaver CS6
Visual web development tools

SublimeText3 Mac version
God-level code editing software (SublimeText3)


 How to use PHP to develop a Q&A community platform Detailed explanation of PHP interactive community monetization model
Jul 23, 2025 pm 07:21 PM
How to use PHP to develop a Q&A community platform Detailed explanation of PHP interactive community monetization model
Jul 23, 2025 pm 07:21 PM
1. The first choice for the Laravel MySQL Vue/React combination in the PHP development question and answer community is the first choice for Laravel MySQL Vue/React combination, due to its maturity in the ecosystem and high development efficiency; 2. High performance requires dependence on cache (Redis), database optimization, CDN and asynchronous queues; 3. Security must be done with input filtering, CSRF protection, HTTPS, password encryption and permission control; 4. Money optional advertising, member subscription, rewards, commissions, knowledge payment and other models, the core is to match community tone and user needs.
 How to set environment variables in PHP environment Description of adding PHP running environment variables
Jul 25, 2025 pm 08:33 PM
How to set environment variables in PHP environment Description of adding PHP running environment variables
Jul 25, 2025 pm 08:33 PM
There are three main ways to set environment variables in PHP: 1. Global configuration through php.ini; 2. Passed through a web server (such as SetEnv of Apache or fastcgi_param of Nginx); 3. Use putenv() function in PHP scripts. Among them, php.ini is suitable for global and infrequently changing configurations, web server configuration is suitable for scenarios that need to be isolated, and putenv() is suitable for temporary variables. Persistence policies include configuration files (such as php.ini or web server configuration), .env files are loaded with dotenv library, and dynamic injection of variables in CI/CD processes. Security management sensitive information should be avoided hard-coded, and it is recommended to use.en
 Securing MySQL Connections with SSL/TLS Encryption
Jul 21, 2025 am 02:08 AM
Securing MySQL Connections with SSL/TLS Encryption
Jul 21, 2025 am 02:08 AM
Why do I need SSL/TLS encryption MySQL connection? Because unencrypted connections may cause sensitive data to be intercepted, enabling SSL/TLS can prevent man-in-the-middle attacks and meet compliance requirements; 2. How to configure SSL/TLS for MySQL? You need to generate a certificate and a private key, modify the configuration file to specify the ssl-ca, ssl-cert and ssl-key paths and restart the service; 3. How to force SSL when the client connects? Implemented by specifying REQUIRESSL or REQUIREX509 when creating a user; 4. Details that are easily overlooked in SSL configuration include certificate path permissions, certificate expiration issues, and client configuration requirements.
 How to use PHP to develop product recommendation module PHP recommendation algorithm and user behavior analysis
Jul 23, 2025 pm 07:00 PM
How to use PHP to develop product recommendation module PHP recommendation algorithm and user behavior analysis
Jul 23, 2025 pm 07:00 PM
To collect user behavior data, you need to record browsing, search, purchase and other information into the database through PHP, and clean and analyze it to explore interest preferences; 2. The selection of recommendation algorithms should be determined based on data characteristics: based on content, collaborative filtering, rules or mixed recommendations; 3. Collaborative filtering can be implemented in PHP to calculate user cosine similarity, select K nearest neighbors, weighted prediction scores and recommend high-scoring products; 4. Performance evaluation uses accuracy, recall, F1 value and CTR, conversion rate and verify the effect through A/B tests; 5. Cold start problems can be alleviated through product attributes, user registration information, popular recommendations and expert evaluations; 6. Performance optimization methods include cached recommendation results, asynchronous processing, distributed computing and SQL query optimization, thereby improving recommendation efficiency and user experience.
 How to develop AI intelligent form system with PHP PHP intelligent form design and analysis
Jul 25, 2025 pm 05:54 PM
How to develop AI intelligent form system with PHP PHP intelligent form design and analysis
Jul 25, 2025 pm 05:54 PM
When choosing a suitable PHP framework, you need to consider comprehensively according to project needs: Laravel is suitable for rapid development and provides EloquentORM and Blade template engines, which are convenient for database operation and dynamic form rendering; Symfony is more flexible and suitable for complex systems; CodeIgniter is lightweight and suitable for simple applications with high performance requirements. 2. To ensure the accuracy of AI models, we need to start with high-quality data training, reasonable selection of evaluation indicators (such as accuracy, recall, F1 value), regular performance evaluation and model tuning, and ensure code quality through unit testing and integration testing, while continuously monitoring the input data to prevent data drift. 3. Many measures are required to protect user privacy: encrypt and store sensitive data (such as AES
 How to build an online customer service robot with PHP. PHP intelligent customer service implementation technology
Jul 25, 2025 pm 06:57 PM
How to build an online customer service robot with PHP. PHP intelligent customer service implementation technology
Jul 25, 2025 pm 06:57 PM
PHP plays the role of connector and brain center in intelligent customer service, responsible for connecting front-end input, database storage and external AI services; 2. When implementing it, it is necessary to build a multi-layer architecture: the front-end receives user messages, the PHP back-end preprocesses and routes requests, first matches the local knowledge base, and misses, call external AI services such as OpenAI or Dialogflow to obtain intelligent reply; 3. Session management is written to MySQL and other databases by PHP to ensure context continuity; 4. Integrated AI services need to use Guzzle to send HTTP requests, safely store APIKeys, and do a good job of error handling and response analysis; 5. Database design must include sessions, messages, knowledge bases, and user tables, reasonably build indexes, ensure security and performance, and support robot memory
 How to make PHP container support automatic construction? Continuously integrated CI configuration method of PHP environment
Jul 25, 2025 pm 08:54 PM
How to make PHP container support automatic construction? Continuously integrated CI configuration method of PHP environment
Jul 25, 2025 pm 08:54 PM
To enable PHP containers to support automatic construction, the core lies in configuring the continuous integration (CI) process. 1. Use Dockerfile to define the PHP environment, including basic image, extension installation, dependency management and permission settings; 2. Configure CI/CD tools such as GitLabCI, and define the build, test and deployment stages through the .gitlab-ci.yml file to achieve automatic construction, testing and deployment; 3. Integrate test frameworks such as PHPUnit to ensure that tests are automatically run after code changes; 4. Use automated deployment strategies such as Kubernetes to define deployment configuration through the deployment.yaml file; 5. Optimize Dockerfile and adopt multi-stage construction
 How to use PHP to implement AI content recommendation system PHP intelligent content distribution mechanism
Jul 23, 2025 pm 06:12 PM
How to use PHP to implement AI content recommendation system PHP intelligent content distribution mechanism
Jul 23, 2025 pm 06:12 PM
1. PHP mainly undertakes data collection, API communication, business rule processing, cache optimization and recommendation display in the AI content recommendation system, rather than directly performing complex model training; 2. The system collects user behavior and content data through PHP, calls back-end AI services (such as Python models) to obtain recommendation results, and uses Redis cache to improve performance; 3. Basic recommendation algorithms such as collaborative filtering or content similarity can implement lightweight logic in PHP, but large-scale computing still depends on professional AI services; 4. Optimization needs to pay attention to real-time, cold start, diversity and feedback closed loop, and challenges include high concurrency performance, model update stability, data compliance and recommendation interpretability. PHP needs to work together to build stable information, database and front-end.
