
 Backend Development
Python Tutorial
Use Python to create a visual GUI interface and replace the background color of your ID photo with one click
Backend Development
Python Tutorial
Use Python to create a visual GUI interface and replace the background color of your ID photo with one click
Use Python to create a visual GUI interface and replace the background color of your ID photo with one click
May 19, 2023 pm 04:19 PM

The general appearance of the interface is actually not much different from the previous one. Everyone should have read the previous article.
The general appearance of the interface
The overall GUI interface is as shown below:
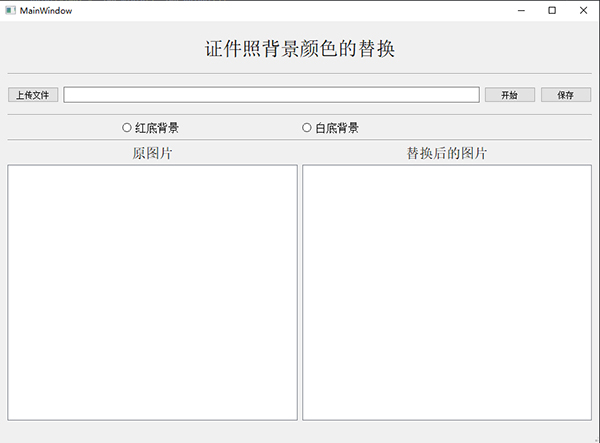
Users can choose to add their ID photos when using Replace it with "white background" or "red background", then after the front-end interface completes uploading the photo, the back-end program will start to perform the required operations.
Remove the background color
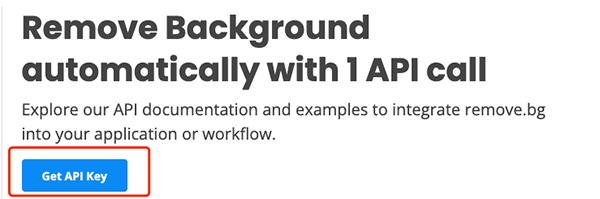
First we need to remove the background color of the photo. The third-party interface removebg is used here. The official link is:

After we complete the account registration, visit the following link to obtain the api_key: https://www.remove.bg/api#remove-background
The following is the corresponding program code, as follows:
def remove_bg(self):
 api_keys = "自己注冊的api_key"
 rmbg = RemoveBg(api_keys, "error.log")
 rmbg.remove_background_from_img_file(imgNamepath)
Add the color we want
After completing the removal of the background color of the ID photo, we then add The background color we want can be used. For example, if we want to add a "red" background color, the code is as follows:
no_bg_image = Image.open(in_path)
x, y = no_bg_image.size
new_image = Image.new('RGBA', no_bg_image.size, color="red")
new_image.paste(no_bg_image, (0, 0, x, y), no_bg_image)
new_image.save(output_path)
This time the control we use to display pictures in the GUI interface is the graphicsView component. After we click the "Select Image" button and upload the image, we need to display the image in the graphicsView window. The code is as follows:
def openImage(self):
 global imgNamepath# 這里為了方便別的地方引用圖片路徑,將其設置為全局變量
 imgNamepath, imgType = QFileDialog.getOpenFileName(self.ui, "選擇圖片", "D:\", "*.png;;*.jpg;;All Files(*)")
 # 通過文件路徑獲取圖片文件,并設置圖片長寬為label控件的長、寬
 img = QtGui.QPixmap(imgNamepath).scaled(self.ui.graphicsView.size(), aspectMode=Qt.KeepAspectRatioByExpanding)
 print("img: ", img.width(), img.height())
 self.ui.graphicsView.setFixedSize(img.width(), img.height())
 # 在label控件上顯示選擇的圖片
 item = QGraphicsPixmapItem(img)
 scene = QGraphicsScene()
 scene.addItem(item)
 self.ui.graphicsView.setScene(scene)
 self.ui.graphicsView.repaint()
 # 顯示所選圖片的路徑
 self.ui.lineEdit.setText(imgNamepath)
Finally let's take a look at the overall effect

The above is the detailed content of Use Python to create a visual GUI interface and replace the background color of your ID photo with one click. For more information, please follow other related articles on the PHP Chinese website!

Hot AI Tools

Undress AI Tool
Undress images for free

Undresser.AI Undress
AI-powered app for creating realistic nude photos

AI Clothes Remover
Online AI tool for removing clothes from photos.

Clothoff.io
AI clothes remover

Video Face Swap
Swap faces in any video effortlessly with our completely free AI face swap tool!

Hot Article
Hot Tools

Notepad++7.3.1
Easy-to-use and free code editor

SublimeText3 Chinese version
Chinese version, very easy to use

Zend Studio 13.0.1
Powerful PHP integrated development environment

Dreamweaver CS6
Visual web development tools

SublimeText3 Mac version
God-level code editing software (SublimeText3)
Hot Topics


 How to handle API authentication in Python
Jul 13, 2025 am 02:22 AM
How to handle API authentication in Python
Jul 13, 2025 am 02:22 AM
The key to dealing with API authentication is to understand and use the authentication method correctly. 1. APIKey is the simplest authentication method, usually placed in the request header or URL parameters; 2. BasicAuth uses username and password for Base64 encoding transmission, which is suitable for internal systems; 3. OAuth2 needs to obtain the token first through client_id and client_secret, and then bring the BearerToken in the request header; 4. In order to deal with the token expiration, the token management class can be encapsulated and automatically refreshed the token; in short, selecting the appropriate method according to the document and safely storing the key information is the key.
 How to test an API with Python
Jul 12, 2025 am 02:47 AM
How to test an API with Python
Jul 12, 2025 am 02:47 AM
To test the API, you need to use Python's Requests library. The steps are to install the library, send requests, verify responses, set timeouts and retry. First, install the library through pipinstallrequests; then use requests.get() or requests.post() and other methods to send GET or POST requests; then check response.status_code and response.json() to ensure that the return result is in compliance with expectations; finally, add timeout parameters to set the timeout time, and combine the retrying library to achieve automatic retry to enhance stability.
 Python variable scope in functions
Jul 12, 2025 am 02:49 AM
Python variable scope in functions
Jul 12, 2025 am 02:49 AM
In Python, variables defined inside a function are local variables and are only valid within the function; externally defined are global variables that can be read anywhere. 1. Local variables are destroyed as the function is executed; 2. The function can access global variables but cannot be modified directly, so the global keyword is required; 3. If you want to modify outer function variables in nested functions, you need to use the nonlocal keyword; 4. Variables with the same name do not affect each other in different scopes; 5. Global must be declared when modifying global variables, otherwise UnboundLocalError error will be raised. Understanding these rules helps avoid bugs and write more reliable functions.
 Python FastAPI tutorial
Jul 12, 2025 am 02:42 AM
Python FastAPI tutorial
Jul 12, 2025 am 02:42 AM
To create modern and efficient APIs using Python, FastAPI is recommended; it is based on standard Python type prompts and can automatically generate documents, with excellent performance. After installing FastAPI and ASGI server uvicorn, you can write interface code. By defining routes, writing processing functions, and returning data, APIs can be quickly built. FastAPI supports a variety of HTTP methods and provides automatically generated SwaggerUI and ReDoc documentation systems. URL parameters can be captured through path definition, while query parameters can be implemented by setting default values ??for function parameters. The rational use of Pydantic models can help improve development efficiency and accuracy.
 Python for loop with timeout
Jul 12, 2025 am 02:17 AM
Python for loop with timeout
Jul 12, 2025 am 02:17 AM
Add timeout control to Python's for loop. 1. You can record the start time with the time module, and judge whether it is timed out in each iteration and use break to jump out of the loop; 2. For polling class tasks, you can use the while loop to match time judgment, and add sleep to avoid CPU fullness; 3. Advanced methods can consider threading or signal to achieve more precise control, but the complexity is high, and it is not recommended for beginners to choose; summary key points: manual time judgment is the basic solution, while is more suitable for time-limited waiting class tasks, sleep is indispensable, and advanced methods are suitable for specific scenarios.
 How to parse large JSON files in Python?
Jul 13, 2025 am 01:46 AM
How to parse large JSON files in Python?
Jul 13, 2025 am 01:46 AM
How to efficiently handle large JSON files in Python? 1. Use the ijson library to stream and avoid memory overflow through item-by-item parsing; 2. If it is in JSONLines format, you can read it line by line and process it with json.loads(); 3. Or split the large file into small pieces and then process it separately. These methods effectively solve the memory limitation problem and are suitable for different scenarios.
 Python for loop over a tuple
Jul 13, 2025 am 02:55 AM
Python for loop over a tuple
Jul 13, 2025 am 02:55 AM
In Python, the method of traversing tuples with for loops includes directly iterating over elements, getting indexes and elements at the same time, and processing nested tuples. 1. Use the for loop directly to access each element in sequence without managing the index; 2. Use enumerate() to get the index and value at the same time. The default index is 0, and the start parameter can also be specified; 3. Nested tuples can be unpacked in the loop, but it is necessary to ensure that the subtuple structure is consistent, otherwise an unpacking error will be raised; in addition, the tuple is immutable and the content cannot be modified in the loop. Unwanted values can be ignored by \_. It is recommended to check whether the tuple is empty before traversing to avoid errors.
 What are python default arguments and their potential issues?
Jul 12, 2025 am 02:39 AM
What are python default arguments and their potential issues?
Jul 12, 2025 am 02:39 AM
Python default parameters are evaluated and fixed values ??when the function is defined, which can cause unexpected problems. Using variable objects such as lists as default parameters will retain modifications, and it is recommended to use None instead; the default parameter scope is the environment variable when defined, and subsequent variable changes will not affect their value; avoid relying on default parameters to save state, and class encapsulation state should be used to ensure function consistency.
