How to uniformly adjust the size of pictures on each page in ppt
Jan 07, 2021 pm 03:58 PMHow to uniformly adjust the size of pictures on each page of ppt: 1. Open the ppt software, insert multiple sets of pictures, and select all pictures; 2. Right-click on the picture and select "Size and Position"; 3. Deselect "Lock Aspect Ratio" in the pop-up window; 4. Click the arrows to the right of height and width and enter the required height and width.

The operating environment of this article: Windows 7 system, Microsoft Office PowerPoint 2020 version, Dell G3 computer.
During data processing, many pictures need to be spliced ??and merged into pictures that meet your needs. Many pictures are of different sizes. How to unify the sizes is very simple using PPT. Let me introduce to you how to uniformly adjust the size of pictures on each page of ppt.
ppt Method to uniformly adjust the size of pictures on each page:
1. First insert multiple groups of pictures and select all pictures. If you accidentally clicked somewhere else, click on an image and then press "Ctrl A" to select all the images.
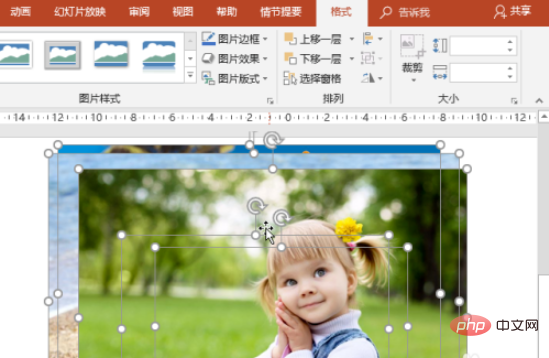
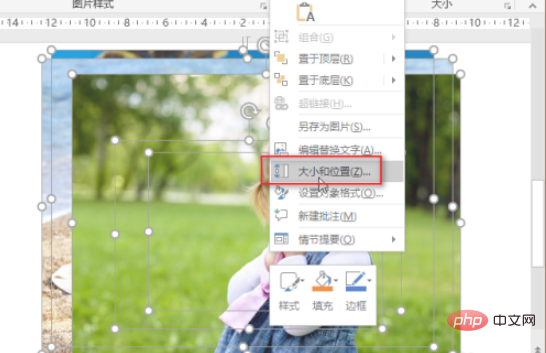
#2. Right-click on the image and click "Size and Position".
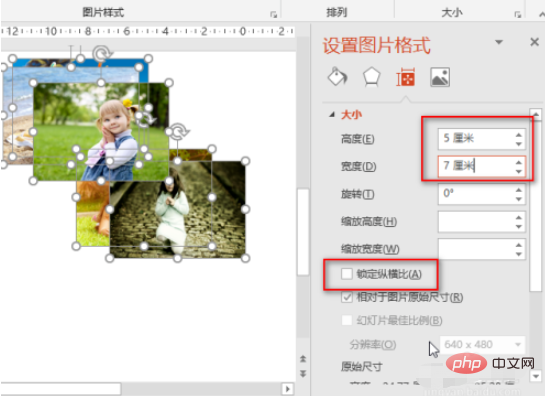
3. Deselect "Lock Aspect Ratio", then click the arrows to the right of Height and Width, and then enter the height and width you want. Just enter an approximate value.
In this way, all dairy products are automatically adjusted to the same size.
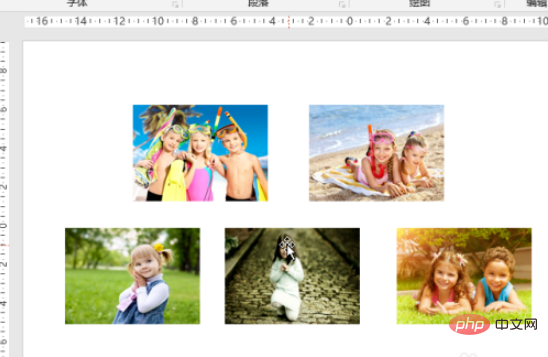
If you are not satisfied with the size, you can select all the pictures, hold down the Shift key, and then move the mouse to the edge of one of the pictures to adjust the picture size.
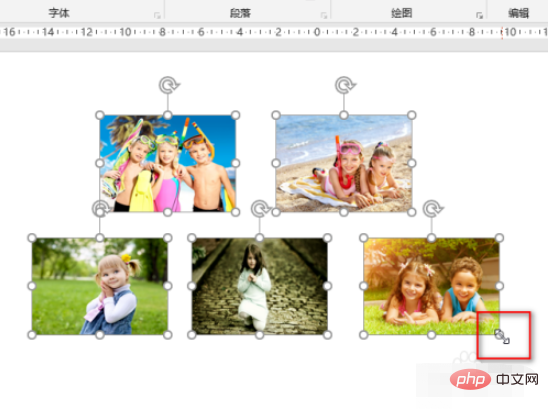
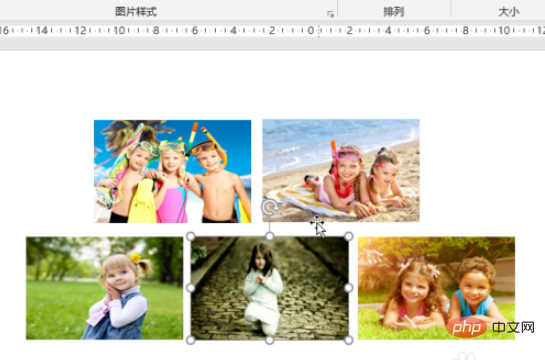
Since you have selected all the pictures and hold down the Shift key when adjusting, the sizes of these pictures will be adjusted uniformly.
For more computer-related knowledge, please visit the FAQ column!
The above is the detailed content of How to uniformly adjust the size of pictures on each page in ppt. For more information, please follow other related articles on the PHP Chinese website!

Hot AI Tools

Undress AI Tool
Undress images for free

Undresser.AI Undress
AI-powered app for creating realistic nude photos

AI Clothes Remover
Online AI tool for removing clothes from photos.

Clothoff.io
AI clothes remover

Video Face Swap
Swap faces in any video effortlessly with our completely free AI face swap tool!

Hot Article

Hot Tools

Notepad++7.3.1
Easy-to-use and free code editor

SublimeText3 Chinese version
Chinese version, very easy to use

Zend Studio 13.0.1
Powerful PHP integrated development environment

Dreamweaver CS6
Visual web development tools

SublimeText3 Mac version
God-level code editing software (SublimeText3)
 Detailed steps to create text with chalk font effect in PPT
Mar 26, 2024 pm 04:50 PM
1. If you want to get a good-looking effect, you can match the PPT with the corresponding [blackboard] background image. 2. First create the materials for [Chalk Lettering]. Draw a shape in [Insert]-[Shape], any shape can be used, fill it with black. 3. Copy the drawn shape and paste it as a [picture]. 4. Delete the drawn shape and set the [Artistic Effect] of the pasted picture to [Line Drawing]. 5. In [Artistic Effect]-[Artistic Effect Options], reduce [Transparency] and increase the value of [Pencil Size]. 6. [Picture Tools]-[Color]-[Set Transparent Color] Set the transparent color to black. 7. In】Set picture format【-】Picture color【Recolor picture】【. 8. In the ppt page, insert a [text box] and enter text. 9. Complex
 How to remove the date that appears automatically when printing from PPT handouts
Mar 26, 2024 pm 08:16 PM
1. Let me first talk about the method I used at the beginning, maybe everyone is using it too. First, open [View]——]Remarks Template[. 2. A place where you can actually see the date after opening it. 3. Select it first and delete it. 4. After deleting, click [Close Master View]. 5. Open the print preview again and find that the date is still there. 6. In fact, this date was not deleted here. It should be in the [Handout Master]. Look at the picture below. 7. Delete the date after you find it. 8. Now when you open the preview and take a look, the date is no longer there. Note: In fact, this method is also very easy to remember, because the printed handouts are handouts, so you should look for the [Handout Master].
 Introduction to the method of inserting heptagons into PPT slides
Mar 26, 2024 pm 07:46 PM
1. Open the PPT slide document, and in the [Outline, Slide] column on the left side of the PPT, click to select the slide where you want to insert the basic [shape]. 2. After selecting, select the [Insert] menu in the function menu bar above the PPT and click. 3. After clicking the [Insert] menu, the [Insert] submenu bar pops up below the function menu bar. Select the [Shape] menu in the [Insert] submenu bar. 4. Click the [Shape] menu to pop up the preset shape type selection page. 5. In the shape type selection page, select the [Heptagon] shape and click. 6. After clicking, move the mouse to the slide editing interface, press the mouse to draw, and release the mouse after the drawing is completed. Complete the insertion of the [heptagon] shape.
 How to deal with blanks when playing PPT slides
Mar 26, 2024 pm 07:51 PM
1. Open the PPT file you created and select the second slide. 2. On the second slide, select one of the pictures, and then select [Animation] to add any animation effect. 3. In the start column of the animation bar, change [While Standalone] to [After Previous Animation], and you will see that the picture animation label [1] will change to [0]. Do the same for subsequent slides, and you can see the effect by playing the slide at the end.
 How to insert excel icons into PPT slides
Mar 26, 2024 pm 05:40 PM
1. Open the PPT and turn the page to the page where you need to insert the excel icon. Click the Insert tab. 2. Click [Object]. 3. The following dialog box will pop up. 4. Click [Create from file] and click [Browse]. 5. Select the excel table to be inserted. 6. Click OK and the following page will pop up. 7. Check [Show as icon]. 8. Click OK.
 Restricted processing operation method is prompted when embedding fonts in PPT
Mar 26, 2024 pm 08:41 PM
1. Open PowerPoint and edit the PPT document. 2. Find the font that cannot be embedded, select the text box, right-click - Cut/Copy. 3. Right-click the blank space of the slide and select [Paste] - Paste as picture. 4. It is simple and convenient to save the font as a picture, but the font cannot be modified. Method 2: Software FontCreatorProgram 1. Download the FontCreatorProgram software from the Internet, unzip the file, and select the [FCP.EXE] file to install. 2. Open the installed software, click [File] - Open - Installed Fonts in the window menu bar, and select PPT. For fonts that cannot be embedded, click [OK]. 3. Select [
 How to create underline animation when mouse clicks text in PPT
Mar 26, 2024 pm 06:40 PM
1. Enter text. 2. Select the shape under Insert and select Line within it. 3. Draw a straight line below the word love. 4. Select the straight line, then select the animation menu, and choose an animation effect from it. 5. Play the animation. At this time, there are no horizontal lines under the text. 6. Click the mouse, and a horizontal line will appear under the text.
 PPT operation content for drawing the animation of a bird flying over
Mar 26, 2024 pm 05:06 PM
1. Open the PPT software, create a new slide, and insert an arc from the menu bar. 2. Copy the arc that has been set, and then move the arc to form the shape of the sea surface. 3. Insert a picture of a bird from [Insert], [Picture] in the menu bar. Then set the image size larger. 4. Click [Animation] on the menu bar, select the picture, set the animation to a custom path, and select left. 5. Copy a picture and set the custom animation path to arc downward. 6. Select the first picture, set the picture animation duration to a longer point, and then extend the picture animation path to the left end of the slide.


