Instructions for using the Player component in vue-music
Jun 23, 2018 pm 05:19 PMThis article mainly introduces the relevant information of vue-music on the Player player component in detail. It has certain reference value. Interested friends can refer to it.
The examples in this article are shared with everyone. The specific content of the Player component is provided for your reference. The specific content is as follows

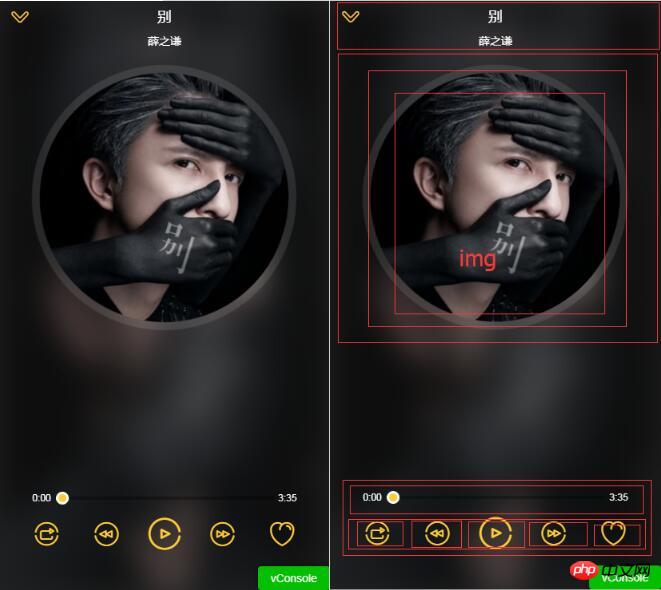
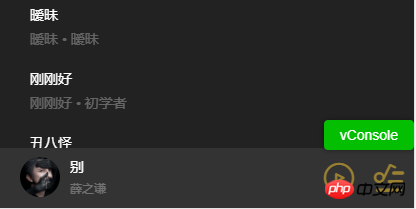
Mini player:

import {playMode} from 'common/js/config.js';

const state = {
 singer:{},
 playing:false, //是否播放
 fullScreen:false, //是否全屏
 playList:[], //播放列表
 sequenceList:[], // 非順序播放列表
 mode:playMode.sequence, // 播放模式(順序0,循環(huán)1,隨機2)
 currentIndex:-1, //當前播放索引
}
export default state


---------------------------------------------
// config.js

export const playMode = {
 sequence:0,
 loop:1,
 random:2
}
2. Get the playlist data when entering the player page, change the playback state and open it in the music-list listIn song The -list component dispatches events to the parent component, and passes in the information and index of the current song <li @click="selectItem(song,index)" v-for="(song,index) in songs" class="item">
------------------------------
selectItem(item,index){
this.$emit('select',item,index)
},Receives dispatched events in the music-list component. <song-list :rank="rank" :songs="songs" @select="selectItem"></song-list>3. If you commit multiple states, set them in actions
import {playMode} from 'common/js/config.js'

export const selectPlay = function({commit,state},{list,index}){
 commit(types.SET_SEQUENCE_LIST, list)
 commit(types.SET_PLAYLIST, list)
 commit(types.SET_CURRENT_INDEX, index)
 commit(types.SET_FULL_SCREEN, true)
 commit(types.SET_PLAYING_STATE, true)
}
4. Use mapActions to submit the changed value in the music-list component import {mapActions} from 'vuex'
methods:{
selectItem(item,index){
this.selectPlay({
list:this.songs,
index
})
},
...mapActions([
'selectPlay'
])
},5. In palyer Get the vuex global status and assign the status to the corresponding location (the code is the complete code, please understand it slowly according to the explanation later) <p class="player" v-show="playList.length>0"> // 如果有列表數(shù)據(jù)則顯示
<p class="normal-player" v-show="fullScreen"> //如果全屏
<p class="background">
<img :src="currentSong.image" alt="" width="100%" height="100%"> //模糊背景圖
</p>
<p class="top">
<p class="back" @click="back">
<i class="icon-back"></i>
</p>
<h1 class="title" v-html="currentSong.name"></h1> //當前歌曲名稱
<h2 class="subtitle" v-html="currentSong.singer"></h2> //當前歌手名
</p>
<p class="middle">
<p class="middle-l">
<p class="cd-wrapper">
<p class="cd" :class="cdCls">
<img :src="currentSong.image" alt="" class="image"> //封面圖
</p>
</p>
</p>
</p>
<p class="bottom">
<p class="progress-wrapper">
<span class="time time-l">{{ format(currentTime) }}</span>
<p class="progress-bar-wrapper">
<progress-bar :percent="percent" @percentChange="onProgressBarChange"></progress-bar>
</p>
<span class="time time-r">{{ format(currentSong.duration) }}</span>
</p>
<p class="operators">
<p class="icon i-left">
<i :class="iconMode" @click="changeMode"></i>
</p>
<p class="icon i-left" :class="disableCls">
<i @click="prev" class="icon-prev"></i>
</p>
<p class="icon i-center" :class="disableCls">
<i :class="playIcon" @click="togglePlaying"></i>
</p>
<p class="icon i-right" :class="disableCls">
<i @click="next" class="icon-next"></i>
</p>
<p class="icon i-right">
<i class="icon icon-not-favorite"></i>
</p>
</p>
</p>
</p>
</transition>
<transition name="mini">
<p class="mini-player" v-show="!fullScreen" @click="open">
<p class="icon">
<img :src="currentSong.image" alt="" width="40" height="40" :class="cdCls">
</p>
<p class="text">
<h2 class="name" v-html="currentSong.name"></h2>
<p class="desc" v-html="currentSong.singer"></p>
</p>
<p class="control">
<i :class="miniIcon" @click.stop="togglePlaying"></i>
</p>
<p class="control">
<i class="icon-playlist"></i>
</p>
</p>
</transition>
<audio :src="currentSong.url" ref="audio" @canplay="ready" @error="error" @timeupdate="updateTime" @ended="end"></audio>
</p>Open the status of the playerimport {mapGetters,mapMutations} from 'vuex';
...mapGetters([
'fullScreen',
'playList',
'currentSong',
'playing',
'currentIndex',
])Note: You cannot assign values ??directly in the component The state this.fullScreen = false in modified vuex needs to be changed through mutations, define mutation-types and mutations, and then use the mapMutations proxy method of vuex to call [types.SET_FULL_SCREEN](state, flag) {
state.fullScreen = flag
},
import {mapGetters,mapMutations} from 'vuex';
methods:{
...mapMutations({
setFullScreen:"SET_FULL_SCREEN",
}),
back(){
this.setFullScreen(false)
},
}Set the click play button method<i :class="playIcon" @click="togglePlaying"></i>
togglePlaying(){
this.setPlayingState(!this.playing); //改變?nèi)肿兞縫laying 的屬性
},
// 然后watch 監(jiān)聽playing 操作實際的audio 標簽的播放暫停
watch:{
playing(newPlaying){
let audio = this.$refs.audio;
this.$nextTick(() => {
newPlaying ? audio.play():audio.pause();
})
}
},
// 用計算屬性改變相應的播放暫停圖標
playIcon(){
return this.playing? 'icon-pause':'icon-play'
},Set the click Play previous and next song button methods. Use mapGetters to get the value of currentIndex (plus one or minus one) and change it, thereby changing the state of currentSong and listening for switching playback. Determine playlist limit reset. prev(){
if(!this.songReady){
return;
}
let index = this.currentIndex - 1;
if(index === -1){ //判斷播放列表界限重置
index = this.playList.length-1;
}
this.setCurrentIndex(index);
if(!this.playing){ //判斷是否播放改變播放暫停的icon
this.togglePlaying();
}
this.songReady = false;
},
next(){
if(!this.songReady){
return;
}
let index = this.currentIndex + 1;
if(index === this.playList.length){ //判斷播放列表界限重置
index = 0;
}
this.setCurrentIndex(index);
if(!this.playing){
this.togglePlaying();
}
this.songReady = false;
},Listen to the canpaly event of the audio element tag, when the song is loaded, and the error event, when an error occurs in the song, provide user experience to prevent users from quickly switching and causing errors. Set the songReady flag. If the song is not ready, directly return false when clicking the next songdata(){
return {
songReady:false,
}
},
ready(){
this.songReady = true;
},
error(){
this.songReady = true;
},Progress bar
audio element monitors timeupdate The event obtains the readable and writable attribute timestamp of the current playback time. Use formt for formatting time processing, (_pad is a zero-padding function) Get the total audio duration currentSong.duration<p class="progress-wrapper">
<span class="time time-l">{{ format(currentTime) }}</span>
<p class="progress-bar-wrapper">
<progress-bar :percent="percent" @percentChange="onProgressBarChange"></progress-bar>
</p>
<span class="time time-r">{{ format(currentSong.duration) }}</span>
</p>
<audio :src="currentSong.url" ref="audio" @canplay="ready" @error="error" @timeupdate="updateTime" @ended="end"></audio>updateTime(e){
this.currentTime = e.target.currentTime; // 獲取當前播放時間段
},
format(interval){
interval = interval | 0;
const minute = interval/60 | 0;
const second = this._pad(interval % 60);
return `${minute}:${second}`;
},
_pad(num,n=2){
let len = num.toString().length;
while(len<n){
num = '0' + num;
len ++;
}
return num;
},Create a progress-bar component to receive the pencent progress parameter, and set the progress bar width and The position of the ball. The player component sets the calculated property percentpercent(){
return this.currentTime / this.currentSong.duration // 當前時長除以總時長
},progress-bar component
<p class="progress-bar" ref="progressBar" @click="progressClick">
 <p class="bar-inner">
  <p class="progress" ref="progress"></p>
  <p class="progress-btn-wrapper" ref="progressBtn"
   @touchstart.prevent="progressTouchStart"
   @touchmove.prevent="progressTouchMove"
   @touchend="progressTouchEnd"
  >
  <p class="progress-btn"></p>
  </p>
 </p>
 </p>
const progressBtnWidth = 16 //小球?qū)挾?
props:{
 percent:{
 type:Number,
 default:0
 }
},


watch:{
 percent(newPercent){
 if(newPercent>=0 && !this.touch.initated){
  const barWidth = this.$refs.progressBar.clientWidth - progressBtnWidth;
  const offsetWidth = newPercent * barWidth;
  this.$refs.progress.style.width = `${offsetWidth}px`;
  this.$refs.progressBtn.style.transform=`translate3d(${offsetWidth}px,0,0)`
 }
 }
}
Set the drag
small button on the progress bar Add touchstart, touchmove, touchend event listening methods to progressBtn, add prevent to the event to prevent the default browser behavior of dragging, and obtain dragging information for calculationCreate a touch object on the instance to maintain the relationship between different callbacks Communications share status information. In the touchstart event method, first set this.touch.initiated to true, indicating that dragging has started. Record the starting click position e.touches[0].pageX and save it to the touch object to record the current progress width. In touchmove, first determine whether the touchstart method has been entered first, and calculate the moved position minus the offset length of the click start position. let deltax = e.touches[0].pageX - this.touch.startX can set the existing length of the progress bar plus the offset length. The maximum width cannot exceed the width of the parent progressbarCall this._offset(offsetWidth) method to set the width of the progress barSet this.touch.initiated to false in the touchend event method to indicate dragging End, and dispatch the event to the player component. Set the currentTime value of audio to the correct value, and the parameter is pencentAdd a click event in the progressbar, call this._offset(e.offsetX), and dispatch the event
 created(){
 this.touch = {};
 },

methods:{
 progressTouchStart(e){
 this.touch.initiated = true;
 this.touch.startX = e.touches[0].pageX;
 this.touch.left = this.$refs.progress.clientWidth;
 },
 progressTouchMove(e){
 if(!this.touch.initiated){
  return;
 }
 let deltaX = e.touches[0].pageX - this.touch.startX;
 let offsetWidth = Math.min(this.$refs.progressBar.clientWidth - progressBtnWidth,Math.max(0,this.touch.left + deltaX));
 this._offset(offsetWidth);
 },
 progressTouchEnd(e){
 this.touch.initiated = false;
 this._triggerPercent();
 },
 progressClick(e){
 const rect = this.$refs.progressBar.getBoundingClientRect();
 const offsetWidth = e.pageX - rect.left;
 this._offset(offsetWidth);
 // this._offset(e.offsetX);
 this._triggerPercent();
 },
 _offset(offsetWidth){
 this.$refs.progress.style.width = `${offsetWidth}px`;
 this.$refs.progressBtn.style[transform] = `translate3d(${offsetWidth}px,0,0)`;
 },
 _triggerPercent(){
 const barWidth = this.$refs.progressBar.clientWidth - progressBtnWidth;
 const percent = this.$refs.progress.clientWidth / barWidth;
 this.$emit("percentChange",percent)
 }
},
This article has been compiled into the "Vue.js Front-end Component Learning Tutorial". Everyone is welcome to learn and read. For tutorials on vue.js components, please click on the special vue.js component learning tutorial to learn. For more vue learning tutorials, please read the special topic "Vue Practical Tutorial" The above is what I compiled for everyone. I hope it will be helpful to everyone in the future. Related articles:
How to integrate the carousel image in mint-ui in vue.js
How to implement it in Jstree Disabled child nodes will also be selected when the parent node is selected
About the usage of filters in Vue
Adaptive in Javascript Approach
The above is the detailed content of Instructions for using the Player component in vue-music. For more information, please follow other related articles on the PHP Chinese website!

Hot AI Tools

Undress AI Tool
Undress images for free

Undresser.AI Undress
AI-powered app for creating realistic nude photos

AI Clothes Remover
Online AI tool for removing clothes from photos.

Clothoff.io
AI clothes remover

Video Face Swap
Swap faces in any video effortlessly with our completely free AI face swap tool!

Hot Article

Hot Tools

Notepad++7.3.1
Easy-to-use and free code editor

SublimeText3 Chinese version
Chinese version, very easy to use

Zend Studio 13.0.1
Powerful PHP integrated development environment

Dreamweaver CS6
Visual web development tools

SublimeText3 Mac version
God-level code editing software (SublimeText3)

Hot Topics
 How to add functions to buttons for vue
Apr 08, 2025 am 08:51 AM
You can add a function to the Vue button by binding the button in the HTML template to a method. Define the method and write function logic in the Vue instance.
 React vs. Vue: Which Framework Does Netflix Use?
Apr 14, 2025 am 12:19 AM
Netflixusesacustomframeworkcalled"Gibbon"builtonReact,notReactorVuedirectly.1)TeamExperience:Choosebasedonfamiliarity.2)ProjectComplexity:Vueforsimplerprojects,Reactforcomplexones.3)CustomizationNeeds:Reactoffersmoreflexibility.4)Ecosystema
 Netflix's Frontend: Examples and Applications of React (or Vue)
Apr 16, 2025 am 12:08 AM
Netflix uses React as its front-end framework. 1) React's componentized development model and strong ecosystem are the main reasons why Netflix chose it. 2) Through componentization, Netflix splits complex interfaces into manageable chunks such as video players, recommendation lists and user comments. 3) React's virtual DOM and component life cycle optimizes rendering efficiency and user interaction management.
 How to jump to the div of vue
Apr 08, 2025 am 09:18 AM
There are two ways to jump div elements in Vue: use Vue Router and add router-link component. Add the @click event listener and call this.$router.push() method to jump.
 React, Vue, and the Future of Netflix's Frontend
Apr 12, 2025 am 12:12 AM
Netflix mainly uses React as the front-end framework, supplemented by Vue for specific functions. 1) React's componentization and virtual DOM improve the performance and development efficiency of Netflix applications. 2) Vue is used in Netflix's internal tools and small projects, and its flexibility and ease of use are key.
 How to jump a tag to vue
Apr 08, 2025 am 09:24 AM
The methods to implement the jump of a tag in Vue include: using the a tag in the HTML template to specify the href attribute. Use the router-link component of Vue routing. Use this.$router.push() method in JavaScript. Parameters can be passed through the query parameter and routes are configured in the router options for dynamic jumps.
 How to implement component jump for vue
Apr 08, 2025 am 09:21 AM
There are the following methods to implement component jump in Vue: use router-link and <router-view> components to perform hyperlink jump, and specify the :to attribute as the target path. Use the <router-view> component directly to display the currently routed rendered components. Use the router.push() and router.replace() methods for programmatic navigation. The former saves history and the latter replaces the current route without leaving records.
 How to use vue pagination
Apr 08, 2025 am 06:45 AM
Pagination is a technology that splits large data sets into small pages to improve performance and user experience. In Vue, you can use the following built-in method to paging: Calculate the total number of pages: totalPages() traversal page number: v-for directive to set the current page: currentPage Get the current page data: currentPageData()


