(I personally tested it and started learning Eclipse (my Eclipse version is 4.5.2, and the jar package version of the Jdbc driver is 5.1.7. It can be used for personal testing). When I connected to the database, I found that there are a lot of experiences on the Internet, but I found a lot of errors on the Internet, so I published this blog. I hope it will be helpful to everyone)
#1: First, you need to download the Jdbc driver (mysql-connector-java-5.1.7-bin.jar )This file
Downloading the above file is also very difficult, so for your convenience, I share it here.
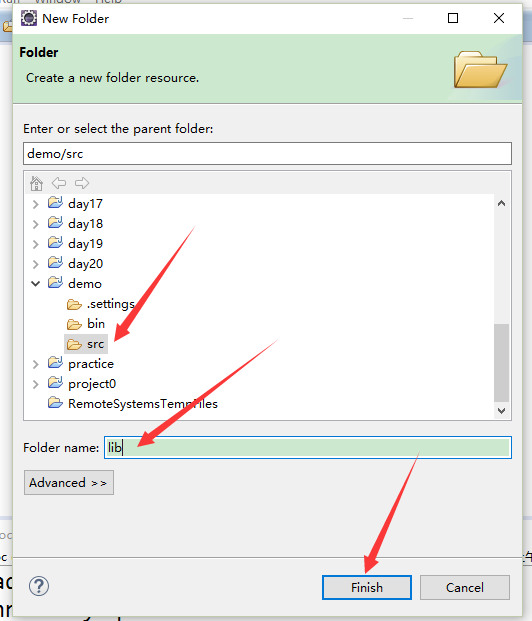
2: After downloading the above Jdbc driver, you can start the hands-on operation. First open Eclipse, create a Project, the name of my project is demo, then right-click src and continue to find new , find Floder, and then right-click on the src under the project as shown in the figure

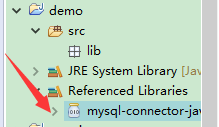
The next step is to paste the downloaded Jdbc driver under the lib under the demo project, and then Click on the jar package you just pasted, find the build path and continue to find the add to build path,

The result that appears is as shown in the picture above. It can only be used after the addition is completed. Eclipse connects to My sql database
The code to connect to the database is as follows (it is important to note that Connection connect=DriverManage.getConnection("jdbc:mysql://localhost:3306/test","root"," Password"))
The "password" in the above sentence is your database's own password; you need to modify it yourself, the one in "jdbc:mysql://localhost:3306/test" above test is a table created by myself using mysql. It is created by myself and requires extra attention; (the statement to create my sql will be found elsewhere in this blog, so please pay attention)
package com.ningmengxueyuan;
import java.sql.*;
public class MysqlJdbc{
public static void main(String args[]) {
try {
Class.forName("com.mysql.jdbc.Driver"); //加載MYSQL JDBC驅(qū)動(dòng)程序
//Class.forName("org.gjt.mm.mysql.Driver");
System.out.println("Success loading Mysql Driver!");
}catch (Exception e) {
System.out.print("Error loading Mysql Driver!");
e.printStackTrace();
}
try{
Connection connect = DriverManager.getConnection(
"jdbc:mysql://localhost:3306/test1","root","123456");
//連接URL為 jdbc:mysql//服務(wù)器地址/數(shù)據(jù)庫(kù)名 ,后面的2個(gè)參數(shù)分別是登陸用戶名和密碼
System.out.println("Success connect Mysql server!");
Statement stmt = connect.createStatement();
ResultSet rs = stmt.executeQuery("select * from user");
//user 為你表的名稱
while (rs.next()) {
System.out.println(rs.getString("name"));
}
}catch(Exception e) {
System.out.print("get data error!");
e.printStackTrace();
}
}
}
The above is the editor's I would like to introduce to you a summary of the operation of connecting Eclipse to Mysql database. I hope it will be helpful to you. If you have any questions, please leave me a message and the editor will reply to you in time. I would also like to thank you all for your support of the PHP Chinese website!
For more articles related to the summary of Eclipse connection to Mysql database operations, please pay attention to the PHP Chinese website!

Hot AI Tools

Undress AI Tool
Undress images for free

Undresser.AI Undress
AI-powered app for creating realistic nude photos

AI Clothes Remover
Online AI tool for removing clothes from photos.

Clothoff.io
AI clothes remover

Video Face Swap
Swap faces in any video effortlessly with our completely free AI face swap tool!

Hot Article

Hot Tools

Notepad++7.3.1
Easy-to-use and free code editor

SublimeText3 Chinese version
Chinese version, very easy to use

Zend Studio 13.0.1
Powerful PHP integrated development environment

Dreamweaver CS6
Visual web development tools

SublimeText3 Mac version
God-level code editing software (SublimeText3)


