 Backend Development
 PHP Tutorial
 Use AdminLTE template in PHP's Laravel framework to write website backend interface_php skills
Use AdminLTE template in PHP's Laravel framework to write website backend interface_php skills
May 16, 2016 pm 07:56 PMAdminLTE is a free advanced admin control panel theme based on Bootstrap 3.x, fully responsive management, suitable for many screen resolutions from small mobile devices to large desktop computers.
Features of AdminLTE:
Fully responsive
Sortable dashboard
18 plugins and 3 custom plugins
Lightweight and fast
Compatible with most Compatible with major browsers
Fully supports Glyphicons, Fontawesome and icons
Tools we use
Laravel
AdminLTE 2.3.2
Bower
Composer
Download a brand new Laravel
If you are not sure, you can go to the official website to check Document link
at We can use the command line directly
composer create-project laravel/laravel myapp --prefer-dist
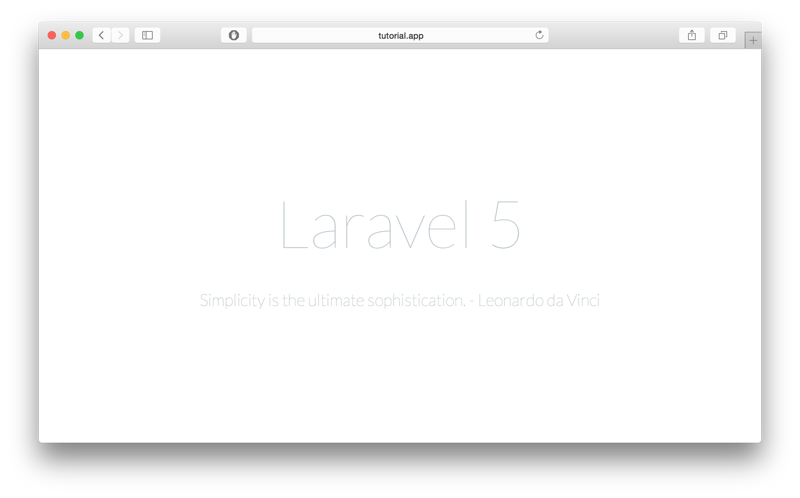
With this command we create a new name myapp Laravel project, if you succeed you can see the picture below

Download AdminLTE through Bower
Enter myapp/ public folder
cd myapp/public
Execute the following command in this folder
bower install admin-lte
Once completed, you will find an additional bower_componets folder, and in this folder you will see AdminLTE
Convert AdminLTE starter.html into Blade template
Laravel uses a good template engine Blade here. In order to make full use of Blade, we need to convert some common common HTML starters. To apply the start page to the Blade template, first create a view in the resources/views folder and name it admin_template.blade.php, and then we create a corresponding route for this page. As below I created
 Route::get('admin', function () {
  return view('admin_template');
 });
Then, change bower_components/admin-lte Copy the content in /starter.html to our view template, and point the relevant links to the corresponding directory of our AdminLTE. The following is my preliminary setting:
<script src="{{ asset("/bower_components/AdminLTE/plugins/jQuery/jQuery-2.1.4.min.js")}}"></script>
<!-- Bootstrap 3.3.5 -->
<script src="{{ asset("/bower_components/AdminLTE/bootstrap/js/bootstrap.min.js")}}"></script>
<!-- AdminLTE App -->
<script src="{{ asset("/bower_components/AdminLTE/dist/js/app.min.js")}}"></script>
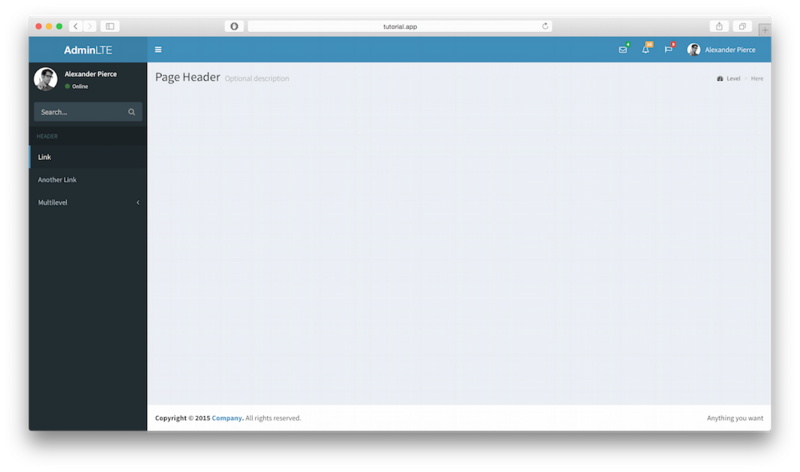
Similarly like this, change the css The links related to js point to the corresponding directory, and then we check the page changes through localhost:8000/admin. At this time, the page becomes as shown below:

Now Now that we have all the resources to use AdminLTE, let's add the final touches to our main view. I'll separate this template into three files, sidebar.blade.php, header.blade.php, and footer. blade.php
The contents of these three files are admin_template.blade.php header part, aside part and footer part respectively. Cut out these three parts and put them into three files in sequence.
Final Touches
Now that we have personalized our templates apart, we need to set up our initial admin_template.blade.php
template In order to facilitate the dynamic loading of content, as shown below:
<!DOCTYPE html>
<html>
head>
<meta charset="UTF-8">
<title>{{ $page_title or "AdminLTE Dashboard" }}</title>
<meta content='width=device-width, initial-scale=1, maximum-scale=1, user-scalable=no' name='viewport'>
<!-- Bootstrap 3.3.2 -->
<link href="{{ asset("/bower_components/AdminLTE/bootstrap/css/bootstrap.min.css") }}" rel="stylesheet"
type="text/css" />
<!-- Font Awesome Icons -->
<link href="https://maxcdn.bootstrapcdn.com/font-awesome/4.3.0/css/font-awesome.min.css" rel="stylesheet"
type="text/css" />
<!-- Ionicons -->
<link href="http://code.ionicframework.com/ionicons/2.0.0/css/ionicons.min.css" rel="stylesheet"
type="text/css" />
<!-- Theme style -->
<link href="{{ asset("/bower_components/AdminLTE/dist/css/AdminLTE.min.css")}}" rel="stylesheet"
type="text/css" />
<!-- AdminLTE Skins. We have chosen the skin-blue for this starter
page. However, you can choose any other skin. Make sure you
apply the skin class to the body tag so the changes take effect.
-->
<link href="{{ asset("/bower_components/AdminLTE/dist/css/skins/skin-blue.min.css")}}" rel="stylesheet"
type="text/css" />
<!-- HTML5 Shim and Respond.js IE8 support of HTML5 elements and media queries -->
<!-- WARNING: Respond.js doesn't work if you view the page via file:// -->
<!--[if lt IE 9]>
<script src="https://oss.maxcdn.com/libs/html5shiv/3.7.0/html5shiv.js"></script>
<script src="https://oss.maxcdn.com/libs/respond.js/1.3.0/respond.min.js"></script>
<![endif]-->
</head>
<body class="hold-transition skin-blue sidebar-mini">
<div class="wrapper">
<!-- Header -->
@include('header')
<!-- Sidebar -->
@include('sidebar')
<!-- Content Wrapper. Contains page content -->
<div class="content-wrapper">
<!-- Content Header (Page header) -->
<section class="content-header">
<h1>
{{ $page_title or "Page Title" }}
<small>{{ $page_description or null }}</small>
</h1>
<!-- You can dynamically generate breadcrumbs here -->
<ol class="breadcrumb">
<li><a href="#"><i class="fa fa-dashboard"></i> Level</a></li>
<li class="active">Here</li>
</ol>
</section>
<!-- Main content -->
<section class="content">
<!-- Your Page Content Here -->
@yield('content')
</section><!-- /.content -->
</div><!-- /.content-wrapper -->
<!-- Footer -->
@include('footer')
<aside class="control-sidebar control-sidebar-dark">
<!-- Create the tabs -->
<ul class="nav nav-tabs nav-justified control-sidebar-tabs">
<li class="active"><a href="#control-sidebar-home-tab" data-toggle="tab"><i class="fa fa-home"></i></a></li>
<li><a href="#control-sidebar-settings-tab" data-toggle="tab"><i class="fa fa-gears"></i></a></li>
</ul>
<!-- Tab panes -->
<div class="tab-content">
<!-- Home tab content -->
<div class="tab-pane active" id="control-sidebar-home-tab">
<h3 class="control-sidebar-heading">Recent Activity</h3>
<ul class="control-sidebar-menu">
<li>
<a href="javascript::;">
<i class="menu-icon fa fa-birthday-cake bg-red"></i>
<div class="menu-info">
<h4 class="control-sidebar-subheading">Langdon's Birthday</h4>
<p>Will be 23 on April 24th</p>
</div>
</a>
</li>
</ul>
<!-- /.control-sidebar-menu -->
<h3 class="control-sidebar-heading">Tasks Progress</h3>
<ul class="control-sidebar-menu">
<li>
<a href="javascript::;">
<h4 class="control-sidebar-subheading">
Custom Template Design
<span class="label label-danger pull-right">70%</span>
</h4>
<div class="progress progress-xxs">
<div class="progress-bar progress-bar-danger" style="width: 70%"></div>
</div>
</a>
</li>
</ul>
<!-- /.control-sidebar-menu -->
</div>
<!-- /.tab-pane -->
<!-- Stats tab content -->
<div class="tab-pane" id="control-sidebar-stats-tab">Stats Tab Content</div>
<!-- /.tab-pane -->
<!-- Settings tab content -->
<div class="tab-pane" id="control-sidebar-settings-tab">
<form method="post">
<h3 class="control-sidebar-heading">General Settings</h3>
<div class="form-group">
<label class="control-sidebar-subheading">
Report panel usage
<input type="checkbox" class="pull-right" checked>
</label>
<p>
Some information about this general settings option
</p>
</div>
<!-- /.form-group -->
</form>
</div>
<!-- /.tab-pane -->
</div>
</aside>
<!-- /.control-sidebar -->
<!-- Add the sidebar's background. This div must be placed
immediately after the control sidebar -->
<div class="control-sidebar-bg"></div>
</div><!-- ./wrapper -->
<!-- REQUIRED JS SCRIPTS -->
<!-- jQuery 2.1.3 -->
<script src="{{ asset ("/bower_components/AdminLTE/plugins/jQuery/jQuery-2.1.3.min.js") }}"></script>
<!-- Bootstrap 3.3.2 JS -->
<script src="{{ asset ("/bower_components/AdminLTE/bootstrap/js/bootstrap.min.js") }}"
type="text/javascript"></script>
<!-- AdminLTE App -->
<script src="{{ asset ("/bower_components/AdminLTE/dist/js/app.min.js") }}" type="text/javascript">
</script>
<!-- Optionally, you can add Slimscroll and FastClick plugins.
Both of these plugins are recommended to enhance the
user experience -->
</body>
</html>In the above code, we added contentn, which contains our main content and added pages Title for a different page, rename it to dashboard.blade.php Now the template is ready to use.
Test page
To verify what we have done before, I will create a simple page
1. Create test.blade.php
@extends('dashboard')
@section('content')
<div class='row'>
<div class='col-md-6'>
<!-- Box -->
<div class="box box-primary">
<div class="box-header with-border">
<h3 class="box-title">Randomly Generated Tasks</h3>
<div class="box-tools pull-right">
<button class="btn btn-box-tool" data-widget="collapse" data-toggle="tooltip" title="Collapse">
<i class="fa fa-minus"></i></button>
<button class="btn btn-box-tool" data-widget="remove" data-toggle="tooltip" title="Remove">
<i class="fa fa-times"></i></button>
</div>
</div>
<div class="box-body">
@foreach($tasks as $task)
<h5>
{{ $task['name'] }}
<small class="label label-{{$task['color']}} pull-right">{{$task['progress']}}%</small>
</h5>
<div class="progress progress-xxs">
<div class="progress-bar progress-bar-{{$task['color']}}" style="width: {{$task['progress']}}%">
</div>
</div>
@endforeach
</div><!-- /.box-body -->
<div class="box-footer">
<form action='#'>
<input type='text' placeholder='New task' class='form-control input-sm' />
</form>
</div><!-- /.box-footer-->
</div><!-- /.box -->
</div><!-- /.col -->
<div class='col-md-6'>
<!-- Box -->
<div class="box box-primary">
<div class="box-header with-border">
<h3 class="box-title">Second Box</h3>
<div class="box-tools pull-right">
<button class="btn btn-box-tool" data-widget="collapse" data-toggle="tooltip" title="Collapse">
<i class="fa fa-minus"></i></button>
<button class="btn btn-box-tool" data-widget="remove" data-toggle="tooltip" title="Remove">
<i class="fa fa-times"></i></button>
</div>
</div>
<div class="box-body">
A separate section to add any kind of widget. Feel free
to explore all of AdminLTE widgets by visiting the demo page
on <a href="https://almsaeedstudio.com">Almsaeed Studio</a>.
</div><!-- /.box-body -->
</div><!-- /.box -->
</div><!-- /.col -->
</div><!-- /.row -->
@endsection2. Create TestController.php
php artisan make:controller TestController --plain
The following is the code part of this controller:
<?php
namespace App\Http\Controllers;
use Illuminate\Http\Request;
use App\Http\Requests;
use App\Http\Controllers\Controller;
class TestController extends Controller
{
public function index() {
$data['tasks'] = [
[
'name' => 'Design New Dashboard',
'progress' => '87',
'color' => 'danger'
],
[
'name' => 'Create Home Page',
'progress' => '76',
'color' => 'warning'
],
[
'name' => 'Some Other Task',
'progress' => '32',
'color' => 'success'
],
[
'name' => 'Start Building Website',
'progress' => '56',
'color' => 'info'
],
[
'name' => 'Develop an Awesome Algorithm',
'progress' => '10',
'color' => 'success'
]
];
return view('test')->with($data);
}
}3. Create the corresponding route
Route::get('test', 'TestController@index');
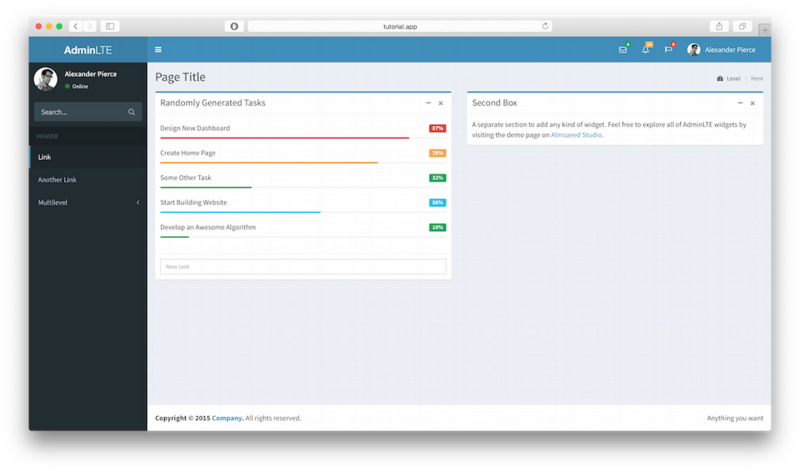
4. Open the corresponding page. If you made no mistakes, it should be as shown below

The above is the content of using AdminLTE template to write website backend interface _php skills in PHP's Laravel framework. For more related content, please pay attention to the PHP Chinese website (www.miracleart.cn)!

Hot AI Tools

Undress AI Tool
Undress images for free

Undresser.AI Undress
AI-powered app for creating realistic nude photos

AI Clothes Remover
Online AI tool for removing clothes from photos.

Clothoff.io
AI clothes remover

Video Face Swap
Swap faces in any video effortlessly with our completely free AI face swap tool!

Hot Article

Hot Tools

Notepad++7.3.1
Easy-to-use and free code editor

SublimeText3 Chinese version
Chinese version, very easy to use

Zend Studio 13.0.1
Powerful PHP integrated development environment

Dreamweaver CS6
Visual web development tools

SublimeText3 Mac version
God-level code editing software (SublimeText3)
 Object-Relational Mapping (ORM) Performance Tuning in PHP
Jul 29, 2025 am 05:00 AM
Avoid N 1 query problems, reduce the number of database queries by loading associated data in advance; 2. Select only the required fields to avoid loading complete entities to save memory and bandwidth; 3. Use cache strategies reasonably, such as Doctrine's secondary cache or Redis cache high-frequency query results; 4. Optimize the entity life cycle and call clear() regularly to free up memory to prevent memory overflow; 5. Ensure that the database index exists and analyze the generated SQL statements to avoid inefficient queries; 6. Disable automatic change tracking in scenarios where changes are not required, and use arrays or lightweight modes to improve performance. Correct use of ORM requires combining SQL monitoring, caching, batch processing and appropriate optimization to ensure application performance while maintaining development efficiency.
 VSCode settings.json location
Aug 01, 2025 am 06:12 AM
The settings.json file is located in the user-level or workspace-level path and is used to customize VSCode settings. 1. User-level path: Windows is C:\Users\\AppData\Roaming\Code\User\settings.json, macOS is /Users//Library/ApplicationSupport/Code/User/settings.json, Linux is /home//.config/Code/User/settings.json; 2. Workspace-level path: .vscode/settings in the project root directory
 Building Immutable Objects in PHP with Readonly Properties
Jul 30, 2025 am 05:40 AM
ReadonlypropertiesinPHP8.2canonlybeassignedonceintheconstructororatdeclarationandcannotbemodifiedafterward,enforcingimmutabilityatthelanguagelevel.2.Toachievedeepimmutability,wrapmutabletypeslikearraysinArrayObjectorusecustomimmutablecollectionssucha
 How to implement a referral system in Laravel?
Aug 02, 2025 am 06:55 AM
Create referrals table to record recommendation relationships, including referrals, referrals, recommendation codes and usage time; 2. Define belongsToMany and hasMany relationships in the User model to manage recommendation data; 3. Generate a unique recommendation code when registering (can be implemented through model events); 4. Capture the recommendation code by querying parameters during registration, establish a recommendation relationship after verification and prevent self-recommendation; 5. Trigger the reward mechanism when recommended users complete the specified behavior (subscription order); 6. Generate shareable recommendation links, and use Laravel signature URLs to enhance security; 7. Display recommendation statistics on the dashboard, such as the total number of recommendations and converted numbers; it is necessary to ensure database constraints, sessions or cookies are persisted,
 css dark mode toggle example
Jul 30, 2025 am 05:28 AM
First, use JavaScript to obtain the user system preferences and locally stored theme settings, and initialize the page theme; 1. The HTML structure contains a button to trigger topic switching; 2. CSS uses: root to define bright theme variables, .dark-mode class defines dark theme variables, and applies these variables through var(); 3. JavaScript detects prefers-color-scheme and reads localStorage to determine the initial theme; 4. Switch the dark-mode class on the html element when clicking the button, and saves the current state to localStorage; 5. All color changes are accompanied by 0.3 seconds transition animation to enhance the user
 Java Performance Optimization and Profiling Techniques
Jul 31, 2025 am 03:58 AM
Use performance analysis tools to locate bottlenecks, use VisualVM or JProfiler in the development and testing stage, and give priority to Async-Profiler in the production environment; 2. Reduce object creation, reuse objects, use StringBuilder to replace string splicing, and select appropriate GC strategies; 3. Optimize collection usage, select and preset initial capacity according to the scene; 4. Optimize concurrency, use concurrent collections, reduce lock granularity, and set thread pool reasonably; 5. Tune JVM parameters, set reasonable heap size and low-latency garbage collector and enable GC logs; 6. Avoid reflection at the code level, replace wrapper classes with basic types, delay initialization, and use final and static; 7. Continuous performance testing and monitoring, combined with JMH
 How to build a REST API with Laravel?
Jul 30, 2025 am 03:41 AM
Create a new Laravel project and start the service; 2. Generate the model, migration and controller and run the migration; 3. Define the RESTful route in routes/api.php; 4. Implement the addition, deletion, modification and query method in PostController and return the JSON response; 5. Use Postman or curl to test the API function; 6. Optionally add API authentication through Sanctum; finally obtain a clear structure, complete and extensible LaravelRESTAPI, suitable for practical applications.
 What is Eloquent ORM in Laravel?
Jul 29, 2025 am 03:50 AM
EloquentORM is Laravel's built-in object relational mapping system. It operates the database through PHP syntax instead of native SQL, making the code more concise and easy to maintain; 1. Each data table corresponds to a model class, and each record exists as a model instance; 2. Adopt active record mode, and the model instance can be saved or updated by itself; 3. Support batch assignment, and the $fillable attribute needs to be defined in the model to ensure security; 4. Provide strong relationship support, such as one-to-one, one-to-many, many-to-many, etc., and you can access the associated data through method calls; 5. Integrated query constructor, where, orderBy and other methods can be called chained to build queries; 6. Support accessors and modifiers, which can format the number when obtaining or setting attributes.


