


Photoshop Beta is suitable for tasting new features and testing new features, but the official version is more suitable for daily use. 1. The installation requires the Creative Cloud application, log in to the Adobe account and have a valid subscription; 2. The beta version contains experimental AI functions such as generator fill and object highlighting tools, but may be unstable; 3. Avoid handling important projects when using them, backup files regularly, and actively feedback problems; 4. The Beta update frequency is monthly or bimonthly, which is not suitable as the main design tool.

It is actually not difficult to use Photoshop Beta. The key is to know the difference between it and the official version and how to avoid being trapped. The beta version is mainly used by Adobe to test new features, and is suitable for people who like to try out new things and are willing to feedback questions. If you are just editing pictures on a daily basis or doing design work, it is recommended to use the official version to be more secure.

The following parts are the key things you need to know before getting started with Photoshop Beta:

Installation and login methods
Photoshop Beta is installed through the Creative Cloud app and is not downloaded separately. After opening the CC desktop program, find Photoshop in the "Applications" page, click the drop-down menu to select "Beta Version" to install.
- Requires an Adobe account to log in
- A valid Photoshop subscription is required (even if it is a trial)
- Beta and official version can coexist and will not overwrite each other
After the installation is completed, you will be prompted when starting, and you may encounter some unstable or lack of functions. Be mentally prepared.

Where to find new features?
Each Photoshop Beta update will bring some experimental features, some of which are AI-related tools, such as generative fill, intelligent selection expansion, etc. These features usually add a "Beta" tab to the menu bar or side tool.
For example:
- "Generated Fill" can be found in the right-click menu. Entering a text description can allow the AI to complete the image
- "Object Highlighting Tool" can be automatically recognized and selected by clicking on objects in the screen
These functions may not be stable, and sometimes the results may not meet expectations and may even crash directly. But if you want to experience the features that may be launched in the future in advance, this is indeed the fastest way.
Notes on using
Although Beta is attractive, there are several points to note:
- Do not use beta to deal with important projects : Because the version is unstable, file corruption or functional abnormalities may occur.
- Regularly backup PSD files : It is best to save a copy in the official version just in case.
- Timely feedback issues : Adobe provides a feedback portal. If you encounter a bug, you can submit it to help them improve.
In addition, Photoshop Beta is not updated every month, usually once a month or once a month or two, depending on the development progress.
Let's summarize
Overall, Photoshop Beta is more like a "tasting platform" suitable for designers and technology enthusiasts to explore new features rather than daily main tools. If you just want to try AI tools occasionally, you can also install them to play. Basically, that's not too complicated, but don't expect it to be completely stable.
The above is the detailed content of How to use Photoshop beta. For more information, please follow other related articles on the PHP Chinese website!

Hot AI Tools

Undress AI Tool
Undress images for free

Undresser.AI Undress
AI-powered app for creating realistic nude photos

AI Clothes Remover
Online AI tool for removing clothes from photos.

Clothoff.io
AI clothes remover

Video Face Swap
Swap faces in any video effortlessly with our completely free AI face swap tool!

Hot Article
Hot Tools

Notepad++7.3.1
Easy-to-use and free code editor

SublimeText3 Chinese version
Chinese version, very easy to use

Zend Studio 13.0.1
Powerful PHP integrated development environment

Dreamweaver CS6
Visual web development tools

SublimeText3 Mac version
God-level code editing software (SublimeText3)
Hot Topics


 Samsung Galaxy Buds Pro Bluetooth headset pairing guide and usage tutorial
Dec 30, 2023 pm 03:44 PM
Samsung Galaxy Buds Pro Bluetooth headset pairing guide and usage tutorial
Dec 30, 2023 pm 03:44 PM
Samsung's Galaxy Buds series of headphones are uniquely designed and ergonomically designed, making them very comfortable to wear. In addition to being comfortable to wear, Samsung Buds series headphones also provide excellent sound quality experience, which has attracted many users. Next, we will introduce to you the usage tutorial of Samsung Buds headphones, especially the pairing process of Samsung Galaxy Buds Pro Bluetooth headphones and mobile phones. How to pair Samsung Galaxy Buds Pro Bluetooth headsets. Pairing with Samsung Buds headsets is very simple. Just follow the steps below to complete the pairing. The first step is to turn on the Bluetooth function of the phone. You can find the Bluetooth setting option in the settings interface of your phone. Step 2: Place GalaxyBu
 How to use Aisi Assistant-Aisi Assistant usage tutorial
Mar 06, 2024 pm 12:10 PM
How to use Aisi Assistant-Aisi Assistant usage tutorial
Mar 06, 2024 pm 12:10 PM
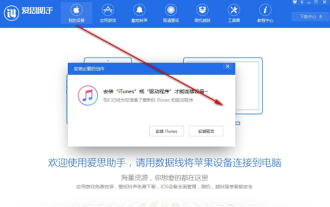
Many novice friends still don’t know how to use Aisi Assistant, so the editor below has brought a tutorial on how to use Aisi Assistant. Friends who need it can quickly take a look. 1. Operation interface, check whether necessary components are installed (as shown in the figure below); 2. My device window, read the relevant description information (as shown in the figure below); 3. If the link cannot be made, according to Instructions for related operations (as shown in the figure below); 4. Use the game window to quickly complete the experience of related popular games (as shown in the figure below); 5. Download and select the various ringtones you need to use (as shown in the figure below) shown); 6. Quickly download various high-definition wallpapers (as shown in the figure below); 7. Support the function of rooting and jailbreaking (as shown in the figure below). above
 How to use exescope? Detailed usage tutorial
Mar 13, 2024 pm 10:40 PM
How to use exescope? Detailed usage tutorial
Mar 13, 2024 pm 10:40 PM
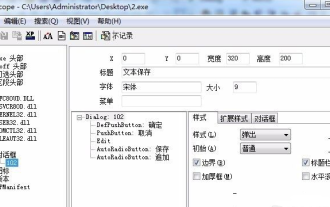
exescope is a powerful program resource editing tool that can easily convert the English version of the software into the Chinese version. So how to use the newly downloaded exescope? If you are also a novice user, come and take a look at the detailed tutorial below. Exescope usage tutorial 1. Open eXeScope, click on the file in the upper left corner, click [Open] in the pop-up options, and select the file you want to open. 2. After opening the software, you can see many controls. 3. You can directly modify the size, position, and content of each control by inputting data, or you can directly click on the dialog box editor above and directly drag the controls on the program interface. After adjusting the controls, click [Save].
 How to use Thunder magnet link - Tutorial on using Thunder magnet link
Mar 05, 2024 pm 05:22 PM
How to use Thunder magnet link - Tutorial on using Thunder magnet link
Mar 05, 2024 pm 05:22 PM
Recently, many friends have asked the editor how to use Thunder Magnet Links. Next, let us learn the tutorial on using Thunder Magnet Links. I hope it can help everyone. Step 1: First, we open the installed Thunder and click the New button, as shown in the picture. Step 2: Then find a magnet link on the Internet, copy and paste it to the location shown in the picture below, and click OK, as shown in the picture. Step 3: The detailed download directory of the resource pops up. We check the resource to be downloaded, select the storage directory, and click Download Now, as shown in the figure. Step 4: Finally, we wait for the resources to download, as shown in the picture. The above is all the content on how to use Thunder magnet links brought to you by the editor. I hope it can be helpful to everyone.
 How to use Sunflower remote control software-Sunflower remote control software usage tutorial
Mar 04, 2024 pm 10:20 PM
How to use Sunflower remote control software-Sunflower remote control software usage tutorial
Mar 04, 2024 pm 10:20 PM
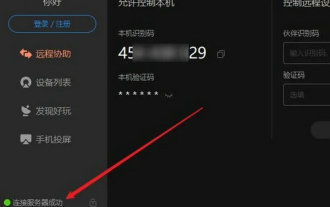
Nowadays, many friends will use the Sunflower remote control software, but many friends still don’t know how to use the Sunflower remote control software. Today, I will introduce in detail all the tutorials on how to use the Sunflower remote control software. I hope it can help everyone. Step 1: First open the Sunflower remote control software and ensure that the software successfully connects to the server (as shown in the picture). Step 2: Then enter the remote Sunflower identification code (as shown in the picture). Step 3: You can directly enter the remote verification code for unattended remote connection, or click to confirm the connection through the remote terminal without verification code (as shown in the figure). Step 4: Then click "Remote Connection", and the desktop control will start to connect to the remote desktop (as shown in the picture). Step 5: After the connection is completed, the system automatically enters the desktop environment of the remote computer.
 Little black box usage tutorial
Feb 23, 2024 pm 05:10 PM
Little black box usage tutorial
Feb 23, 2024 pm 05:10 PM
Little Black Box is a very easy to use game platform, so how to use this software specifically? Users will encounter many problems when using this software and have different solutions. This tutorial summary of the multi-functional use of the small black box will tell you how to use it. The following is a detailed introduction, so take a look! Tutorial on using Little Black Box [2024-01-31] ??How to redeem the cdkey purchased from Little Black Box [2024-01-31] ??How to store games purchased from Little Black Box into Steam [2024-01-31] ??The CDkey purchased from Little Black Box can be returned Payment?
 Tutorial for using Shuqi Novel
Mar 14, 2024 am 08:28 AM
Tutorial for using Shuqi Novel
Mar 14, 2024 am 08:28 AM
Shuqi Novel is a tool with rich book resources that can be read for free. Most users do not know how to use the functions and tools in Shuqi Novel. The most detailed software usage tutorials will be compiled below. Next, the editor will bring users A summary of the multi-functional tutorials for Shuqi Novel. Interested users can come and take a look! Shuqi Novel usage tutorial [2024-03-13] Where are the bookmarks of Shuqi Novel [2024-03-13] How to turn off automatic renewal of Shuqi Novel membership [2024-03-13] Where can I get the VIP of Shuqi Novel [2024 -03-13] Where to read the id of Shuqi’s novel [2024-03-13] Where to enter the invitation code of Shuqi’s novel [2024-03-13] How to listen to Shuqi’s novel
 How to use ons simulator - ons simulator usage tutorial
Mar 04, 2024 pm 01:10 PM
How to use ons simulator - ons simulator usage tutorial
Mar 04, 2024 pm 01:10 PM
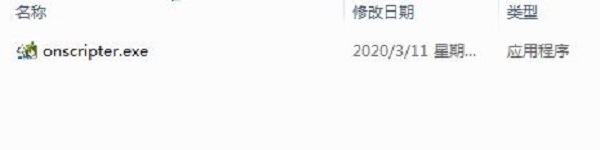
Recently, many friends have asked me how to use the ons simulator. Next, let us learn the tutorial on how to use the ons simulator. I hope it can help everyone. Step 1: First download the onscripter tool as shown below. Step 2: Then download the ons emulator game. Step 3: Then drag the simulator onscripter.exe file you just downloaded directly into the game directory and double-click onscripter.exe to open it. Step 4: Just run the game directly. The above is all the content on how to use the ons simulator brought by the editor. I hope it can be helpful to everyone.
