


There are three ways to update Windows 10 drivers: 1. Use Device Manager to manually update, right-click the device and select "Update Driver", and you can automatically search or specify local files; 2. Visit the official website of hardware manufacturers such as Intel, NVIDIA, AMD or brand official website to download the latest drivers and install them through Device Manager; 3. Use third-party tools such as Driver Booster and Driver Easy to automatically scan and update, which is suitable for beginners but need to pay attention to software evaluation and system backup.

Updating drivers is an important operation to keep Windows 10 systems running smoothly, especially when encountering hardware problems or performance degradation. In fact, the update driver is not complicated, but many people don’t know where to start.
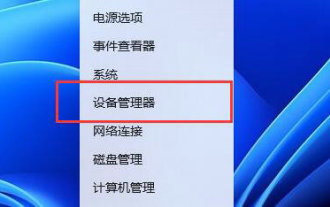
Manual update drivers using Device Manager
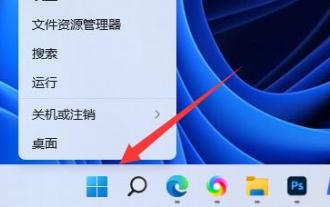
The "Device Manager" that comes with Windows is the most direct tool. Open method: Right-click on the "Start Menu" and select "Device Manager". Find the hardware category you want to update (such as display adapter, network adapter, etc.), right-click the corresponding device, and select "Update Driver".
You can choose:
- Automatically search for updated drivers - the system will search and install the latest version online
- Browse the computer to find the driver - If you have downloaded the driver file, you can use this option to specify the path to install it
This method is suitable for people who have a certain understanding of the hardware, or when you know there is something wrong with a specific device.
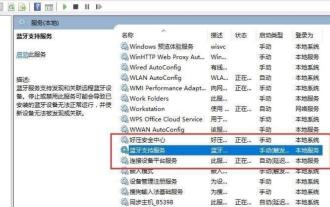
Download and install the latest drivers through the official website
Sometimes the drivers included in the system may not be the latest, especially for devices such as graphics cards and sound cards that require high performance. At this time, you can go to the official website of the hardware manufacturer to download the latest version of the driver.
Common brand official websites such as:
- Intel Driver Support Page
- NVIDIA driver download
- AMD Graphics Driver Center
- Driver support pages for brands such as Dell, Lenovo, and Asus
After entering the official website, you generally need to enter the device model or automatically identify the hardware, and then download the driver package of the corresponding system. After decompression, it can be installed through the Device Manager "Browse".
Use third-party driver update tools
If you don’t want to check models and drivers one by one, you can also use some third-party driver update software, such as Driver Booster, Driver Easy, Snappy Driver Installer, etc. These tools will automatically scan for expired drivers in the system and provide one-click download and installation functions.
However, it is important to note:
- Some software free versions may bundle other programs
- It is recommended to back up the system or create a restore point before use
- It is best to check user reviews before update to avoid accidentally installing incompatible drivers.
Although convenient, this method is more suitable for novice users who are not very familiar with computer operations.
Basically these are the methods. Is it difficult to update the driver? The key is to choose the right method and just don’t install the driver randomly.
The above is the detailed content of How to update drivers on Windows 10?. For more information, please follow other related articles on the PHP Chinese website!

Hot AI Tools

Undress AI Tool
Undress images for free

Undresser.AI Undress
AI-powered app for creating realistic nude photos

AI Clothes Remover
Online AI tool for removing clothes from photos.

Clothoff.io
AI clothes remover

Video Face Swap
Swap faces in any video effortlessly with our completely free AI face swap tool!

Hot Article
Hot Tools

Notepad++7.3.1
Easy-to-use and free code editor

SublimeText3 Chinese version
Chinese version, very easy to use

Zend Studio 13.0.1
Powerful PHP integrated development environment

Dreamweaver CS6
Visual web development tools

SublimeText3 Mac version
God-level code editing software (SublimeText3)
Hot Topics


 Hyperx headset microphone has no sound
Feb 16, 2024 am 09:12 AM
Hyperx headset microphone has no sound
Feb 16, 2024 am 09:12 AM
The quality of hyperx headphones has always been very good, but some users find that the microphone of the headphones has no sound when using it. There are many possible reasons for this situation. Here are some of them. Several kinds. There is no sound from the hyperx headset microphone. 1. Connect and check whether the microphone is fully inserted into the headphone jack. You can try plugging and unplugging it a few times. 2. If other equipment conditions permit, you can plug the headset into other normally operating equipment to see if it can be used normally and whether the audio link is normal. 3. Audio settings Check the audio settings to make sure that the speakers and microphone are enabled normally and not muted or at a low volume. 4. To disable the software, you can try disabling the audio adapter.
 How to solve win11 memory leak. Analysis of the causes of win11 memory leak and various solutions.
Feb 29, 2024 am 09:58 AM
How to solve win11 memory leak. Analysis of the causes of win11 memory leak and various solutions.
Feb 29, 2024 am 09:58 AM
Recently, many friends who use win11 system have found that the memory occupied by their computer desktop window is very large, and there are also serious memory leaks, which will cause other programs to run unsmoothly. To address this problem, we should How can users solve it? We open the control panel of the computer, click to select the function of the power button, and uncheck the enable fast startup option. Restarting the computer will solve the problem. There may also be a problem with the graphics card driver. Just re-download the driver. . Causes of memory leaks: Memory leaks are caused by misaligned resources in a computer program due to incorrect memory allocation. This happens when unused RAM locations are still not freed. Do not confuse memory leaks with space leaks or memory leaks
 How to enter bios on Onda b460 motherboard?
Feb 17, 2024 pm 03:33 PM
How to enter bios on Onda b460 motherboard?
Feb 17, 2024 pm 03:33 PM
How to enter bios on Onda b460 motherboard? 1) Turn on the computer and press the Del key to enter the BIOS setup interface, select Advanced BIOS settings AdvancedBIOSFeatures; 2) Advanced BIOS setup (AdvancedBIOSFeatures) interface, first select the hard disk boot priority: HardDiskBootPriority; 3) In the first boot device (FirstBootDevice), there For U disk options such as USB-ZIP and USB-HDD, you can either select "HardDisk" or "USB-HDD" to start the computer. After selecting, press F10 to save and press ESC to exit.
 How to solve the missing battery icon in win11? How to restore the battery icon missing in win11
Mar 07, 2024 am 10:25 AM
How to solve the missing battery icon in win11? How to restore the battery icon missing in win11
Mar 07, 2024 am 10:25 AM
Many users have upgraded their operating systems to win11, but many users have found that their battery icons are missing after the upgrade. So what is going on? Users can directly click Device Manager under the Start menu, then select Battery to set up. Let this website carefully introduce to users how to recover the lost battery icon in Win11. How to restore the battery icon missing in win11 Method 1. Right-click the bottom start menu. 3. After opening, find the battery and double-click to open it. 4. Then enter the driver, disable the device and then re-enable it. Method 2 1. If it still doesn’t work, you can right-click the start menu and open settings. 3. Then enter the taskbar to hide it
 What should I do if my win11 keyboard fails and I can't type? Solution to Win11 keyboard failure and unable to type
Mar 16, 2024 pm 12:40 PM
What should I do if my win11 keyboard fails and I can't type? Solution to Win11 keyboard failure and unable to type
Mar 16, 2024 pm 12:40 PM
What should I do if my win11 keyboard fails and I can’t type? When we use win11 system, we will find that the keyboard fails and cannot be operated. So what should users do if they encounter this kind of thing? Users can directly find the management under this computer, and then click the keyboard under the device manager to operate. Let this website carefully introduce to users the solutions to the problem of Win11 keyboard failure and unable to type. Solution to Win11 keyboard failure and unable to type: 1. After turning on the computer, find "This PC" on the desktop, right-click and select "Manage". 2. After entering the management page, click "Device Manager" on the left and find the
 How to check nvidia graphics card driver version
Feb 24, 2024 pm 07:13 PM
How to check nvidia graphics card driver version
Feb 24, 2024 pm 07:13 PM
How to check if there is an nvidia graphics card driver on your computer. Turn on your computer, right-click "This PC" on the desktop, and then click "Manage". Click "Device Manager" as shown below. Click "Display Devices." Right-click the name of the graphics card and select Properties. How to check the graphics card driver installed on your computer: Enter the My Computer interface and right-click "This Computer". Click "Properties" at the bottom of the pop-up list. Click "Device Manager" at the bottom of the control panel homepage to enter the device manager interface. Step 1: Find and right-click the "Computer" icon on the desktop, select "Properties" and click Open. Step 2: Click on the first "Device Manager" and open it. Step 3: Find and click the small icon in front of "Display Adapter"
 What should I do if win11 Bluetooth cannot connect? Analysis of the problem that win11 Bluetooth cannot connect and can only pair
Mar 16, 2024 pm 06:30 PM
What should I do if win11 Bluetooth cannot connect? Analysis of the problem that win11 Bluetooth cannot connect and can only pair
Mar 16, 2024 pm 06:30 PM
When we use the computer, we will find that win11 cannot connect to Bluetooth. So what should we do if win11 cannot connect to Bluetooth? Users can turn on the Bluetooth support service option or enter the network adapter under the device manager to operate. Let this site carefully introduce to users the analysis of the problem that Win11 Bluetooth cannot connect and can only pair. Win11 Bluetooth cannot connect and can only pair. Step 1: 1. Run (Win R), enter the [services.msc] command, and press [OK or Enter] to quickly open the service. 2. In the service window, find the name [Bluetooth Support Service]. 3. Double-click to open [Bluetooth Support Service], if the service status is stopped
 What should I do if the battery icon in Windows 11 does not show the plug? Analysis of the problem that the battery icon does not show the plug in win11
Mar 17, 2024 am 08:01 AM
What should I do if the battery icon in Windows 11 does not show the plug? Analysis of the problem that the battery icon does not show the plug in win11
Mar 17, 2024 am 08:01 AM
What should I do if the battery icon in Windows 11 does not show the plug? In fact, the method is very simple. Users can directly click on the Device Manager under the Start menu, and then find the driver under Battery to operate, or click on Settings under Personalization to operate. Let this site carefully introduce to users the analysis of the problem that the battery icon does not display the plug in Win11. Solution 1 for the problem of win11 battery icon not showing the plug: 1. Right-click the "Start Menu" at the bottom. 2. Open "Device Manager" in the right-click menu. 3. After opening, find "Battery" and double-click to open it. 4. Then enter “Driver&
