


Changing the DNS server can improve the Internet speed or solve network problems. The steps are as follows: 1. Enter the network adapter settings in the control panel, find the currently used network connection and right-click to select "Properties"; 2. Click "Properties" in "Internet Protocol Version 4 (TCP/IPv4)" and select "Use the DNS server address below"; 3. Fill in the preferred and alternate DNS addresses, such as 8.8.8.8 and 8.8.4.4, and take effect immediately after saving; 4. Enter ipconfig /all through the command prompt to check whether the settings are successful, and you can verify the effect through the speed test website. The whole process is simple and fast, suitable for optimizing the network experience.

Changing a DNS server is actually not difficult, mainly to improve the Internet speed or solve certain network problems. It is not complicated to operate on Windows 10. The key is to find the correct setting location and fill in the DNS address correctly.
Find Network Adapter Settings
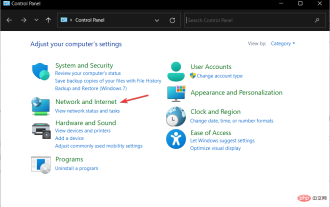
First you need to enter the network adapter settings in the control panel. You can search for "Network and Sharing Center" through the Start menu and click "Change Adapter Settings" on the left. Here are the network connections you are currently using, such as Ethernet or Wi-Fi.
Right-click the connection you are using now (such as "Ethernet" or "Wi-Fi") and select "Properties". Next, find "Internet Protocol Version 4 (TCP/IPv4)" in the pop-up window and click the "Properties" button.
Setting up a custom DNS address
At this time, the IPv4 settings window will be opened, and the default may be "Automatically obtain the DNS server address". If you want to set it manually, select "Use the DNS server address below".

- Preferred DNS server: Fill in the primary DNS address you want to use, such as Google's
8.8.8.8or Cloudflare's1.1.1.1 - Alternate DNS server: You can leave blank or fill in another alternate address, such as
8.8.4.4
After confirming, determine the save settings all the way. This process will not affect your network connection, but the new DNS will take effect immediately.
Check whether it is effective
After the modification, you can open the command prompt (CMD) and enter:
ipconfig /all
Check whether the "DNS Server" column displays the address you just set. If you see the preferred DNS you fill in, it means that you have succeeded.
In addition, you can also check if it is a little faster than before by visiting some speed test sites. Different DNSs may have different resolution speeds for different websites, so sometimes you need to try a few more addresses to find the one that suits you best.
Basically all that is it, the whole process can be completed in a few minutes. Although changing DNS is not something you have to do every day, it is indeed a practical trick when the network is unstable or you want to optimize the experience.
The above is the detailed content of How to change the DNS server on Windows 10?. For more information, please follow other related articles on the PHP Chinese website!

Hot AI Tools

Undress AI Tool
Undress images for free

Undresser.AI Undress
AI-powered app for creating realistic nude photos

AI Clothes Remover
Online AI tool for removing clothes from photos.

Clothoff.io
AI clothes remover

Video Face Swap
Swap faces in any video effortlessly with our completely free AI face swap tool!

Hot Article
Hot Tools

Notepad++7.3.1
Easy-to-use and free code editor

SublimeText3 Chinese version
Chinese version, very easy to use

Zend Studio 13.0.1
Powerful PHP integrated development environment

Dreamweaver CS6
Visual web development tools

SublimeText3 Mac version
God-level code editing software (SublimeText3)
Hot Topics


 How to solve win11 DNS server error
Jan 10, 2024 pm 09:02 PM
How to solve win11 DNS server error
Jan 10, 2024 pm 09:02 PM
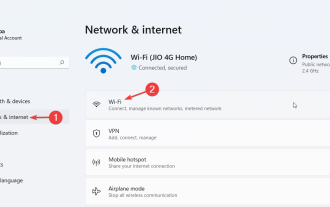
We need to use the correct DNS when connecting to the Internet to access the Internet. In the same way, if we use the wrong dns settings, it will prompt a dns server error. At this time, we can try to solve the problem by selecting to automatically obtain dns in the network settings. Let’s take a look at the specific solutions. How to solve win11 network dns server error. Method 1: Reset DNS 1. First, click Start in the taskbar to enter, find and click the "Settings" icon button. 2. Then click the "Network & Internet" option command in the left column. 3. Then find the "Ethernet" option on the right and click to enter. 4. After that, click "Edit" in the DNS server assignment, and finally set DNS to "Automatic (D
 How to fix Xbox Series S/X download speeds, reduced ping and lag
Apr 16, 2023 pm 04:49 PM
How to fix Xbox Series S/X download speeds, reduced ping and lag
Apr 16, 2023 pm 04:49 PM
Xbox consoles have improved dramatically over the years. Over the years, games have evolved with life-like features that gamers can't seem to get enough of. Playing your favorite games on Xbox can be a completely engrossing experience. However, sometimes using these advanced features, we end up with lag or ping issues if the internet speed is not that good. Sometimes we want games to download faster. Today, games like Forza Horizon 5 and Mortal Kombat require over 100GB of RAM. Downloading such games can take a long time if we don't have the right internet settings to help us. Method 1: Pass
 How to solve Steam error code 105 Unable to connect to server?
Apr 22, 2023 pm 10:16 PM
How to solve Steam error code 105 Unable to connect to server?
Apr 22, 2023 pm 10:16 PM
Steam is a popular game library. It allows its users to play games and download games to their Steam accounts. Since it is a cloud-based library, it allows users to use any computer and allows them to store many games within the limited computer memory. These features make it very popular among the gamer community. However, many gamers have reported seeing the following error code in their systems. Error code 105 - Unable to connect to server. Server may be offline error This error mainly occurs due to some issues in the connection. When you see this issue in your system, try the following general fixes and check if the issue is resolved. Restart your router. Restart your system. Still see a problem? Don't worry
 Fix: Windows 11 update error 0x80072ee7
Apr 14, 2023 pm 01:31 PM
Fix: Windows 11 update error 0x80072ee7
Apr 14, 2023 pm 01:31 PM
Certain Windows 11 updates may cause issues and larger builds that cause performance errors. For example, if you don’t fix update error 0x80072ee7, it might make your machine behave erratically. It triggers in different situations and fixing it depends on the reason behind the glitch. Sometimes, users report that this issue occurs when installing certain Windows updates. Browse without random security notifications and system errors. If this happens, your computer may have unwanted programs or malware. The reasons behind the errors vary, ranging from antivirus issues to other software interfering with Windows updates. How do Windows update errors occur? If 0x appears while browsing
 Why NameResolutionError(self.host, self, e) from e and how to solve it
Mar 01, 2024 pm 01:20 PM
Why NameResolutionError(self.host, self, e) from e and how to solve it
Mar 01, 2024 pm 01:20 PM
The reason for the error is NameResolutionError(self.host,self,e)frome, which is an exception type in the urllib3 library. The reason for this error is that DNS resolution failed, that is, the host name or IP address attempted to be resolved cannot be found. This may be caused by the entered URL address being incorrect or the DNS server being temporarily unavailable. How to solve this error There may be several ways to solve this error: Check whether the entered URL address is correct and make sure it is accessible Make sure the DNS server is available, you can try using the "ping" command on the command line to test whether the DNS server is available Try accessing the website using the IP address instead of the hostname if behind a proxy
 How to assign multiple IP addresses in one LAN card on Windows 10/11
May 30, 2023 am 11:25 AM
How to assign multiple IP addresses in one LAN card on Windows 10/11
May 30, 2023 am 11:25 AM
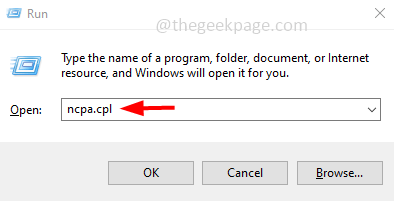
Sometimes it is necessary to assign multiple addresses to a single LAN card. For example, if you need to run multiple websites with unique IP addresses or bind applications to different IP addresses, etc. If you are thinking about how to assign multiple addresses to a single network interface card or LAN card, this article will help you achieve it. Follow the steps below till the end and it will be done. So let’s get started! Assign multiple IP addresses to one LAN card Step 1: Use the Windows+R keys together to open the run prompt and type ncpa.cpl, then press the Enter key to open the Network Connection window. Step 2: Right click on your network adapter Ethernet or WiFi option and click Properties. Step 3: From the Properties Window
 How to change DNS settings on Windows 11
May 01, 2023 pm 06:58 PM
How to change DNS settings on Windows 11
May 01, 2023 pm 06:58 PM
Your ISP is configured to provide a default Domain Name System (DNS) when setting up your Internet connection. This poses various security threats and slows down the internet, so DNS servers must be assigned manually. Browse this detailed guide to learn how to change DNS settings on your Windows 11 computer and protect your online presence. How to change DNS settings on Windows 11? 1. Using the Settings app Use the + shortcut to go to the Settings app. WindowsI select Network & Internet from the left sidebar, then Wi-Fi or Ethernet from the right, depending on your internet connection. Scroll down and select Hardware Properties. Find the DNS server assignment setting and click on it
 The requested control is invalid NET HELPMSG 2191: 2 simple fixes
Apr 15, 2023 am 09:13 AM
The requested control is invalid NET HELPMSG 2191: 2 simple fixes
Apr 15, 2023 am 09:13 AM
In the TCP/IP protocol suite, Domain Name System is one of the protocols that provides name resolution services for mapping computer names to IP addresses. However, sometimes it malfunctions, resulting in errors such as The requested control is not valid for this service NETHELPMSG2191. DNS clients and servers work together to provide computer name to IP address mapping name resolution services for computers and users. After installing Windows, client and server versions of the operating system have the client service enabled by default. Once you specify the server's IP address in your TCP/IP network configuration, the DNS client queries the server to discover domain controllers and resolve computer names to IP addresses. only in service
