
 System Tutorial
Windows Series
How to Control the Steam Deck or SteamOS from a Mac, Windows, or Linux PC
System Tutorial
Windows Series
How to Control the Steam Deck or SteamOS from a Mac, Windows, or Linux PC
How to Control the Steam Deck or SteamOS from a Mac, Windows, or Linux PC
Jun 21, 2025 am 06:03 AM
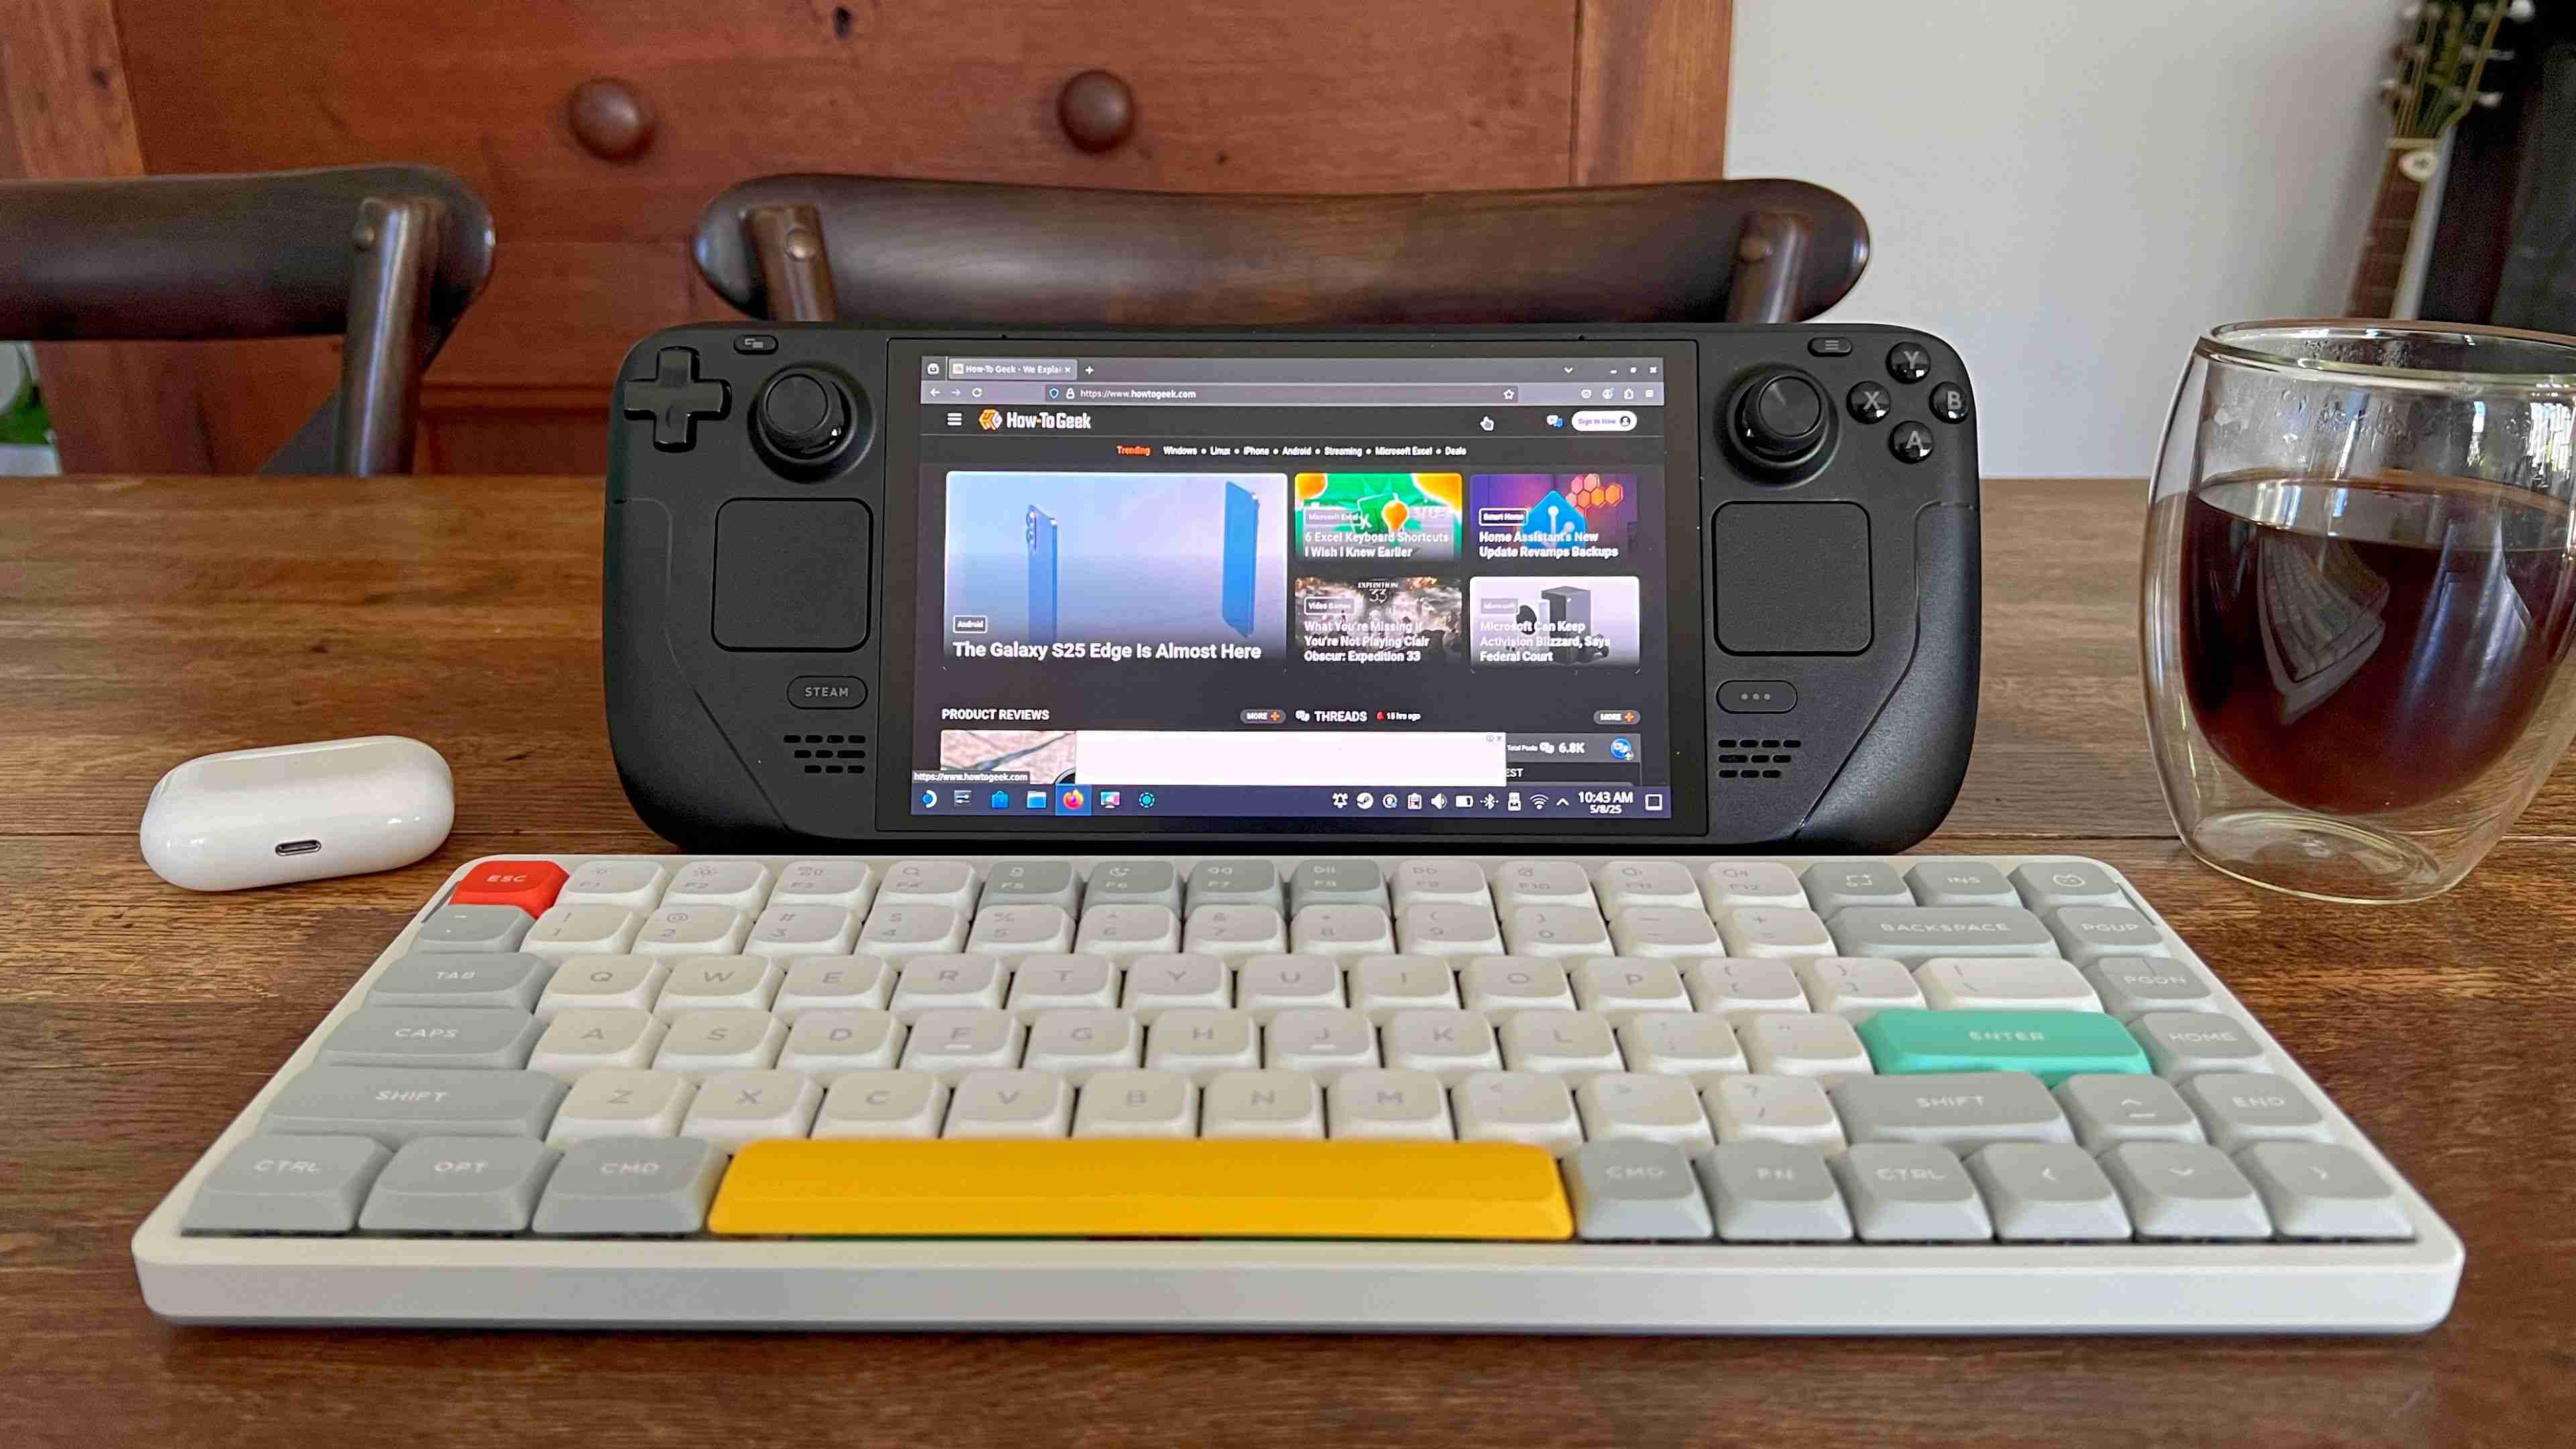
Control your Steam Deck with your Mac, Windows, or Linux PC to avoid using on-screen keyboards and tiny trackpads. Share a clipboard and seamlessly move from one screen to another, wirelessly and over the local network. It’s free and easy set up, here’s how.
How It Works and Why It’s Worth It
Your computer—whether it’s a MacBook running macOS, a Windows gaming machine, or a Linux tiny PC—already has a perfectly good set of peripherals attached. Even if you’re using a laptop, the built-in keyboard and trackpad might just be all you need.
The Steam Deck is primarily designed for use in Game Mode, a controller-friendly UI that makes it easy to browse the store, launch games, and access most basic settings. But the Steam Deck also has Desktop Mode, a fully-fledged Linux environment that’s necessary for advanced operations or for using your Steam Deck like a “real” computer.
 Related
 How to Use Your Steam Deck as a Linux PC
Your Steam Deck isn't just for playing games.
Though Desktop Mode is fully compatible with your Steam Deck’s built-in trackpads, joysticks, and face buttons out of the box; controlling it is far from pleasant. You can connect external pointing devices and keyboards to your Steam Deck, but what about the perfectly good peripherals you’ve already got sitting on your desk?
Normally, you could use a KVM (short for “kernel-based virtual machine”) to seamlessly switch between two or more operating systems on the fly. This technology is often built into monitors or built around a dedicated piece of hardware known as a KVM switch. Fortunately, there is a simpler way.
With a virtual KVM, you can add this functionality to your Windows, Mac, or Linux machines (including the Steam Deck). With one machine acting as the server (the “host” of your keyboard and mouse, if you will), you can nominate other machines up as client devices. When you move your pointer off one edge of the screen, it will magically appear on the other.
For Steam Deck users, this is great for almost any Desktop Mode operations. Even though I’ve had my Steam Deck OLED for more than six months and have spent a fair bit of time tweaking away in Desktop Mode, I’ve still not come to terms with the on-screen keyboard and floaty trackpad. It’s fine in a pinch, but to do things quickly and efficiently you can’t beat the real thing.
A virtual KVM is perfect for managing files with a real mouse, typing lengthy terminal commands into Konsole, using a web browser right on your Steam Deck to download things locally, or browsing the Discover store. Shortcuts for copy, paste, and select all work as you’d expect, and the Steam Deck has way more utility as a “real” computer when you use it with some “real” peripherals.
 Related
 10 Non-Steam Apps You Should Install on Your Steam Deck Right Away
Make your Steam Deck even better.
5You could realistically put your Steam Deck to use as an additional monitor on your desk and reap the benefits of it being a completely separate machine running on a heavily modified version of Arch Linux. I currently have mine propped up below my MacBook (which is on a laptop stand) so I can watch YouTube videos and live streams.
That said, I wouldn't use this solution for gaming due to the added latency. It’s not super-noticeable under regular desktop operations, but for responsive controls you should take a moment to connect or pair your mouse or keyboard directly instead.
Setting Up Your KVM Server
For this, we’ll be using the open-source virtual KVM app Input Leap. This project was once known as Barrier, but the previous project was retired in 2021. Both devices need to be sharing the same local network.
Releases are available for most major operating systems including Windows, Mac (with separate Apple silicon and Intel releases, plus a Universal release that does both), and binaries for Linux distros like Debian, Fedora, Ubuntu. You might also find it in other package managers (this will be useful later).
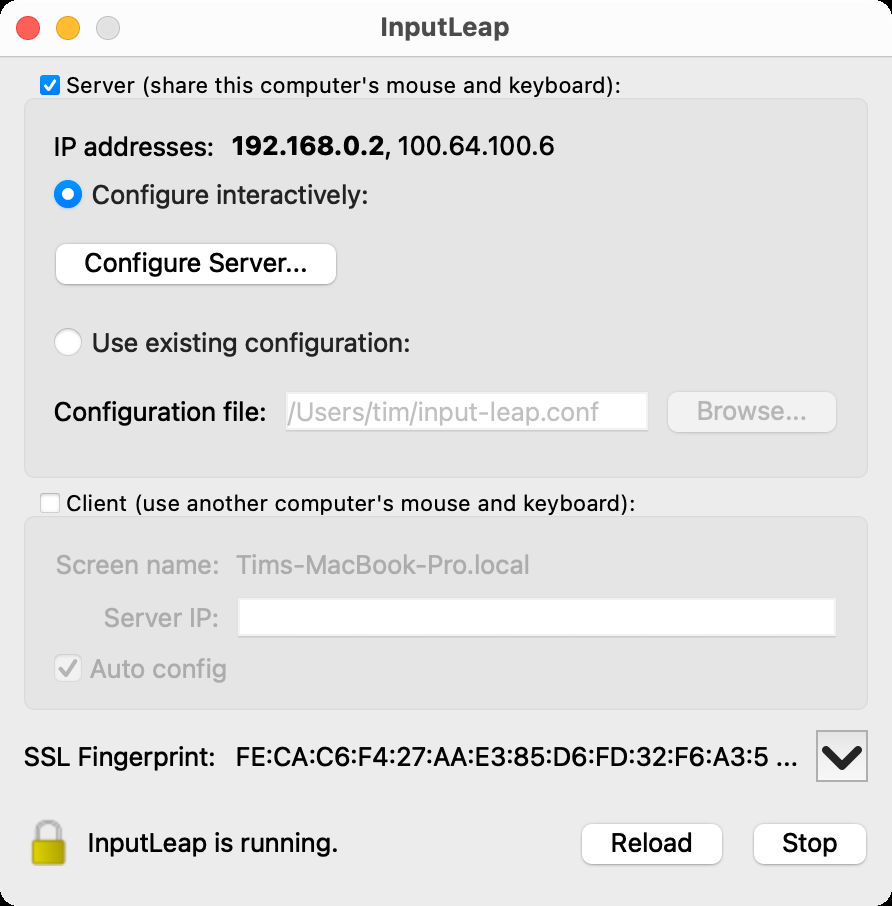
The first step is to download Input Leap on your server—the machine you’ll be using to control your clients. I’ll be using a Mac, but the general setup process should be almost identical save for Apple’s additional security safeguards.
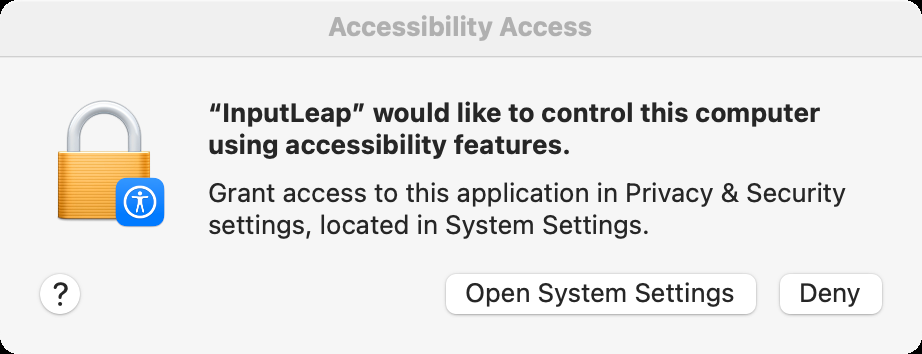
With the app downloaded, install it and run it. On my Mac, I had to visit System Preferences > Privacy & Security and then click “Open anyway” to get the app running as it’s not signed. With the app finally open, I approved the permission requests to control my Mac.
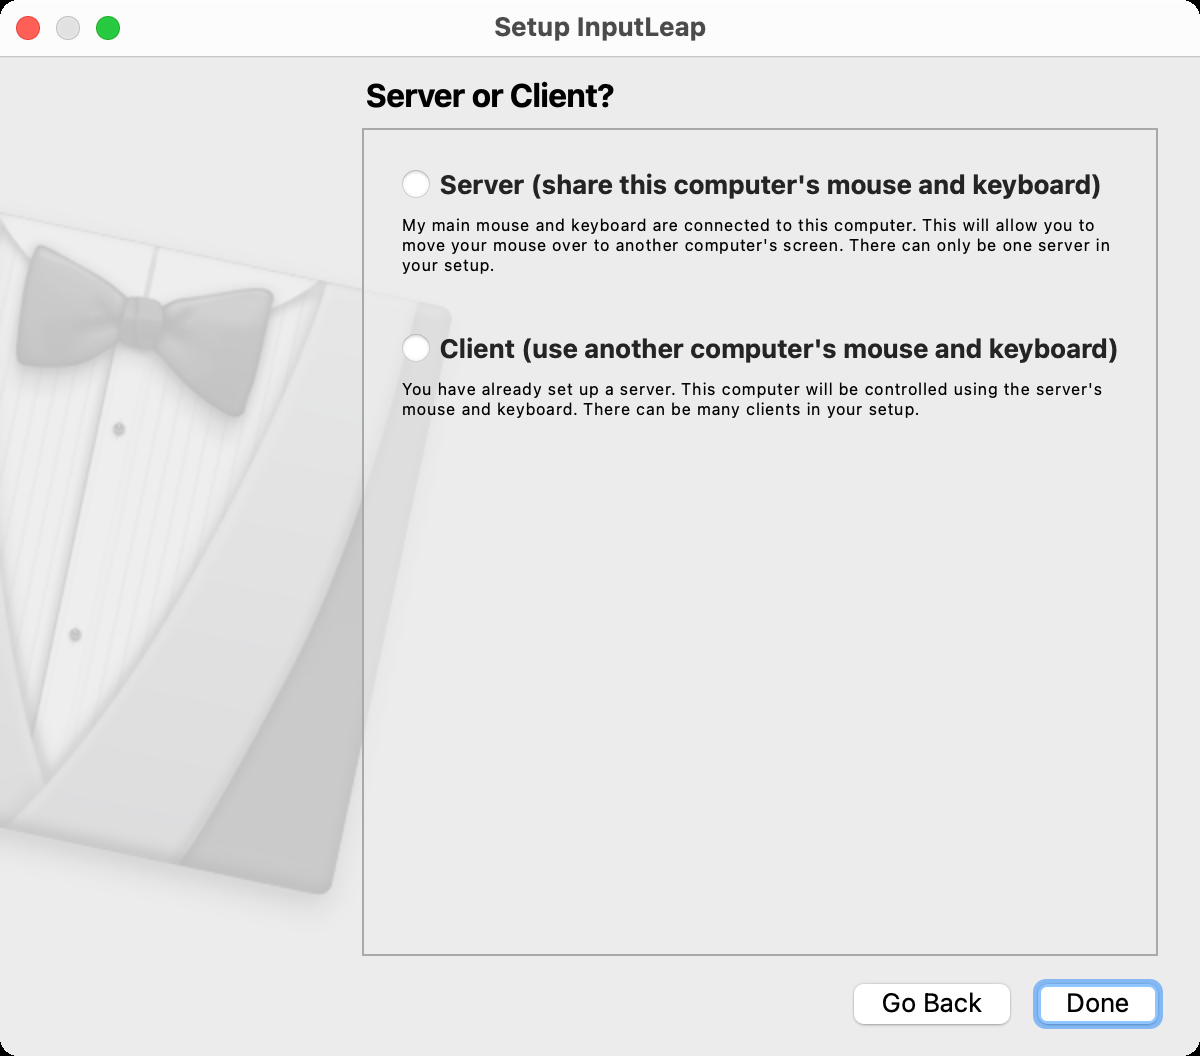
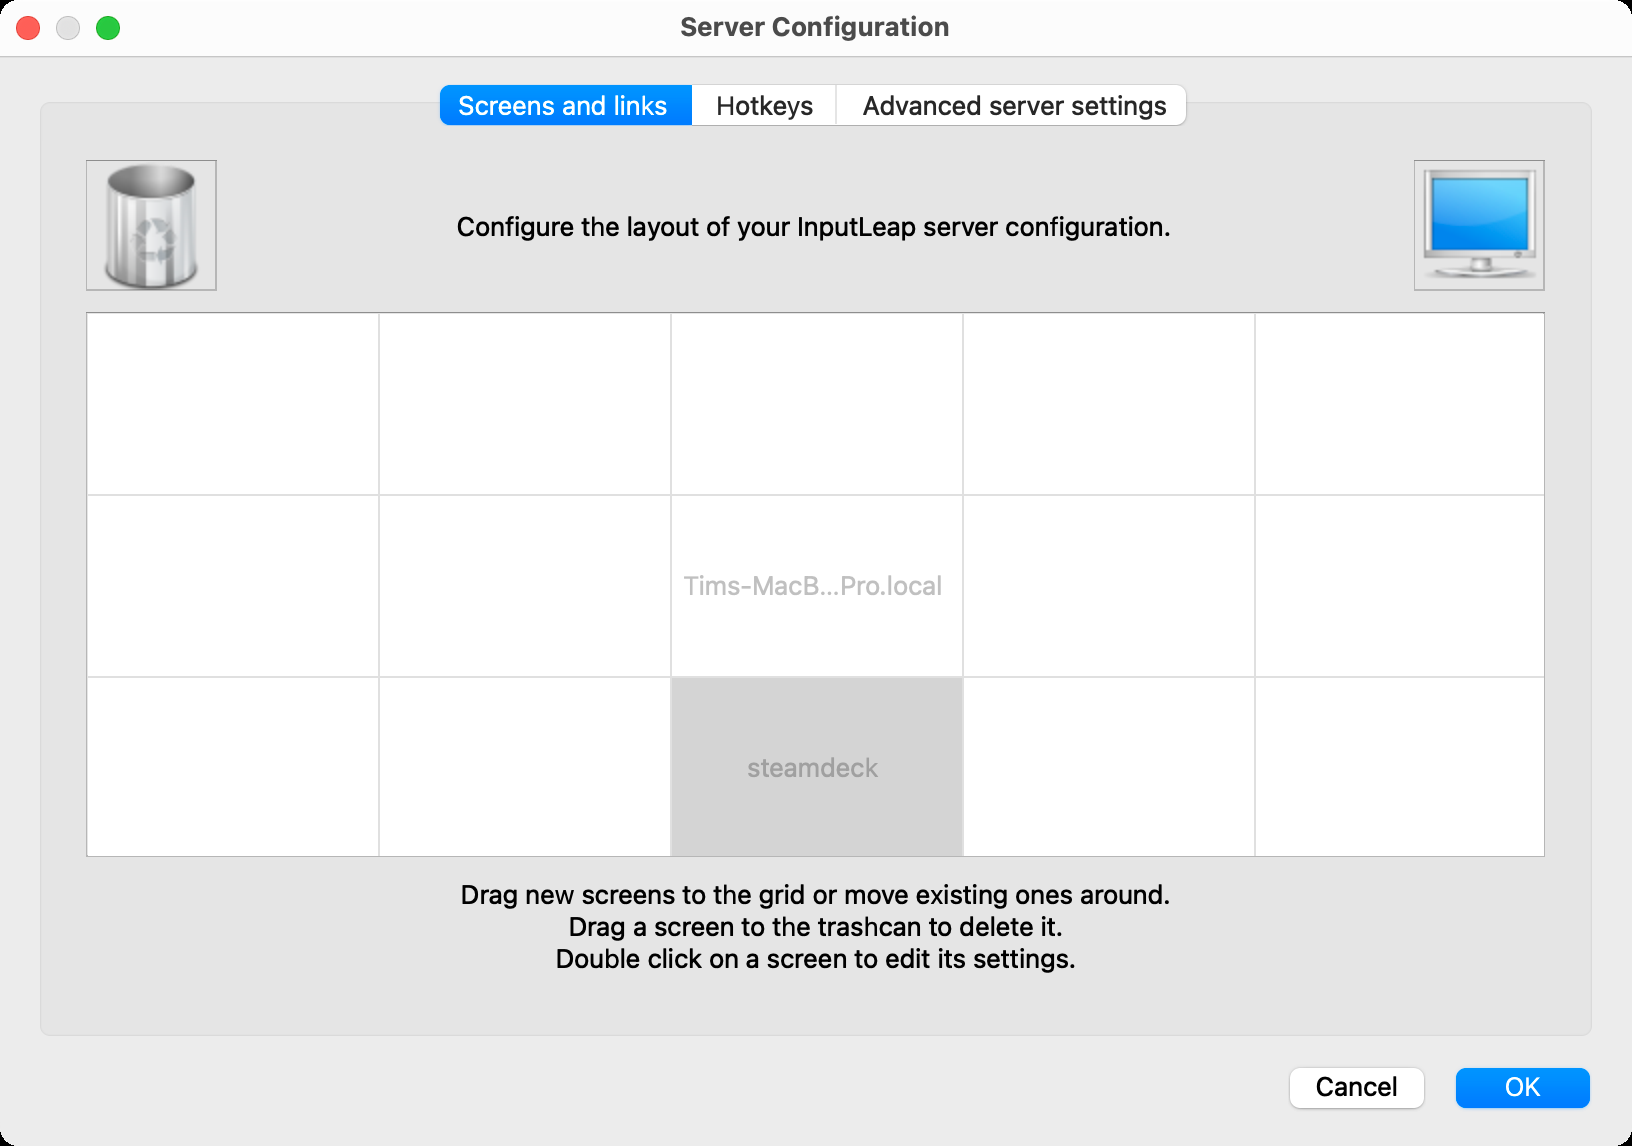
With the app finally open, there’s a brief setup wizard to run through. Nominate your computer as a server when prompted to do so, and then click “Configure Server” to see the “Screens and links” setup panel. This is where you configure where your Steam Deck (and other screens) will appear. Click and drag the screen icon in the top-right corner into position.
Now double-click on the "Untitled" screen you just added and name it “steamdeck” under “Screen name” and then click OK.
On macOS, I had to perform the following extra step to get Input Leap working:
Open Applications where the app is installed, find the “Input Leap” application then right-click on it and choose “Show Package Contents.” Now navigate to Contents > MacOS and drag the “input-leap” file into the System Settings > Privacy & Security > Accessibility window.
Make sure both the app and process are enabled in this window before you close it. Make sure you grant the app permission to search for devices on the local network if prompted to do so.
Now that Input Leap is configured, click “Start” to start the server.
Set Up Your Steam Deck as a Virtual KVM Client
Now it’s time to repeat the process, except on your Steam Deck. Fortunately, the app is easy to install thanks to its inclusion in the Discover store.
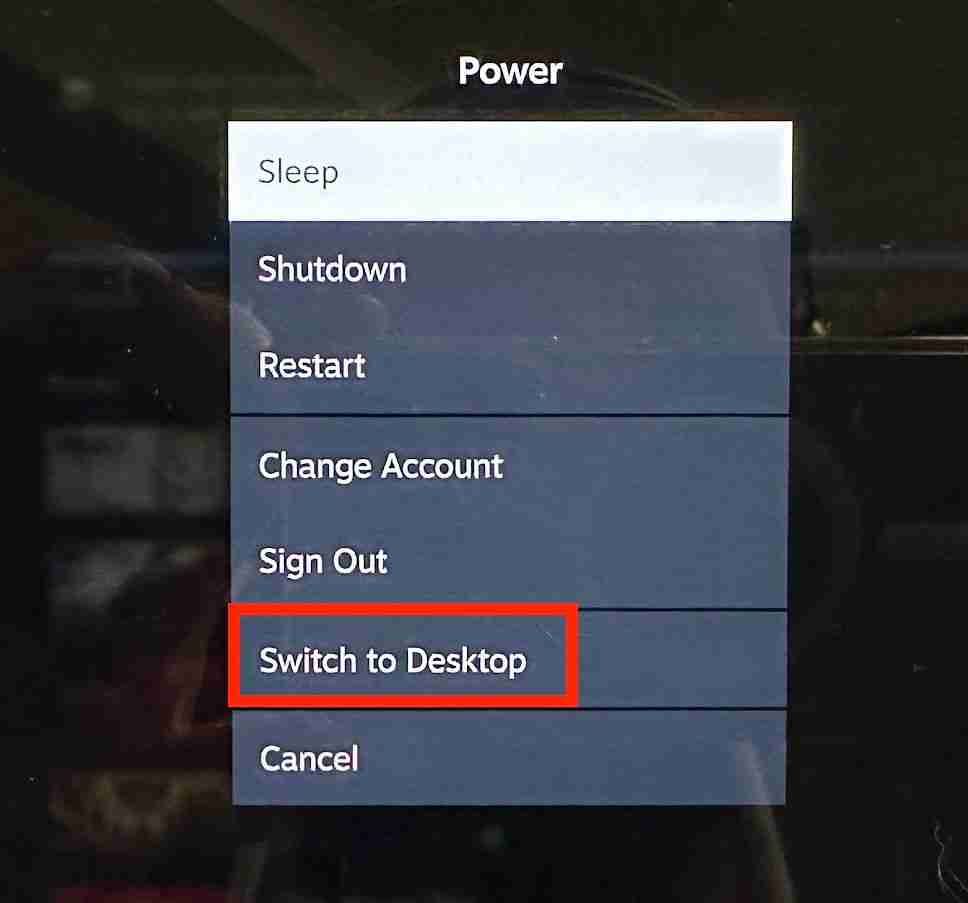
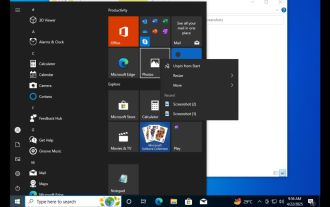
If you’re in Game Mode, press and hold the power button on the top of your Steam Deck and then choose “Switch to Desktop” then wait for the SteamOS desktop to load.
Once you’re in, launch the Discover store either using the SteamOS menu or the shortcut in the taskbar at the bottom of the screen. Now search for “input” by moving the cursor with your right trackpad and clicking in the search box with the right trigger. Hit Steam X to bring up the on-screen keyboard.
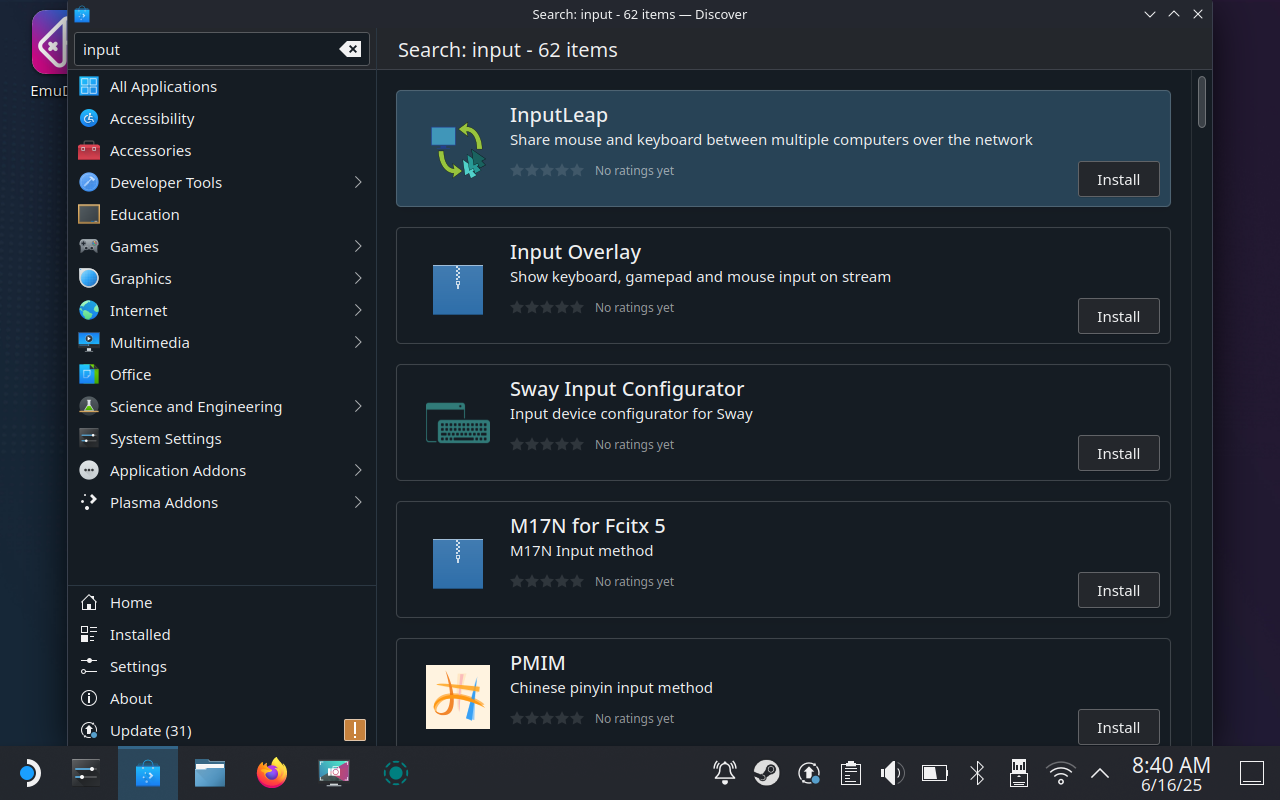
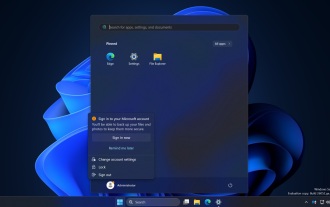
When you see “Input Leap” appear, click “Install” and wait a few minutes for the installation to complete. You can now launch the app from the SteamOS menu (you’ll find it categorized under “Internet” or you can just search for it). You’ll now have to run through the same setup procedure as you did before, except this time nominate your Steam Deck as a client device.
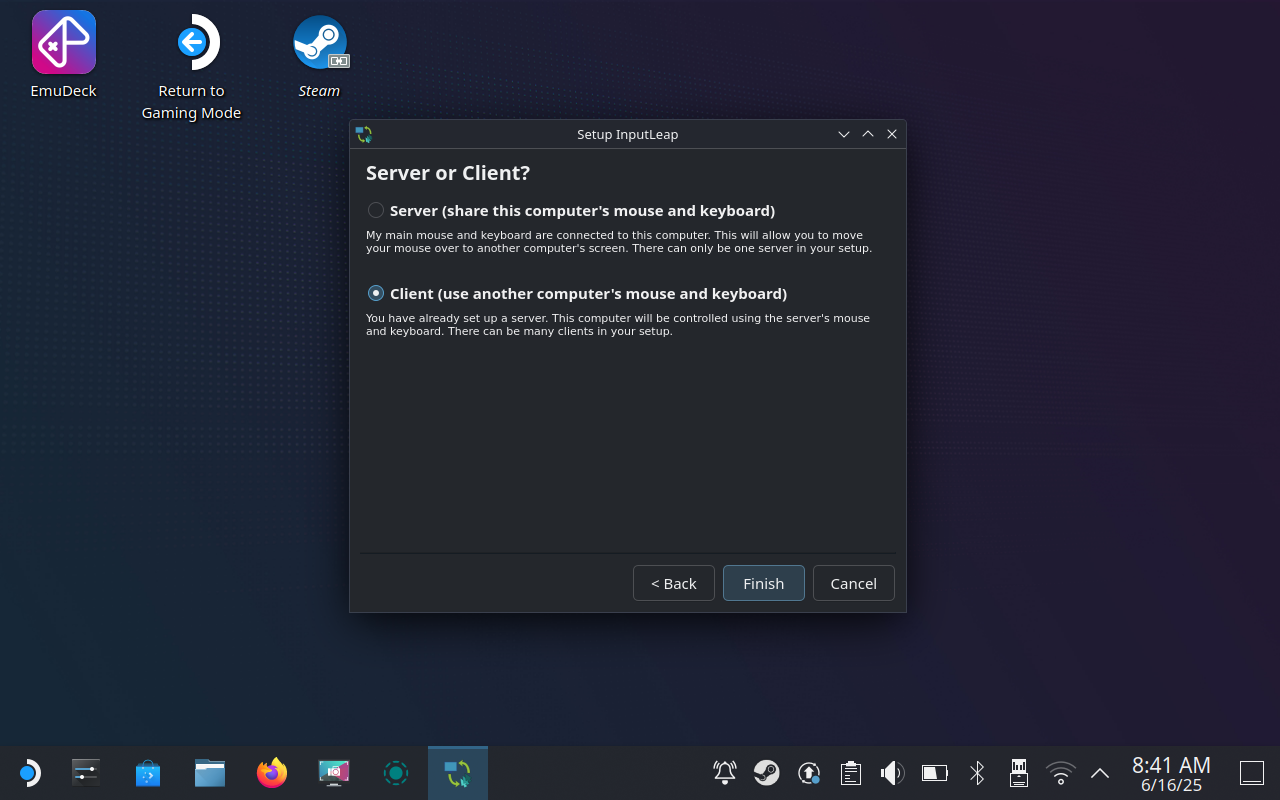
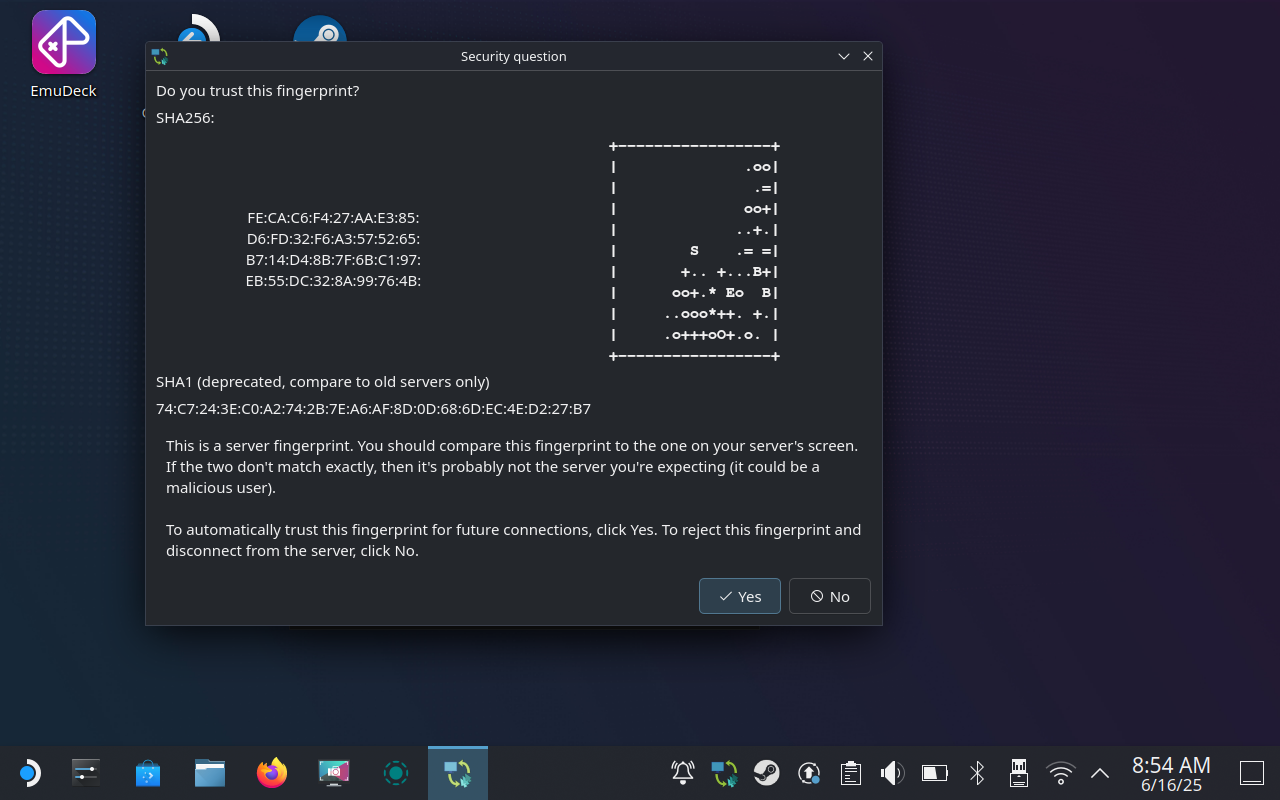
Finally, Input Leap will be ready to start. Double-check that the “Screen name” under the client box is the same as the name you used earlier in the initial setup. Click “Start” and you should see a window appear asking you if you recognize the device that’s asking to connect, click “Yes” and your KVM setup should be complete.
A Much Better SteamOS Experience
You can now move your mouse cursor to the edge of the screen that you nominated in the initial setup to have it jump to your Steam Deck. When you do this, your keyboard controls will also switch to the Steam Deck. You can type, click, drag, and do everything as if your keyboard and mouse were connected to your Steam Deck directly.
A “proper” KVM is running all of the time, and this solution can too. Though Input Leap will wake your Steam Deck’s display, it won’t wake your Steam Deck from suspend (which happens after a few minutes of inactivity). You’ll need to change this setting under “Power Management” preferences in your Steam Deck’s System Settings for an “always-on” solution (just be aware of the battery drain implications of doing so).
I’ve left everything as normal since the only time I need it is when my Steam Deck is on. The clipboard sharing works great for text, allowing me to copy long terminal commands on my Mac and paste them directly into Konsole.
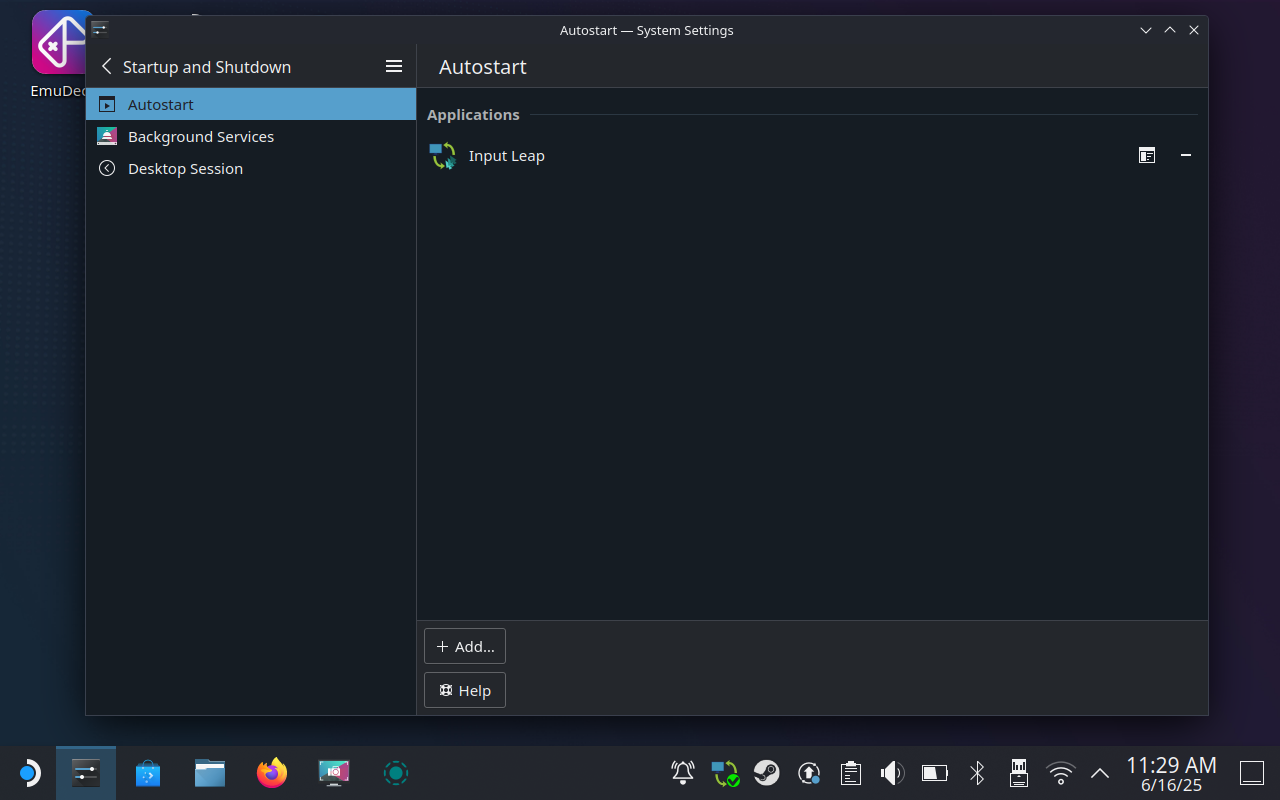
You should also add Input Leap to your Steam Deck’s startup items, accessible under System Settings > Startup and Shutdown using the “Add” button under “Autostart” and locating Input Leap from the menu. You can do the same on your Windows, Mac, or Linux host machine too.
With your virtual KVM always running, booting into Desktop Mode on your Steam Deck will allow you to immediately control your handheld with your main computer’s keyboard and mouse.
This virtual KVM has been an absolute game-changer for my Steam Deck in Desktop Mode. No longer do I have to mess around with plugging a physical keyboard into my Steam Deck, and I can get things done way faster than relying on the trackpad.
It goes without saying that this works on any handheld that runs SteamOS, including the Legion GO.
 Related
 SteamOS Gave My Legion GO the Battery Life It's Always Deserved
Finally I'm free of Windows' hunger for power.
The above is the detailed content of How to Control the Steam Deck or SteamOS from a Mac, Windows, or Linux PC. For more information, please follow other related articles on the PHP Chinese website!

Hot AI Tools

Undress AI Tool
Undress images for free

Undresser.AI Undress
AI-powered app for creating realistic nude photos

AI Clothes Remover
Online AI tool for removing clothes from photos.

Clothoff.io
AI clothes remover

Video Face Swap
Swap faces in any video effortlessly with our completely free AI face swap tool!

Hot Article
Hot Tools

Notepad++7.3.1
Easy-to-use and free code editor

SublimeText3 Chinese version
Chinese version, very easy to use

Zend Studio 13.0.1
Powerful PHP integrated development environment

Dreamweaver CS6
Visual web development tools

SublimeText3 Mac version
God-level code editing software (SublimeText3)
Hot Topics


 How to remove password from Windows 11 login
Jun 27, 2025 am 01:38 AM
How to remove password from Windows 11 login
Jun 27, 2025 am 01:38 AM
If you want to cancel the password login for Windows 11, there are three methods to choose: 1. Modify the automatic login settings, uncheck "To use this computer, users must enter their username and password", and then restart the automatic login after entering the password; 2. Switch to a passwordless login method, such as PIN, fingerprint or face recognition, configure it in "Settings>Account>Login Options" to improve convenience and security; 3. Delete the account password directly, but there are security risks and may lead to some functions being limited. It is recommended to choose a suitable solution based on actual needs.
 I Became a Windows Power User Overnight With This New Open-Source App from Microsoft
Jun 20, 2025 am 06:07 AM
I Became a Windows Power User Overnight With This New Open-Source App from Microsoft
Jun 20, 2025 am 06:07 AM
Like many Windows users, I am always on the lookout for ways to boost my productivity. Command Palette quickly became an essential tool for me. This powerful utility has completely changed how I interact with Windows, giving me instant access to the
 How to uninstall programs in Windows 11?
Jun 30, 2025 am 12:41 AM
How to uninstall programs in Windows 11?
Jun 30, 2025 am 12:41 AM
There are three main ways to uninstall programs on Windows 11: 1. Uninstall through "Settings", open the "Settings" > "Apps" > "Installed Applications", select the program and click "Uninstall", which is suitable for most users; 2. Use the control panel, search and enter "Control Panel" > "Programs and Functions", right-click the program and select "Uninstall", which is suitable for users who are accustomed to traditional interfaces; 3. Use third-party tools such as RevoUninstaller to clean up more thoroughly, but pay attention to the download source and operation risks, and novices can give priority to using the system's own methods.
 How to run an app as an administrator in Windows?
Jul 01, 2025 am 01:05 AM
How to run an app as an administrator in Windows?
Jul 01, 2025 am 01:05 AM
To run programs as administrator, you can use Windows' own functions: 1. Right-click the menu to select "Run as administrator", which is suitable for temporary privilege hike scenarios; 2. Create a shortcut and check "Run as administrator" to achieve automatic privilege hike start; 3. Use the task scheduler to configure automated tasks, suitable for running programs that require permissions on a scheduled or background basis, pay attention to setting details such as path changes and permission checks.
 Windows 11 Is Bringing Back Another Windows 10 Feature
Jun 18, 2025 am 01:27 AM
Windows 11 Is Bringing Back Another Windows 10 Feature
Jun 18, 2025 am 01:27 AM
This might not be at the top of the list of features people want to return from Windows 10, but it still offers some usefulness. If you'd like to view the current minutes and seconds without turning on that display in the main taskbar clock (where it
 Windows 10 KB5061087 fixes Start menu crash, direct download links
Jun 26, 2025 pm 04:22 PM
Windows 10 KB5061087 fixes Start menu crash, direct download links
Jun 26, 2025 pm 04:22 PM
Windows 10 KB5061087 is now rolling out as an optional preview update for those on version 22H2 with Start menu fixes.
 Microsoft: DHCP issue hits KB5060526, KB5060531 of Windows Server
Jun 26, 2025 pm 04:32 PM
Microsoft: DHCP issue hits KB5060526, KB5060531 of Windows Server
Jun 26, 2025 pm 04:32 PM
Microsoft confirmed that the DHCP server service might stop responding or refuse to connect after the June 2025 Update for Windows Server.
 Building Your First Gaming PC in 2025: What You Actually Need
Jun 24, 2025 am 12:52 AM
Building Your First Gaming PC in 2025: What You Actually Need
Jun 24, 2025 am 12:52 AM
In the past, I always viewed the i5 lineup as anemic when it came to gaming. However, in 2025, a mid-range CPU is more than enough to start your gaming journey. Many games still don’t fully utilize multi-core performance as well as they could, so
