


When working with dates in Excel, finding a format that's both efficient and easy to sort is essential. The YYYYMMDD format stands out as an ideal choice because it eliminates ambiguity, especially when dealing with international data. This format ensures dates are consistently organized, making spreadsheets more reliable and easier to work with. In this article, I'll demonstrate how to apply and utilize the YYYYMMDD format in Excel.
Key Takeaways:
- The YYYYMMDD format is perfect for clear and consistent date organization in Excel.
- It removes confusion, particularly when managing international data.
- Sorting dates becomes more straightforward with the YYYYMMDD format.
- Custom formatting in Excel offers flexibility in date presentation.
- The TEXT function can easily convert dates to the YYYYMMDD format.
Table of Contents
Unveiling Excel Secrets: YYYYMMDD Unraveled
YYYYMMDD Format in Excel
When handling dates in Excel, different projects or data analyses may require specific formatting. The YYYYMMDD format is particularly useful for sorting and organizing data. This format shows the year first, followed by the month and day without any separators, making chronological sorting effortless.
Why Use the YYYYMMDD Format?
The YYYYMMDD format is not only concise but also universally recognized, especially in data management and computing environments. It prevents confusion caused by various date formats (like MM/DD/YYYY or DD/MM/YYYY) and ensures correct sorting when dates are treated as text strings.
Step-by-Step: Transforming Dates in Excel
Converting “yyyymmdd” to a Standard Date Display
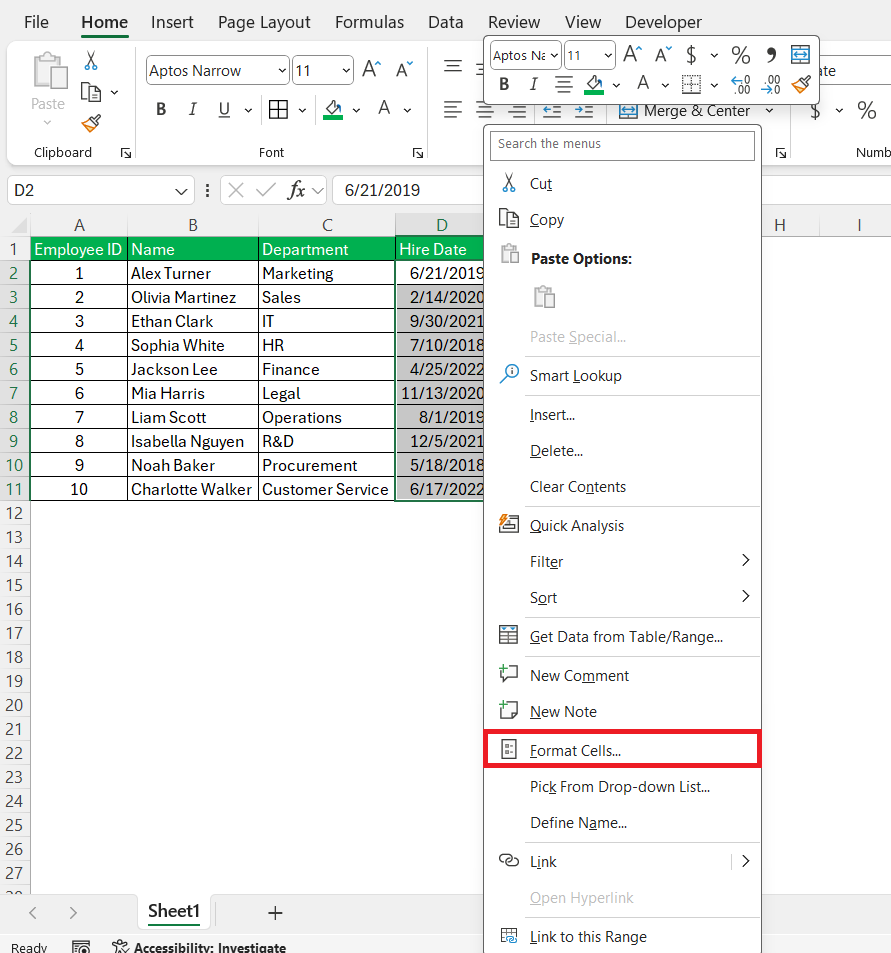
Transforming 'yyyymmdd' to a more familiar date format in Excel is a task I've performed numerous times. I select the cells containing the 'yyyymmdd' format, right-click to access the context menu, and select 'Format Cells'.
In the Number tab, I choose Custom from the list and enter the desired format like 'yyyymmdd' to change the date display.

This adaptability allows me to adjust dates to the preferred style for my projects or reports.

Converting Dates to YYYYMMDD with a Formula
Sometimes, converting a date to this format using a formula is necessary, especially for generating a string or working with dates in more complex formulas. Here's how to do it: Use the TEXT function:
=TEXT(D2, “yyyymmdd”)

This formula converts the date in cell A1 to a text string in the YYYYMMDD format.
Tips and Tricks for Smoother Date Handling
Avoiding Common Pitfalls in Date Formatting
Avoiding common pitfalls in date formatting is crucial to prevent data discrepancies. I always ensure that Excel recognizes dates in the correct regional format. By navigating to File > Options > Advanced and scrolling to the section titled 'When calculating this workbook', I check 'Use 1904 date system'.

It's important to remember that Excel stores dates as serial numbers; thus, it's vital to confirm that date entries are recognized as dates and not plain text, as this impacts calculations and sorting.
When Excel Doesn’t Recognize Your Date Format
When Excel doesn't recognize your date format, it can be confusing. I've learned that it's often because the dates are entered as text or the system's regional settings don't match the date format used. First, I check for leading spaces or non-date characters.
If that's not the issue, I use the 'Text to Columns' wizard, selecting 'Delimited', and then 'Date' with the correct format. This often helps Excel recognize the dates correctly.

Real Excel Stories: YYYYMMDD Successes
Case Studies: How YYYYMMDD Streamlined Workflows
I've observed numerous instances where adopting the YYYYMMDD format has significantly streamlined workflows. In one case study, a multinational corporation switched to this format and saw an immediate reduction in scheduling errors across its global teams, leading to a smoother project management process.
Another case involved a financial institution that managed to reduce operational errors in transaction processing after standardizing the date format, which enhanced compliance and reporting efficiency.
From Frustration to Freedom: Reader Triumphs
Through my work, I've encountered firsthand accounts where mastering the YYYYMMDD format in Excel led readers from frustration to freedom. One reader, overwhelmed by disorganized data, used YYYYMMDD to automate their reporting system, drastically reducing the time spent on monthly reports.
Another shared how this knowledge freed them from the tiresome manual entry, leading to a more reliable dataset and the confidence to take on more complex tasks with ease.
FAQ: Everything You Need to Know About Excel Dates
How to do yyyymmdd in Excel?
To apply 'yyyymmdd' in Excel, I select the cell or range where I need this format, right-click, and choose 'Format Cells'. Under the Number tab, I select Custom and type 'yyyymmdd' into the Type box. After clicking OK, the selected dates convert to this compact, unambiguous format.
How Do I Ensure Consistent Date Formats Across My Worksheets?
To ensure consistent date formats across my worksheets in Excel, I set a standard format like 'YYYY-MM-DD' for all date columns. I meticulously use this format when entering new data and converting existing dates. To maintain uniformity, I often utilize Excel templates with predefined formats and share detailed formatting guides with collaborators. This keeps everyone aligned and streamlines collaborative projects.
Can I Automate Date Conversions in Large Excel Datasets?
Yes, I can automate date conversions in large Excel datasets. By employing formulas like TEXT and DATEVALUE or using the 'Text to Columns' wizard, I can quickly convert entire columns to the desired date format. For repetitive tasks, I create macros with Visual Basic for Applications (VBA) to handle the date formatting with a single button click, enhancing the efficiency of the process significantly.
How to change the date format in Excel from dd mm yyyy to mm dd yyyy?
To change the date format in Excel from 'dd mm yyyy' to 'mm dd yyyy', I select the cells with the dates, and then use 'Ctrl 1' to bring up the Format Cells dialog. Under the Number tab, I choose Custom and then adjust the format by typing 'mm dd yyyy' in the Type box. This simple change makes the dates fit my preferred American-style format.
How do you convert date TEXT to date format in Excel?
To convert date text to a date format in Excel, I use the DATEVALUE function. For example, if the text date is in cell A1, I'll enter =DATEVALUE(A1) in cell B1. Excel then interprets the text as a serial date number, which I can format using the Format Cells dialog to display as a standard date.
The above is the detailed content of The Ultimate Guide to YYYYMMDD Format Conversion in Excel. For more information, please follow other related articles on the PHP Chinese website!

Hot AI Tools

Undress AI Tool
Undress images for free

Undresser.AI Undress
AI-powered app for creating realistic nude photos

AI Clothes Remover
Online AI tool for removing clothes from photos.

Clothoff.io
AI clothes remover

Video Face Swap
Swap faces in any video effortlessly with our completely free AI face swap tool!

Hot Article
Hot Tools

Notepad++7.3.1
Easy-to-use and free code editor

SublimeText3 Chinese version
Chinese version, very easy to use

Zend Studio 13.0.1
Powerful PHP integrated development environment

Dreamweaver CS6
Visual web development tools

SublimeText3 Mac version
God-level code editing software (SublimeText3)


 how to group by month in excel pivot table
Jul 11, 2025 am 01:01 AM
how to group by month in excel pivot table
Jul 11, 2025 am 01:01 AM
Grouping by month in Excel Pivot Table requires you to make sure that the date is formatted correctly, then insert the Pivot Table and add the date field, and finally right-click the group to select "Month" aggregation. If you encounter problems, check whether it is a standard date format and the data range are reasonable, and adjust the number format to correctly display the month.
 How to Fix AutoSave in Microsoft 365
Jul 07, 2025 pm 12:31 PM
How to Fix AutoSave in Microsoft 365
Jul 07, 2025 pm 12:31 PM
Quick Links Check the File's AutoSave Status
 How to change Outlook to dark theme (mode) and turn it off
Jul 12, 2025 am 09:30 AM
How to change Outlook to dark theme (mode) and turn it off
Jul 12, 2025 am 09:30 AM
The tutorial shows how to toggle light and dark mode in different Outlook applications, and how to keep a white reading pane in black theme. If you frequently work with your email late at night, Outlook dark mode can reduce eye strain and
 how to repeat header rows on every page when printing excel
Jul 09, 2025 am 02:24 AM
how to repeat header rows on every page when printing excel
Jul 09, 2025 am 02:24 AM
To set up the repeating headers per page when Excel prints, use the "Top Title Row" feature. Specific steps: 1. Open the Excel file and click the "Page Layout" tab; 2. Click the "Print Title" button; 3. Select "Top Title Line" in the pop-up window and select the line to be repeated (such as line 1); 4. Click "OK" to complete the settings. Notes include: only visible effects when printing preview or actual printing, avoid selecting too many title lines to affect the display of the text, different worksheets need to be set separately, ExcelOnline does not support this function, requires local version, Mac version operation is similar, but the interface is slightly different.
 How to Screenshot on Windows PCs: Windows 10 and 11
Jul 23, 2025 am 09:24 AM
How to Screenshot on Windows PCs: Windows 10 and 11
Jul 23, 2025 am 09:24 AM
It's common to want to take a screenshot on a PC. If you're not using a third-party tool, you can do it manually. The most obvious way is to Hit the Prt Sc button/or Print Scrn button (print screen key), which will grab the entire PC screen. You do
 Where are Teams meeting recordings saved?
Jul 09, 2025 am 01:53 AM
Where are Teams meeting recordings saved?
Jul 09, 2025 am 01:53 AM
MicrosoftTeamsrecordingsarestoredinthecloud,typicallyinOneDriveorSharePoint.1.Recordingsusuallysavetotheinitiator’sOneDriveina“Recordings”folderunder“Content.”2.Forlargermeetingsorwebinars,filesmaygototheorganizer’sOneDriveoraSharePointsitelinkedtoaT
 how to find the second largest value in excel
Jul 08, 2025 am 01:09 AM
how to find the second largest value in excel
Jul 08, 2025 am 01:09 AM
Finding the second largest value in Excel can be implemented by LARGE function. The formula is =LARGE(range,2), where range is the data area; if the maximum value appears repeatedly and all maximum values ??need to be excluded and the second maximum value is found, you can use the array formula =MAX(IF(rangeMAX(range),range)), and the old version of Excel needs to be executed by Ctrl Shift Enter; for users who are not familiar with formulas, you can also manually search by sorting the data in descending order and viewing the second cell, but this method will change the order of the original data. It is recommended to copy the data first and then operate.
 how to get data from web in excel
Jul 11, 2025 am 01:02 AM
how to get data from web in excel
Jul 11, 2025 am 01:02 AM
TopulldatafromthewebintoExcelwithoutcoding,usePowerQueryforstructuredHTMLtablesbyenteringtheURLunderData>GetData>FromWebandselectingthedesiredtable;thismethodworksbestforstaticcontent.IfthesiteoffersXMLorJSONfeeds,importthemviaPowerQuerybyenter
