

How to Get Quarters with Excel Dates – Step by Step Guide
May 17, 2025 am 03:12 AM
Working with dates in Excel is a frequent task for me, and converting them into fiscal or calendar quarters is often necessary. If you're in a similar situation and need to determine which quarter a date falls into, Excel provides straightforward methods to achieve this. Let me guide you through the process of extracting quarters from dates in Excel.
Key Takeaways:
- Excel's date formulas make extracting quarters from dates easy and efficient.
- Quarters are vital for business data analysis, aiding in performance tracking over time.
- Use the formula
=ROUNDUP(MONTH(A2)/3, 0)to determine calendar quarters from a date in Excel. - Customize formulas for fiscal years starting on different dates using the MOD function.
- Ensuring consistency and accuracy in date formatting and formulas is essential for reliable quarter extraction.
Table of Contents
Introduction to Excel Date Formulas
The Importance of Quarters in Data Analysis
In data analysis, breaking down data into quarters is essential for gaining strategic insights that help measure performance over specific time periods. Given the seasonality in most industries and the common practice of quarterly business assessments, the ability to organize data into these periods is invaluable.
For me, using quarterly data allows for better evaluation of marketing campaigns, more effective budget management, and more accurate trend anticipation.
Utilizing Excel for Advanced Date Functionality
Excel is my preferred tool for managing and analyzing date-related data due to its robust functionality. Its built-in date and time functions enable me to convert raw data into meaningful insights based on specific time periods with ease.
Excel's date functions not only allow for storing and sorting dates but also facilitate complex date arithmetic, such as calculating date differences, determining the day of the week, and, crucially for this discussion, identifying quarters for both calendar and fiscal year reporting.
This advanced date functionality transforms routine data analysis into an opportunity for deeper operational insights and smarter decision-making.
The Basics of Date-to-Quarter Conversion
Understanding Standard Calendar and Fiscal Quarters
Quarters are a common way to divide the year into four parts in business and finance. Standard calendar quarters follow the Gregorian calendar, starting in January.
Q1 spans January to March, Q2 April to June, and so forth. Fiscal quarters, however, are adjusted to an organization's financial year, which may not align with the calendar year. For example, a company with a fiscal year starting in July will have its first quarter (Q1) from July to September.
This distinction is important because fiscal quarters are closely linked to financial planning and reporting cycles, affecting everything from tax reporting to investor relations. Understanding this nuance is crucial when using Excel for financial analysis to ensure data reflects the company's operational period.
Step-by-Step Guide: Extracting Quarters from Dates in Excel
Preparing Your Excel Sheet for Conversion
Before using formulas, it's crucial to set up the Excel sheet correctly for accurate date-to-quarter conversion. Start by ensuring all dates are in a consistent format to avoid mismatches or errors that could affect your results. I always check and format date cells using the "Format Cells" dialog (Ctrl 1).

Next, I organize my data in a tabular format, with dates in one column and related values in adjacent columns. This setup not only looks neat but also aids functionality. Converting a range of cells to an Excel Table (using Insert > Table) creates a dynamic range, allowing formulas to update automatically as new data is added.

A well-organized worksheet is key to smooth quarter conversions and effective analysis.
Formula Breakdown: Quick Methods to Extract Quarters
Let's explore how to quickly extract quarters from dates in Excel. I use a formula that leverages the MONTH function to determine the quarter. The formula =ROUNDUP(MONTH(A2)/3, 0) converts the month from the date in cell A2 into a quarter by dividing by 3—the number of months in a quarter—and rounding up to the nearest whole number.

For visual reports, another approach is to create a lookup table that matches months with their respective quarters and use the VLOOKUP function to retrieve the quarter for each date.

Customizing Solutions for Fiscal Year Quarters
Adjusting Formulas for Non-standard Fiscal Years
Customizing formulas for non-standard fiscal years in Excel requires some adjustments. It's not a universal solution; each formula needs to be tailored to the specific fiscal year start date. For a fiscal year starting in April, I adjust the calendar quarters using a formula like =MOD(MONTH(A2) 8, 12) / 3 1, assuming dates are in column A.

This formula re-maps the calendar so that April becomes the first month of the fiscal year. I add 8 to the month number (April being the 4th month, hence 4 8=12), then use the MOD function to cycle back to 1 after December.
By dividing by 3 and adding 1, I allocate each month to the correct fiscal quarter. These adjustments ensure that quarterly data analysis aligns with the unique timing of the fiscal year and internal reporting requirements.
Incorporating Fiscal Year Information with Quarters
Adding fiscal year information to quarters can enhance analysis by providing clear context for the data. To achieve this, I create a formula that combines the quarter calculation with the year information.
For a fiscal year starting in October, dates from October to December belong to the first fiscal quarter of the next calendar year. Therefore, I use a formula like:
=IF(MONTH(A2) >= 10, YEAR(A2) 1 & " Q" & ROUNDUP((MONTH(A2) - 10 1) / 3, 0), YEAR(A2) & " Q" & ROUNDUP((MONTH(A2) - 10 1 12) / 3, 0))

This formula concatenates the year with the fiscal quarter, adjusting for the fiscal year start. Using the IF function, I ensure that the date is assigned to the correct fiscal year.
Troubleshooting and Tips for Accurate Reporting
Common Errors and Their Solutions
When calculating fiscal quarters in Excel, some errors are more common than others. Here's how to address them:
-
Incorrect Fiscal Year Start: Often, errors occur when the fiscal year start date is not correctly set. Ensure your formula references the correct cell with the fiscal year start. For example, if your fiscal year starts in April,
=CHOOSE(MONTH(A2), 4, 4, 4, 1, 1, 1, 2, 2, 2, 3, 3, 3)adjusts the quarter based on the month in cell A2.

- Mixed Date Formats: Excel may not recognize dates if they're not formatted consistently. Standardize date formats using the Format Cells > Date option.

- Formula Errors: Typing errors in formulas can lead to incorrect results. Double-check your formulas for accuracy. For complex formulas, break them down into smaller parts to identify errors. Use Excel's Formula Auditing tools to trace and correct errors in formulas.

Addressing these common issues with care and precision enhances the reliability of fiscal quarter calculations.
Best Practices for Reliable Quarter Extraction
To ensure reliable quarter extraction, I follow these best practices:
- Regular Updates: Keep data inputs up-to-date. Outdated data can skew analysis, so ensuring your Excel report reflects real-time developments is crucial.
-
Dynamic Formulas: Use formulas that automatically adjust to the current date for more relevant results. The formula
=IF(MONTH(TODAY()) dynamically assigns the current quarter based on the system date.

- Data Validation: Excel's Data Validation feature is essential to ensure data input meets your criteria, reducing the risk of human errors during data entry.

- Consistency: Maintain a uniform approach across all reports when calculating fiscal quarters. This consistency ensures reliable comparative analysis over time and accurate data comparisons.
By diligently applying these best practices, I find that the likelihood of errors decreases, supporting more credible and actionable financial analysis.
FAQ
How do you calculate quarters in Excel?
To calculate quarters from a date in Excel, use the ROUNDUP formula: =ROUNDUP(MONTH(date)/3, 0), replacing date with the cell reference. If the cell A2 holds a date, the formula =ROUNDUP(MONTH(A2)/3, 0) will give you the quarter that date falls in. Make sure to adjust for fiscal year start if needed.
How do I convert a date to a fiscal quarter using Excel?
To convert a date to a fiscal quarter in Excel, use a formula that accounts for the fiscal year start month. For a fiscal year starting in April, the formula =ROUNDUP((MONTH(A1)-3 12)/3, 0) will convert a date in cell A1 to the appropriate fiscal quarter. Modify the '3' in the formula to match the fiscal year start month.
Can Excel automatically distinguish between fiscal and calendar year quarters?
Excel doesn't automatically distinguish between fiscal and calendar year quarters; you'll need to customize formulas to differentiate them. Assign quarters based on your fiscal year start using formulas and potentially the CHOOSE function. Set up your Excel sheet to accurately reflect the organization's fiscal calendar for correct quarter reporting.
What are some common mistakes made when extracting quarters in Excel?
Common mistakes when extracting quarters in Excel include using incorrect fiscal year start dates, mixed date formats, and formula typing errors. Always verify the fiscal start month, standardize date formats, and double-check formulas for accuracy to avoid these errors. Use formula auditing to trace and correct any mistakes.
How to show quarterly data in Excel?
To show quarterly data in Excel, organize your dates and corresponding data in columns, calculate the quarter for each date, then utilize PivotTables or Charts to group and display the data by quarter. This approach provides a visual summary and easier trend analysis across different quarters.
The above is the detailed content of How to Get Quarters with Excel Dates – Step by Step Guide. For more information, please follow other related articles on the PHP Chinese website!

Hot AI Tools

Undress AI Tool
Undress images for free

Undresser.AI Undress
AI-powered app for creating realistic nude photos

AI Clothes Remover
Online AI tool for removing clothes from photos.

Clothoff.io
AI clothes remover

Video Face Swap
Swap faces in any video effortlessly with our completely free AI face swap tool!

Hot Article
Hot Tools

Notepad++7.3.1
Easy-to-use and free code editor

SublimeText3 Chinese version
Chinese version, very easy to use

Zend Studio 13.0.1
Powerful PHP integrated development environment

Dreamweaver CS6
Visual web development tools

SublimeText3 Mac version
God-level code editing software (SublimeText3)
Hot Topics


 How to Use Parentheses, Square Brackets, and Curly Braces in Microsoft Excel
Jun 19, 2025 am 03:03 AM
How to Use Parentheses, Square Brackets, and Curly Braces in Microsoft Excel
Jun 19, 2025 am 03:03 AM
Quick Links Parentheses: Controlling the Order of Opera
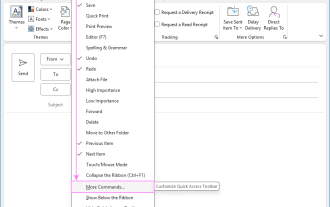 Outlook Quick Access Toolbar: customize, move, hide and show
Jun 18, 2025 am 11:01 AM
Outlook Quick Access Toolbar: customize, move, hide and show
Jun 18, 2025 am 11:01 AM
This guide will walk you through how to customize, move, hide, and show the Quick Access Toolbar, helping you shape your Outlook workspace to fit your daily routine and preferences. The Quick Access Toolbar in Microsoft Outlook is a usefu
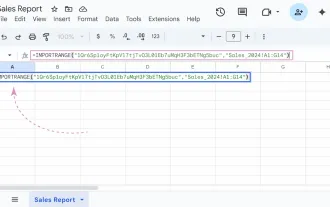 Google Sheets IMPORTRANGE: The Complete Guide
Jun 18, 2025 am 09:54 AM
Google Sheets IMPORTRANGE: The Complete Guide
Jun 18, 2025 am 09:54 AM
Ever played the "just one quick copy-paste" game with Google Sheets... and lost an hour of your life? What starts as a simple data transfer quickly snowballs into a nightmare when working with dynamic information. Those "quick fixes&qu
 Don't Ignore the Power of F9 in Microsoft Excel
Jun 21, 2025 am 06:23 AM
Don't Ignore the Power of F9 in Microsoft Excel
Jun 21, 2025 am 06:23 AM
Quick LinksRecalculating Formulas in Manual Calculation ModeDebugging Complex FormulasMinimizing the Excel WindowMicrosoft Excel has so many keyboard shortcuts that it can sometimes be difficult to remember the most useful. One of the most overlooked
 6 Cool Right-Click Tricks in Microsoft Excel
Jun 24, 2025 am 12:55 AM
6 Cool Right-Click Tricks in Microsoft Excel
Jun 24, 2025 am 12:55 AM
Quick Links Copy, Move, and Link Cell Elements
 How to recover unsaved Word document
Jun 27, 2025 am 11:36 AM
How to recover unsaved Word document
Jun 27, 2025 am 11:36 AM
1. Check the automatic recovery folder, open "Recover Unsaved Documents" in Word or enter the C:\Users\Users\Username\AppData\Roaming\Microsoft\Word path to find the .asd ending file; 2. Find temporary files or use OneDrive historical version, enter ~$ file name.docx in the original directory to see if it exists or log in to OneDrive to view the version history; 3. Use Windows' "Previous Versions" function or third-party tools such as Recuva and EaseUS to scan and restore and completely delete files. The above methods can improve the recovery success rate, but you need to operate as soon as possible and avoid writing new data. Automatic saving, regular saving or cloud use should be enabled
 5 New Microsoft Excel Features to Try in July 2025
Jul 02, 2025 am 03:02 AM
5 New Microsoft Excel Features to Try in July 2025
Jul 02, 2025 am 03:02 AM
Quick Links Let Copilot Determine Which Table to Manipu
 How to use Microsoft Teams?
Jul 02, 2025 pm 02:17 PM
How to use Microsoft Teams?
Jul 02, 2025 pm 02:17 PM
Microsoft Teams is not complicated to use, you can get started by mastering the basic operations. To create a team, you can click the "Team" tab → "Join or Create Team" → "Create Team", fill in the information and invite members; when you receive an invitation, click the link to join. To create a new team, you can choose to be public or private. To exit the team, you can right-click to select "Leave Team". Daily communication can be initiated on the "Chat" tab, click the phone icon to make voice or video calls, and the meeting can be initiated through the "Conference" button on the chat interface. The channel is used for classified discussions, supports file upload, multi-person collaboration and version control. It is recommended to place important information in the channel file tab for reference.
