


This tutorial explains the basics and beyond of the Excel time format.
Microsoft Excel has a handful of time features and knowing them in depth can save you a lot of time. To leverage powerful time functions, it helps to know how Excel stores times. In this article, you will find everything you need to know about formatting time in Excel:
Excel time format
If you have been following our Excel Date Format tutorial, you know that Microsoft Excel stores dates as sequential numbers beginning with January 1, 1900, which is stored as number 1. As time is a portion of a day, times are stored as decimal fractions.
In Excel's internal system:
- 00:00:00 is stored as 0.0
- 23:59:59 is stored as 0.99999
- 06:00 AM is 0.25
- 12:00 PM is 0.5
When both date and time are entered in a cell, the value is stored as a decimal number comprised of an integer representing the date and a decimal portion representing the time. For example, 1 June 2025 9:30 AM is stored as 45809.39583.

How to get a decimal number representing time in Excel
To get a decimal number representing a certain time, carry out these steps:
- Select a cell containing the time.
- Press Ctrl 1 to open the Format Cells dialog box.
- On the Number tab, select General under Category, and you will see the decimal in the Sample box.
Now, you can write down that number and click Cancel to close the window. Or, you can click the OK button and have the time replaced with a corresponding decimal number in the cell.

To keep both the original time and its decimal representation, enter a simple formula like =B3 (where B3 is the time value) in any empty cell, and set the General number format for that cell.

This is the fastest way to convert time to decimal in Excel. You can also use different formulas to convert time to hours, minutes or seconds.
How to format time in Excel
Microsoft Excel is smart enough to recognize a time value as you type it in a cell. For example, if you type 20:30, or 8:30 PM, or even 8:30 p, Excel will interpret this as a time and display either 20:30 or 8:30 PM, depending on your default time format.
To change an existing time formatting or apply some specific one, use the Format Cells dialog as described below.
- Select the cell(s) that you want to format.
- Press Ctrl 1 to open the Format Cells dialog.
- On the Number tab, select Time from the Category list, and then choose the desired format from the Type list.
- Click OK to apply the selected format and close the dialog box.


Custom time format in Excel
Though Microsoft Excel provides a number of predefined time formats, you may want to create your own one that fits best for a particular sheet. This can also be done using the Format Cells dialog box:
- Select the target cells.
- Press Ctrl 1 to open the Format Cells dialog.
- Under Category, select Custom and type the desired format code in the Type box.
- Review the Sample value to check if it's formatted as expected.
- Click OK to save the changes.
For example, to format a date time value like 1-Jun-2025 9:30 AM, utilize this code: d-mmm-yyyy h:mm AM/PM.

The custom time format you've created will be in the Type list the next time you need it.
Tip. The easiest way to make a custom time format is to use one of the existing formats as a starting point. For this, click Time in the Category list, and select one of the predefined formats under Type. After that switch to Custom and make the changes to the format displayed in the Type box.
Excel time formatting codes
When creating a custom time format in your worksheets, you can use the following codes.
| Code | Description | Displays as |
|---|---|---|
| h | Hours without a leading zero | 0-23 |
| hh | Hours with a leading zero | 00-23 |
| m | Minutes without a leading zero | 0-59 |
| mm | Minutes with a leading zero | 00-59 |
| s | Seconds without a leading zero | 0-59 |
| ss | Seconds with a leading zero | 00-59 |
| AM/PM | Periods of the day (if omitted, 24-hour time format is used) | AM or PM |
12 hour time format in Excel
To set the 12 hour format for times in Excel, include AM/PM in the format code that you enter in the Format Cells dialog.
| Format | Displays as |
|---|---|
| h:mm:ss AM/PM | 1:30:00 PM |
| h:mm AM/PM | 1:30 PM |
To change time to 12 hour format, you can also use the TEXT function with one of the codes listed above.
Assuming the original time value is in A3, the formula takes this form:
=TEXT(A3,"hh:mm:ss AM/PM")

Note. The TIME function converts a time value into a text string. If you intend to calculate times at a later point, then set a custom 12-hour format using the Format Cells dialog.
24 hour time format in Excel
To apply the 24 hour time format, use any format code without AM/PM.
| Format | Displays as |
|---|---|
| h:mm:ss | 13:30:00 |
| h:mm | 13:30 |
Once you've decided on the format code, apply a corresponding custom format to the original cell or supply the format code to the TEXT function to return a formatted time in another cell. Remember that in the latter case, the output will be a text string.
With the source time in A3, the formula goes as follows:
=TEXT(A3,"hh:mm:ss")

Excel time format over 24 hours
When adding up times, the total may exceed 24 hours. To format times over 24 hours correctly, enclose the hour code in square brackets like [h].
Here are some examples of time formats over 24 hours:
| Format | Displays as | Explanation |
|---|---|---|
| [h]:mm | 41:30 | 41 hours and 30 minutes |
| [h]:mm:ss | 41:30:10 | 41 hours, 30 minutes and 10 seconds |
| [h] "hours", mm "minutes", ss "seconds" | 40 hours, 30 minutes, 10 seconds | |
| d h:mm:ss | 1 17:30:10 | 1 day, 17 hours, 30 minutes and 10 seconds |
| d "day" h:mm:ss | 1 day 17:30:10 | |
| d "day," h "hours," m "minutes and" s "seconds" | 1 day, 17 hours, 30 minutes and 10 seconds |
For more information, please see how to show, add, subtract over 24 hours, 60 minutes, 60 seconds.
Excel date time format
To create custom formatting for date and time, use various combinations of time and date format codes.
The following table provides some examples of how your Excel date time formats may look like:
| Format | Displays as |
|---|---|
| d-mmm-yy h:mm:ss AM/PM | 13-Jan-25 1:30:00 PM |
| mmmm dd, hh:mm AM/PM | January 13, 01:30 PM |
| dddd, m/d/yy h:mm:ss | Monday, 1/13/25 13:30:00 |
| ddd, mmmm dd, yyyy hh:mm | Mon, January 13, 2025 13:30 |
Excel time format without date
To format a date time value so that only time is visible in a cell, use only the time codes without the date codes. At that, you can use the international standard notation such as hh:mm:ss or your custom notation. Here are a few examples:
| Format | Displays as |
|---|---|
| h:mm:ss AM/PM | 1:30:00 PM |
| hh:mm:ss AM/PM | 01:30:00 PM |
| hh:mm:ss | 13:30:00 |
| hh-mm-ss | 13-30-00 |
| hh.mm.ss | 13.30.00 |
How to format negative time values
The custom time formats discussed above work for positive values only. If the result of your calculations is a negative number formatted as time (e.g. when you subtract a bigger time from a smaller one), the result will be displayed as #####. If you want to format negative time values differently, the following options are available to you:
- Display an empty cell for negative times. Type a semicolon at the end of the time format, for example [h]:mm;
- Display an error message. Type a semicolon at the end of the time format, and then type a message in quotation marks, e.g. [h]:mm;"Negative time"
Generally speaking, a semicolon acts as a delimiter to separate positive values' format from negative values' formatting. For full details, please see Custom Excel number format.
If you want to display negative times as negative values, e.g. -10:30, the easiest way is to switch to Excel's 1904 date system. For this, click File > Options > Advanced, scroll down to When calculating this workbook section and check the Use 1904 date system box.
For more information, please see How to calculate and display negative times in Excel.
Excel default time format
When setting up a time format in the Format Cells dialog, you may have noticed that one of the formats begins with an asterisk (*). This is the default time format in your Excel.

To quickly apply the default Excel time format to the selected cell or a range of cells, go to the Home tab > Number group, and choose Time from the Number Format drop-down list.

How to change the default time format
To change the default time format in Excel, this is what you need to do:
- Open the Control Panel and click Region. If your Control panel opens in Category view, then click Clock and Region > Change the date, time, or number format.
- In the Region dialog box, set the Short time and Long time formats you want.

Now that you've got the hang of time formatting in Excel, it will be much easier for you to manipulate date and time values in your worksheets. I thank you for reading and hope to see you on our blog next week!
Practice workbook for download
Excel time formatting - examples (.xlsx file)
The above is the detailed content of Time formatting in Excel: 12/24 hour, custom, default. For more information, please follow other related articles on the PHP Chinese website!

Hot AI Tools

Undress AI Tool
Undress images for free

Undresser.AI Undress
AI-powered app for creating realistic nude photos

AI Clothes Remover
Online AI tool for removing clothes from photos.

Clothoff.io
AI clothes remover

Video Face Swap
Swap faces in any video effortlessly with our completely free AI face swap tool!

Hot Article
Hot Tools

Notepad++7.3.1
Easy-to-use and free code editor

SublimeText3 Chinese version
Chinese version, very easy to use

Zend Studio 13.0.1
Powerful PHP integrated development environment

Dreamweaver CS6
Visual web development tools

SublimeText3 Mac version
God-level code editing software (SublimeText3)
Hot Topics


 How to Use Parentheses, Square Brackets, and Curly Braces in Microsoft Excel
Jun 19, 2025 am 03:03 AM
How to Use Parentheses, Square Brackets, and Curly Braces in Microsoft Excel
Jun 19, 2025 am 03:03 AM
Quick Links Parentheses: Controlling the Order of Opera
 Outlook Quick Access Toolbar: customize, move, hide and show
Jun 18, 2025 am 11:01 AM
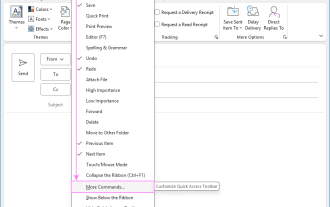
Outlook Quick Access Toolbar: customize, move, hide and show
Jun 18, 2025 am 11:01 AM
This guide will walk you through how to customize, move, hide, and show the Quick Access Toolbar, helping you shape your Outlook workspace to fit your daily routine and preferences. The Quick Access Toolbar in Microsoft Outlook is a usefu
 Google Sheets IMPORTRANGE: The Complete Guide
Jun 18, 2025 am 09:54 AM
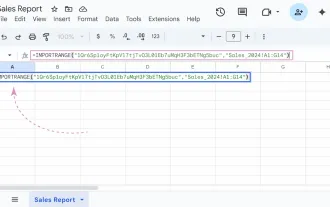
Google Sheets IMPORTRANGE: The Complete Guide
Jun 18, 2025 am 09:54 AM
Ever played the "just one quick copy-paste" game with Google Sheets... and lost an hour of your life? What starts as a simple data transfer quickly snowballs into a nightmare when working with dynamic information. Those "quick fixes&qu
 6 Cool Right-Click Tricks in Microsoft Excel
Jun 24, 2025 am 12:55 AM
6 Cool Right-Click Tricks in Microsoft Excel
Jun 24, 2025 am 12:55 AM
Quick Links Copy, Move, and Link Cell Elements
 Don't Ignore the Power of F9 in Microsoft Excel
Jun 21, 2025 am 06:23 AM
Don't Ignore the Power of F9 in Microsoft Excel
Jun 21, 2025 am 06:23 AM
Quick LinksRecalculating Formulas in Manual Calculation ModeDebugging Complex FormulasMinimizing the Excel WindowMicrosoft Excel has so many keyboard shortcuts that it can sometimes be difficult to remember the most useful. One of the most overlooked
 Prove Your Real-World Microsoft Excel Skills With the How-To Geek Test (Advanced)
Jun 17, 2025 pm 02:44 PM
Prove Your Real-World Microsoft Excel Skills With the How-To Geek Test (Advanced)
Jun 17, 2025 pm 02:44 PM
Whether you've recently taken a Microsoft Excel course or you want to verify that your knowledge of the program is current, try out the How-To Geek Advanced Excel Test and find out how well you do!This is the third in a three-part series. The first i
 How to recover unsaved Word document
Jun 27, 2025 am 11:36 AM
How to recover unsaved Word document
Jun 27, 2025 am 11:36 AM
1. Check the automatic recovery folder, open "Recover Unsaved Documents" in Word or enter the C:\Users\Users\Username\AppData\Roaming\Microsoft\Word path to find the .asd ending file; 2. Find temporary files or use OneDrive historical version, enter ~$ file name.docx in the original directory to see if it exists or log in to OneDrive to view the version history; 3. Use Windows' "Previous Versions" function or third-party tools such as Recuva and EaseUS to scan and restore and completely delete files. The above methods can improve the recovery success rate, but you need to operate as soon as possible and avoid writing new data. Automatic saving, regular saving or cloud use should be enabled
 5 New Microsoft Excel Features to Try in July 2025
Jul 02, 2025 am 03:02 AM
5 New Microsoft Excel Features to Try in July 2025
Jul 02, 2025 am 03:02 AM
Quick Links Let Copilot Determine Which Table to Manipu
