


Inserting a media file into a post with WordPress is not very complicated thanks to the dedicated button present by default. However, if you develop a plugin using media files, this button won’t help your users insert the code needed by your functions.
Fortunately, it is possible to add you own media button, so you can make it do whatever you want, properly.
In this tutorial, we will review how to add a media button in the right place, how to open the media window when the user clicks on it and, finally, how to get the selected items in order to insert them simultaneously into both visual and HTML editors.
Key Takeaways
- Adding a media button to the WordPress content editor involves creating a new function in your plugin or theme file, hooking your function to the media_buttons action, and modifying your function to display your button in the right way.
- To open the media window when the user clicks the button, JavaScript with jQuery, which is included in WordPress by default, is used. This involves creating a JS file, including it in your WordPress function, and constructing the window.
- The user’s selection can be retrieved using the ‘select’ event created by WordPress for the media windows. Depending on whether you allow multiple choice, the use of the variable storing the selection differs.
- The media button can be optimized by ensuring it doesn’t reconstruct each time the user hits the button. This can be achieved by checking if the window has already been created and if not, creating it.
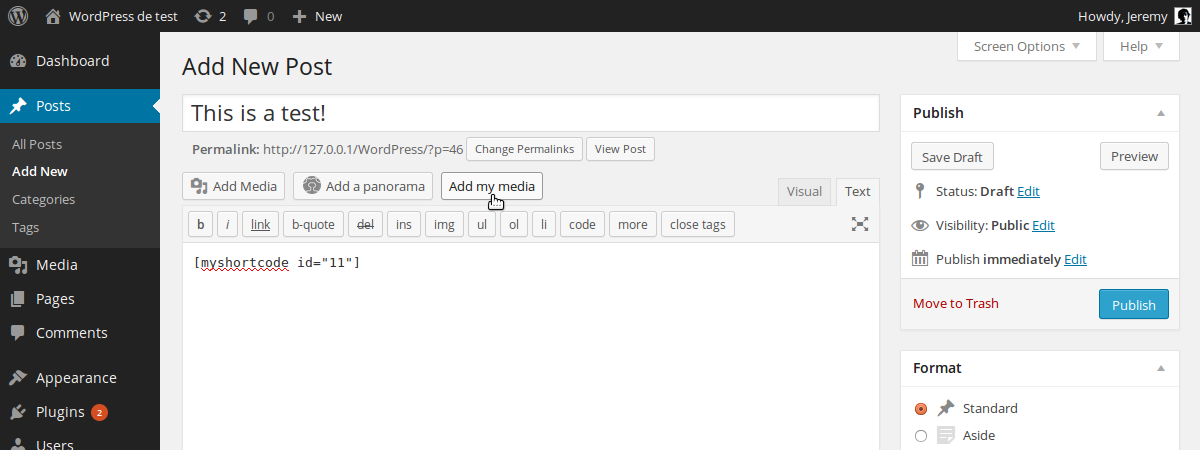
Add a Media Button
Adding our media button is the first and easiest part. As with customising many things in WordPress, we will use actions to put our button in the right place.
Begin by creating a new function in the dedicated file of your plugin or theme (e.g. functions.php). For this tutorial, I will use a function named add_my_media_button(). Hook your function to the media_buttons action which is, as its name suggests it, the action called when WordPress is displaying the media buttons.
<span>add_action('media_buttons', 'add_my_media_button');</span>
As you can imagine, we now need to modify our function to display our button, in the right way. We want our button to have the same style as the default one.
Media buttons are not real buttons, they are links with the style of a button and WordPress give us a class for this style, named “button“.
<span>function add_my_media_button() {
</span>    echo <span>'<a href="#"  >Add my media</a>';
</span><span>}</span>
We give our button an ID. That way, we will be able to retrieve it later, in JavaScript.
Our custom media button is ready: it has the right style and almost the right place. In fact, by default, our new button is placed before the default one. If we want to place it after, it is possible by passing a third argument to the add_action() call in order to change our function’s priority.
In fact, the function which displays the default media button has a priority of 10. Indicating a lower value for our function will place our button before the default one. If we want to place it after, we can indicate a greater value.
<span>add_action('media_buttons', 'add_my_media_button');</span>
And that’s it! Now we have to make our button more useful.
Open the Media Window
To open the media window, we will use JavaScript with jQuery which is included in WordPress by default. First, we create a JS file. I chose to name it media_button.js but, of course, you are free to choose your own name.
Include the JavaScript File
If you are familiar with WordPress, you should know that the CMS gives us a proper way to include the JS files we need. To do that, we create a function in which we use the WordPress function wp_enqueue_script().
<span>function add_my_media_button() {
</span>    echo <span>'<a href="#"  >Add my media</a>';
</span><span>}</span>
As you can see, we indicate jQuery as a dependency. Thanks to the last argument, I chose to include the script in the footer but you can put it in the header if you prefer.
We created a function in order to ask WordPress to include our script only if it is necessary. For that, we will use another action: wp_enqueue_media, which is triggered when WordPress calls all the scripts needed by the media buttons.
<span>add_action('media_buttons', 'add_my_media_button', 15);</span>
Construct the Window
To be able to use the jQuery function $(), we encapsulate the content of our media_button.js file in the jQuery() function. Then, we create a new function which will open the media window when the user clicks on our button.
<span>function include_media_button_js_file() {
</span>    <span>wp_enqueue_script('media_button', 'path/to/media_button.js', array('jquery'), '1.0', true);
</span><span>}</span>
A media window is an instance of the wp.media object. Its constructor admits one parameter which is another object containing some attributes for the window. So the open_media_window_() function above may contain the following:
<span>add_action('wp_enqueue_media', 'include_media_button_js_file');</span>
The title attribute will be displayed as the title of the window. Be careful, the value of the button attribute is an object which admits a text attribute to set the label of the button on which the user will click to validate its choice.
The library attribute will be used by WordPress to filter the media files displayed in the window. In this example, only the images can be selected. Moreover, the user won’t be able to chose more than one file thanks to the false value for the multiple attribute.
None of these attributes are really required by WordPress. However, if you don’t indicate a title, your window will be untitled. By default, the multiple attribute is set to false and the displayed media files are not filtered.
Use the Media Window
Retrieve the User’s Selection
The following code goes inside the open_media_window() function we created above.
For the moment, our window is constructed but it is not opened. To open the window, you can use the open() method but, before, you may want to retrieve the user’s selection.
To do that, we will use a special event created by WordPress for the media windows: select. Attach a function to this event require the use of the on() method.
<span>add_action('media_buttons', 'add_my_media_button');</span>
The user’s selection is now stored in the variable selection. Depending on whether or not you allow multiple choice, the use of this variable is different.
If the user can only chose one file, you can retrieve it with the first() method. Then you can convert the obtained object to JSON in order to get the information you want. Replace the above window.on event with:
<span>function add_my_media_button() {
</span>    echo <span>'<a href="#"  >Add my media</a>';
</span><span>}</span>
This JSON object contains all you need about the chosen file. For instance, you can access the file’s ID with the id attribute while the file’s URL is accessible via the url attribute.
If you want to know what attributes can be used, you can for example list all of them in your browser’s console.
<span>add_action('media_buttons', 'add_my_media_button', 15);</span>
If the user can select multiple files, you can convert the selection to an Array. Then you can retrieve each file’s data with the toJSON() method, exactly as in the first case. Replace the above window.on event with:
<span>function include_media_button_js_file() {
</span>    <span>wp_enqueue_script('media_button', 'path/to/media_button.js', array('jquery'), '1.0', true);
</span><span>}</span>
The files Array is sorted: the 0 entry contains the first file selected by the user, the 1 entry contains the second file, and so on.
Insert Text in the Editor
Now that we retrieved the user’s choice, we would insert some text in the editor. To do that, we will use the WordPress function wp.media.editor.insert() which admits one parameter: the text to insert at the cursor’s current position.
<span>add_action('wp_enqueue_media', 'include_media_button_js_file');</span>
The advantage of using this function is that WordPress will automatically insert our text in both visual and HTML editors.
Optimization
Our window is ready to be used. However, a problem persists: it will be reconstructed each time the user hits the button so we will change this behavior.
<span>jQuery(function($) {
</span>    <span>$(document).ready(function(){
</span>            <span>$('#insert-my-media').click(open_media_window);
</span>        <span>});
</span>
    <span>function open_media_window() {
</span>    <span>}
</span><span>});</span>
First we check if the window has already been created and, if not, we create it. Then, we open our window and we finish the open_media_window() function with the instruction return false; in order to prevent the default behavior of the link.
Note that there exists more than one way to prevent the problem indicated above. However, the scheme is always the same and you can adapt your favorite method easily.
In Conclusion
You now know how to add a media button and how to use it to insert some text related to the user’s choice in the editor. If you listed the attributes of the data variable we created above, you may have noticed that WordPress give us all the information about the chosen media file, meaning you can do whatever you want with it.
Frequently Asked Questions (FAQs) about Adding a Media Button to the Content Editor
Why is my “Add Media” button not working in WordPress?
There could be several reasons why your “Add Media” button is not working in WordPress. The most common reason is a plugin conflict. Some plugins may interfere with the functionality of the “Add Media” button. To resolve this, you can deactivate all your plugins and then reactivate them one by one to identify the problematic plugin. Another reason could be outdated WordPress or theme versions. Ensure you have the latest versions installed. If the problem persists, it could be due to a JavaScript or jQuery issue. In this case, you may need to seek help from a professional developer.
How can I add a media button to the content editor in WordPress?
Adding a media button to the content editor in WordPress is a straightforward process. You can do this by using the ‘a(chǎn)dd_action’ function in your theme’s functions.php file. This function allows you to add a new button to the content editor. You can then use the ‘wp_enqueue_media’ function to load the necessary scripts and styles for the media uploader. Finally, you can use the ‘wp.media’ object to open the media uploader when the button is clicked.
Can I customize the media button in the content editor?
Yes, you can customize the media button in the content editor. You can change the button’s text, style, and functionality using various WordPress functions and hooks. For instance, you can use the ‘media_buttons_context’ filter to change the button’s position in the editor. You can also use the ‘wp.media’ object to customize the media uploader’s appearance and behavior.
Why can’t I see the “Add Media” button in my content editor?
If you can’t see the “Add Media” button in your content editor, it could be due to a user role restriction. WordPress allows you to control what different user roles can do on your website. If your user role doesn’t have the ‘upload_files’ capability, you won’t be able to see the “Add Media” button. You can change this by modifying your user role’s capabilities using a plugin like User Role Editor.
How can I fix the “Add Media” button not working issue without coding knowledge?
If you’re not comfortable with coding, you can try several solutions to fix the “Add Media” button not working issue. First, try clearing your browser cache and cookies. If that doesn’t work, deactivate all your plugins and reactivate them one by one to identify the problematic plugin. You can also switch to a default WordPress theme to see if the issue is theme-related. If none of these solutions work, consider seeking help from a professional developer or contacting WordPress support.
What are the alternatives to the “Add Media” button in WordPress?
If you’re having trouble with the “Add Media” button, there are several alternatives you can use. One option is to use the ‘Add From Server’ plugin, which allows you to upload files directly from your server. Another option is to use the ‘Drag & Drop Featured Image’ plugin, which lets you drag and drop images into your posts and pages. You can also use the ‘Media from FTP’ plugin to upload files via FTP.
Can I add a media button to the content editor in other CMS platforms?
Yes, you can add a media button to the content editor in other CMS platforms. The process may vary depending on the platform, but it generally involves using the platform’s API or built-in functions to add a new button to the content editor. You can then use JavaScript or jQuery to open a media uploader when the button is clicked.
How can I add multiple media buttons to the content editor?
You can add multiple media buttons to the content editor by using the ‘a(chǎn)dd_action’ function multiple times in your theme’s functions.php file. Each ‘a(chǎn)dd_action’ function call will add a new button to the content editor. You can then use the ‘wp_enqueue_media’ function and the ‘wp.media’ object to load the necessary scripts and styles for each media uploader.
Can I restrict who can use the “Add Media” button in the content editor?
Yes, you can restrict who can use the “Add Media” button in the content editor. WordPress allows you to control what different user roles can do on your website. If you want to restrict the “Add Media” button to certain user roles, you can do so by modifying the user roles’ capabilities using a plugin like User Role Editor.
Why is my media not showing up after using the “Add Media” button?
If your media is not showing up after using the “Add Media” button, it could be due to several reasons. The most common reason is a file size or type issue. WordPress has limits on the size and type of files you can upload. If your file exceeds these limits, it won’t show up in your post or page. You can change these limits by modifying your server’s php.ini file or using a plugin like Increase Maximum Upload File Size. Another reason could be a plugin conflict. Some plugins may interfere with the media uploader’s functionality. To resolve this, you can deactivate all your plugins and then reactivate them one by one to identify the problematic plugin.
The above is the detailed content of Adding a Media Button to the WordPress Content Editor. For more information, please follow other related articles on the PHP Chinese website!

Hot AI Tools

Undress AI Tool
Undress images for free

Undresser.AI Undress
AI-powered app for creating realistic nude photos

AI Clothes Remover
Online AI tool for removing clothes from photos.

Clothoff.io
AI clothes remover

Video Face Swap
Swap faces in any video effortlessly with our completely free AI face swap tool!

Hot Article
Hot Tools

Notepad++7.3.1
Easy-to-use and free code editor

SublimeText3 Chinese version
Chinese version, very easy to use

Zend Studio 13.0.1
Powerful PHP integrated development environment

Dreamweaver CS6
Visual web development tools

SublimeText3 Mac version
God-level code editing software (SublimeText3)
Hot Topics


 How to use Git with WordPress
Jun 26, 2025 am 12:23 AM
How to use Git with WordPress
Jun 26, 2025 am 12:23 AM
When managing WordPress projects with Git, you should only include themes, custom plugins, and configuration files in version control; set up .gitignore files to ignore upload directories, caches, and sensitive configurations; use webhooks or CI tools to achieve automatic deployment and pay attention to database processing; use two-branch policies (main/develop) for collaborative development. Doing so can avoid conflicts, ensure security, and improve collaboration and deployment efficiency.
 How to create a simple Gutenberg block
Jun 28, 2025 am 12:13 AM
How to create a simple Gutenberg block
Jun 28, 2025 am 12:13 AM
The key to creating a Gutenberg block is to understand its basic structure and correctly connect front and back end resources. 1. Prepare the development environment: install local WordPress, Node.js and @wordpress/scripts; 2. Use PHP to register blocks and define the editing and display logic of blocks with JavaScript; 3. Build JS files through npm to make changes take effect; 4. Check whether the path and icons are correct when encountering problems or use real-time listening to build to avoid repeated manual compilation. Following these steps, a simple Gutenberg block can be implemented step by step.
 How to use the WordPress testing environment
Jun 24, 2025 pm 05:13 PM
How to use the WordPress testing environment
Jun 24, 2025 pm 05:13 PM
Use WordPress testing environments to ensure the security and compatibility of new features, plug-ins or themes before they are officially launched, and avoid affecting real websites. The steps to build a test environment include: downloading and installing local server software (such as LocalWP, XAMPP), creating a site, setting up a database and administrator account, installing themes and plug-ins for testing; the method of copying a formal website to a test environment is to export the site through the plug-in, import the test environment and replace the domain name; when using it, you should pay attention to not using real user data, regularly cleaning useless data, backing up the test status, resetting the environment in time, and unifying the team configuration to reduce differences.
 How to flush rewrite rules programmatically
Jun 27, 2025 am 12:21 AM
How to flush rewrite rules programmatically
Jun 27, 2025 am 12:21 AM
In WordPress, when adding a custom article type or modifying the fixed link structure, you need to manually refresh the rewrite rules. At this time, you can call the flush_rewrite_rules() function through the code to implement it. 1. This function can be added to the theme or plug-in activation hook to automatically refresh; 2. Execute only once when necessary, such as adding CPT, taxonomy or modifying the link structure; 3. Avoid frequent calls to avoid affecting performance; 4. In a multi-site environment, refresh each site separately as appropriate; 5. Some hosting environments may restrict the storage of rules. In addition, clicking Save to access the "Settings>Pinned Links" page can also trigger refresh, suitable for non-automated scenarios.
 How to set up redirects in WordPress htaccess
Jun 25, 2025 am 12:19 AM
How to set up redirects in WordPress htaccess
Jun 25, 2025 am 12:19 AM
TosetupredirectsinWordPressusingthe.htaccessfile,locatethefileinyoursite’srootdirectoryandaddredirectrulesabovethe#BEGINWordPresssection.Forbasic301redirects,usetheformatRedirect301/old-pagehttps://example.com/new-page.Forpattern-basedredirects,enabl
 How to make a WordPress theme responsive
Jun 28, 2025 am 12:14 AM
How to make a WordPress theme responsive
Jun 28, 2025 am 12:14 AM
To implement responsive WordPress theme design, first, use HTML5 and mobile-first Meta tags, add viewport settings in header.php to ensure that the mobile terminal is displayed correctly, and organize the layout with HTML5 structure tags; second, use CSS media query to achieve style adaptation under different screen widths, write styles according to the mobile-first principle, and commonly used breakpoints include 480px, 768px and 1024px; third, elastically process pictures and layouts, set max-width:100% for the picture and use Flexbox or Grid layout instead of fixed width; finally, fully test through browser developer tools and real devices, optimize loading performance, and ensure response
 How to integrate third-party APIs with WordPress
Jun 29, 2025 am 12:03 AM
How to integrate third-party APIs with WordPress
Jun 29, 2025 am 12:03 AM
Tointegratethird-partyAPIsintoWordPress,followthesesteps:1.SelectasuitableAPIandobtaincredentialslikeAPIkeysorOAuthtokensbyregisteringandkeepingthemsecure.2.Choosebetweenpluginsforsimplicityorcustomcodeusingfunctionslikewp_remote_get()forflexibility.
 How to send email from WordPress using SMTP
Jun 27, 2025 am 12:30 AM
How to send email from WordPress using SMTP
Jun 27, 2025 am 12:30 AM
UsingSMTPforWordPressemailsimprovesdeliverabilityandreliabilitycomparedtothedefaultPHPmail()function.1.SMTPauthenticateswithyouremailserver,reducingspamplacement.2.SomehostsdisablePHPmail(),makingSMTPnecessary.3.SetupiseasywithpluginslikeWPMailSMTPby
