


So, this morning you woke up with the idea to develop a way to store and label interesting articles you’ve read. After playing with the idea, you figure a Telegram chatbot is the most convenient solution for this problem.
In this guide, we’ll walk you through everything you need to know to build your first Telegram chatbot using JavaScript and Node.js.
To get started, we have to register our new bot with the so-called Botfather to receive our API access token.
Key Takeaways
- Register your bot with the BotFather on Telegram to get an API access token, which is necessary for running the bot’s code.
- Use JavaScript and Node.js to code your bot. The tutorial uses a simple Node.js project with two dependencies: dotenv and node-telegram-bot-api.
- Create bot commands by passing the API access token and setting the polling option to true. This allows the bot to check for incoming messages at regular intervals.
- Explore advanced options like sending keyboards with predefined options. You can also request data, such as a person’s phone number or geolocation.
- To deploy your bot, you can use cloud platforms like Heroku, AWS, and Google Cloud, or traditional hosting providers. The exact process will depend on the platform you choose.
Bot Registration with @BotFather
The first step towards our very own Telegram bot is registering the bot with the BotFather. The BotFather is a bot itself that makes your life much easier. It helps you with registering bots, changing the bot description, adding commands, and providing you with the API token for your bot.
The API token is the most important step, as this allows you to run the code that can perform tasks for the bot.
1. Finding the BotFather
The BotFather can be found on Telegram by searching for ‘BotFather’. Click on the official BotFather, indicated with the white checkmark icon in the blue circle.

2. Registering a New Bot
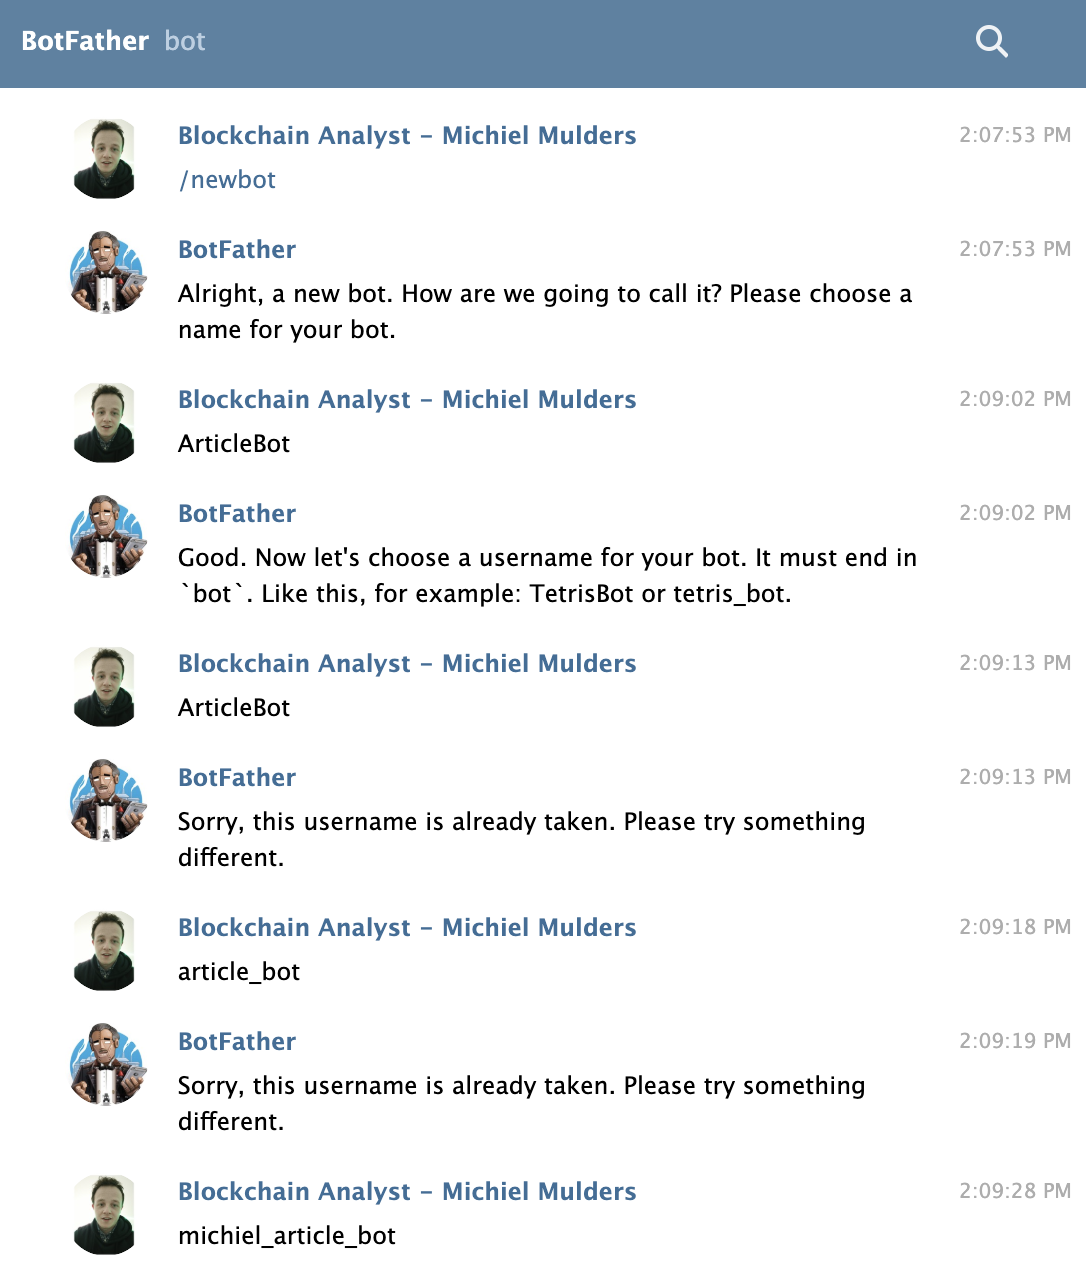
Now we’ve found BotFather, let’s talk to him! You can start the conversation by typing /newbot. BotFather will ask you to choose a name for your both. This name can be anything and doesn’t have to be unique. To keep things simple, I named my bot ArticleBot.
Next, you will be prompted to input a username for the bot. The username must be unique and end in bot. Therefore, I chose michiel_article_bot, as that username was not yet taken. This will also be the username you use for looking up the bot in Telegram’s search field.
FatherBot will return a success message with your token to access the Telegram HTTP API. Make sure to store this token safely, and certainly don’t share it with anyone else.

3. Modifying the Bot
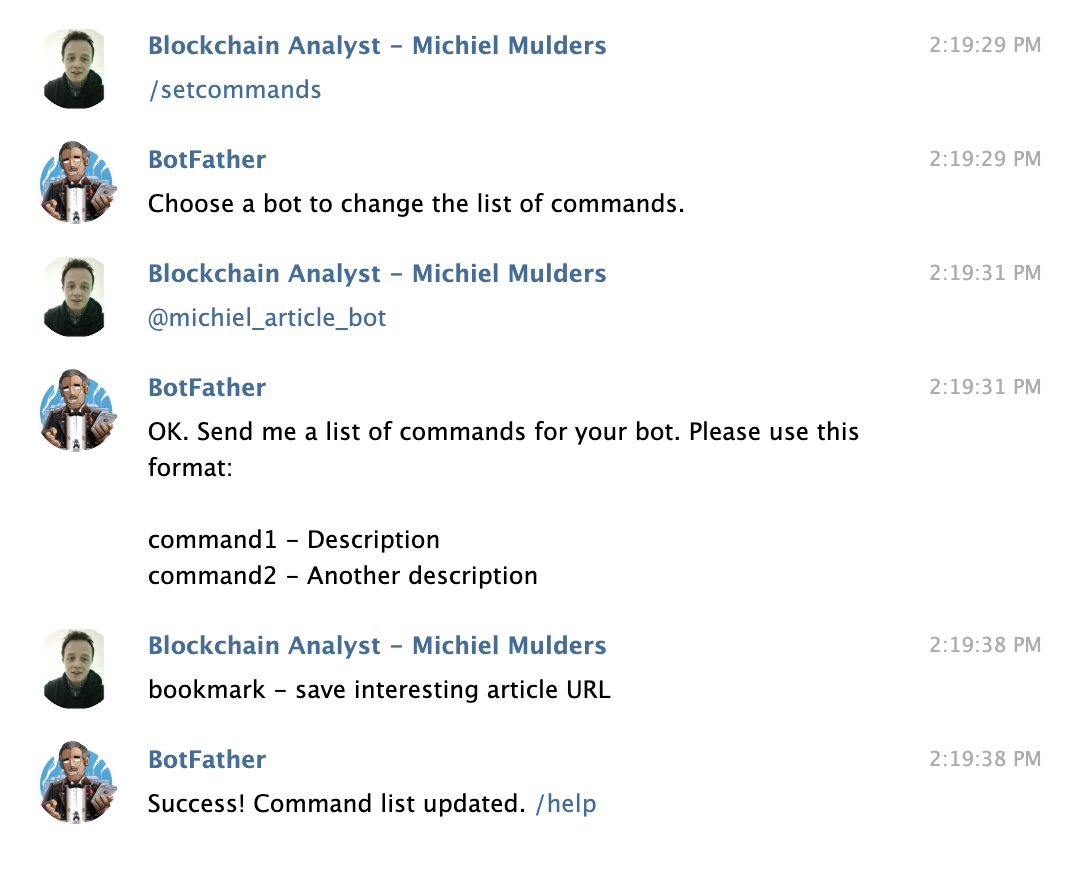
We can further modify the bot by adding a description or setting the commands we wish the bot to know. You can message the bot with the text /setcommands. It will show you how to input the commands with the format command1 - Description.
For my bot, I set the command bookmark - save interesting article URL.
If you look up your bot now, you will see a command icon in the chatbox that shows you the available commands. You can create many more commands that do work and not list them via BotFather. However, from a UX viewpoint, I recommend registering all available commands with BotFather.

We can set the privacy of the bot with /setprivacy. You can either enable or disable it. By default, the privacy value is set to enabled, which means your bot will only receive messages that start with the / symbol or by mentioning the bot’s username.
This setting can be disabled which means that your bot can receive all messages that are sent to a group. You will have to add a bot to your group for it to receive all these messages.

A list of all available commands can be found here:

Finally, we are all set to get started coding. Make sure you have the API access token ready.
Coding Your First Bot Command
First of all, during this tutorial, we will be using the following code I’ve prepared.
It’s a simple Node.js project that has only two dependencies: dotenv and node-telegram-bot-api. The first package is used for creating a .env config file that will hold our API access token. The second package acts as a Node.js wrapper for the Telegram Bots API, which we will be using for this tutorial.
1. Setting Up the Project
To get started, clone the GitHub repository and open the project in your favorite editor. Next, create a .env file in the root of your project and add a single line — TOKEN=yourtoken. Replace yourtoken with the token you have received from BotFather.
To make sure the connection works, navigate to the root of the project in your terminal and run npm start. The npm start command will run your app.js file and should connect to your bot. If you don’t see any errors, we are good to go!
2. Create the First Bot Command
First of all, we have to create the bot by passing it our API access token and setting the polling option to true. This means the bot will check for incoming messages at regular intervals.
<span>require('dotenv').config();
</span><span>const TelegramBot = require('node-telegram-bot-api');
</span>
<span>const token = process.env.TOKEN;
</span>
<span>// Created instance of TelegramBot
</span><span>const bot = new TelegramBot(token, {
</span>   <span>polling: true
</span><span>});
</span>
Now the bot has been created, let’s take a look at the following snippet of code that represents our /bookmark command. We set a listener for incoming text messages, onText, and specify to look for a message that starts with /bookmark, as we specify this in the regex string.
When a message starts with /bookmark, our code will execute. First of all, we store the chat ID, as we want to be able to send a message back to this user’s chat.
Next, we check if the user has used the command correctly. We expect a URL to be passed with the command like this: /bookmark www.google.com.
If there is no URL specified, we send a message back to the stored chatID telling the user to provide us with a URL. If they do send a URL, we store the URL and send them a success message.
<span>// Listener (handler) for telegram's /bookmark event
</span>bot<span>.onText(<span>/<span>\/bookmark</span>/</span>, (msg<span>, match</span>) => {
</span>   <span>const chatId = msg.chat.id;
</span>   <span>const url = match.input.split(' ')[1];
</span>   <span>// 'msg' is the received Message from Telegram
</span>   <span>// 'match' is the result of executing the regexp above on the text content
</span>   <span>// of the message
</span>
   <span>if (url === undefined) {
</span>       bot<span>.sendMessage(
</span>           chatId<span>,
</span>           <span>'Please provide URL of article!',
</span>       <span>);
</span>       <span>return;
</span>   <span>}
</span>
   <span>URLs.push(url);
</span>   bot<span>.sendMessage(
</span>       chatId<span>,
</span>       <span>'URL has been successfully saved!',
</span>   <span>);
</span><span>});
</span>
You might have noticed we are using two parameters for the callback function msg and match. The msg property represents the full message you receive whereas match represents the result from the regular expression we have defined. The image below shows you the full msg, and after ---- it shows you the match.
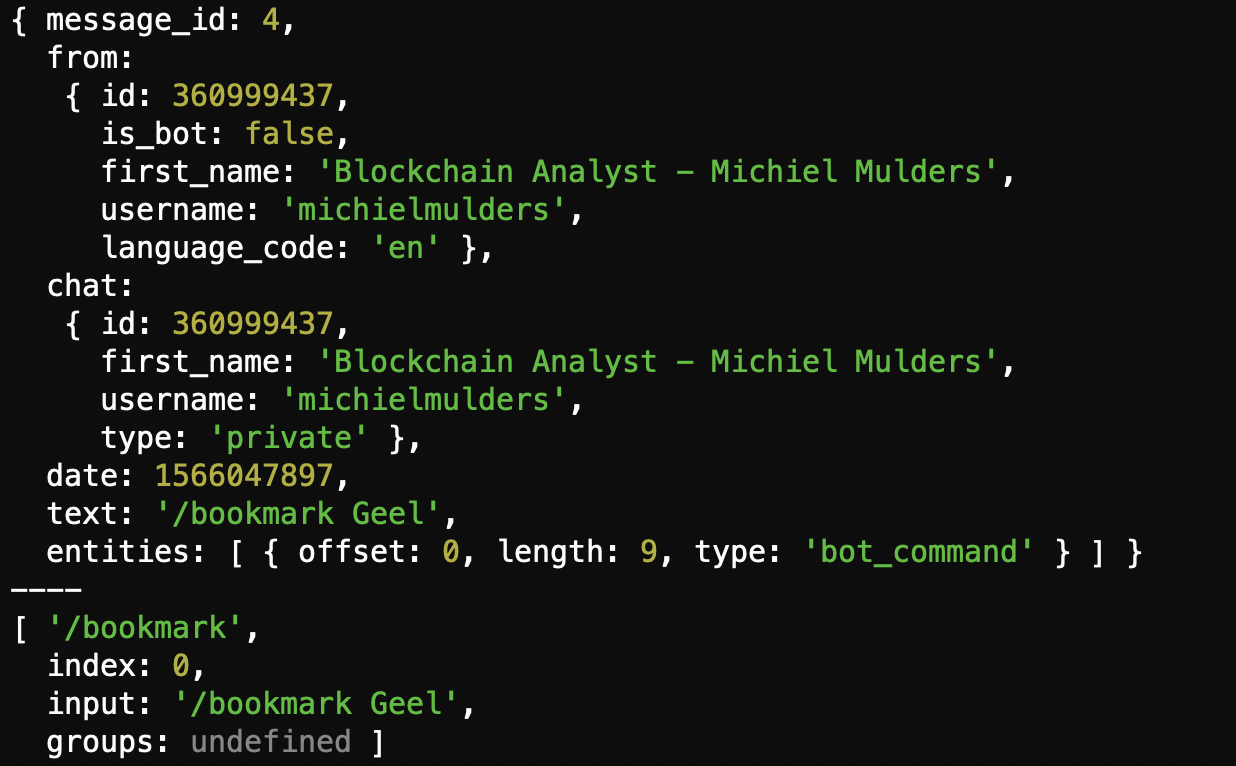
When we try out our command in the chat with the bot, we receive the following result:

If you see the same result, congratulations! You have just created your first bot command. Let’s take a look at more advanced options like sending keyboards with predefined options.
3. Keyboard Options
Now we know how to create a custom command, let’s take a deeper look at the keyboard options. It is possible to send a predefined keyboard with your command to limit the options of the user. It can be as simple as restricting the user to answer with Yes or No.
3.1 Normal Keyboard
Let’s take a look at the following snippet of code. We have added a third parameter to our bot.sendMessage function. This object defines the options for our keyboard. If you take a closer look at reply_markup.keyboard, you find an array that contains more arrays. Every array here represents a row with options. This helps you with formatting options that are more important or have longer button text.
<span>// Listener (handler) for showcasing different keyboard layout
</span>bot<span>.onText(<span>/<span>\/keyboard</span>/</span>, (msg) => {
</span> bot<span>.sendMessage(msg.chat.id, 'Alternative keybaord layout', {
</span> <span>'reply_markup': {
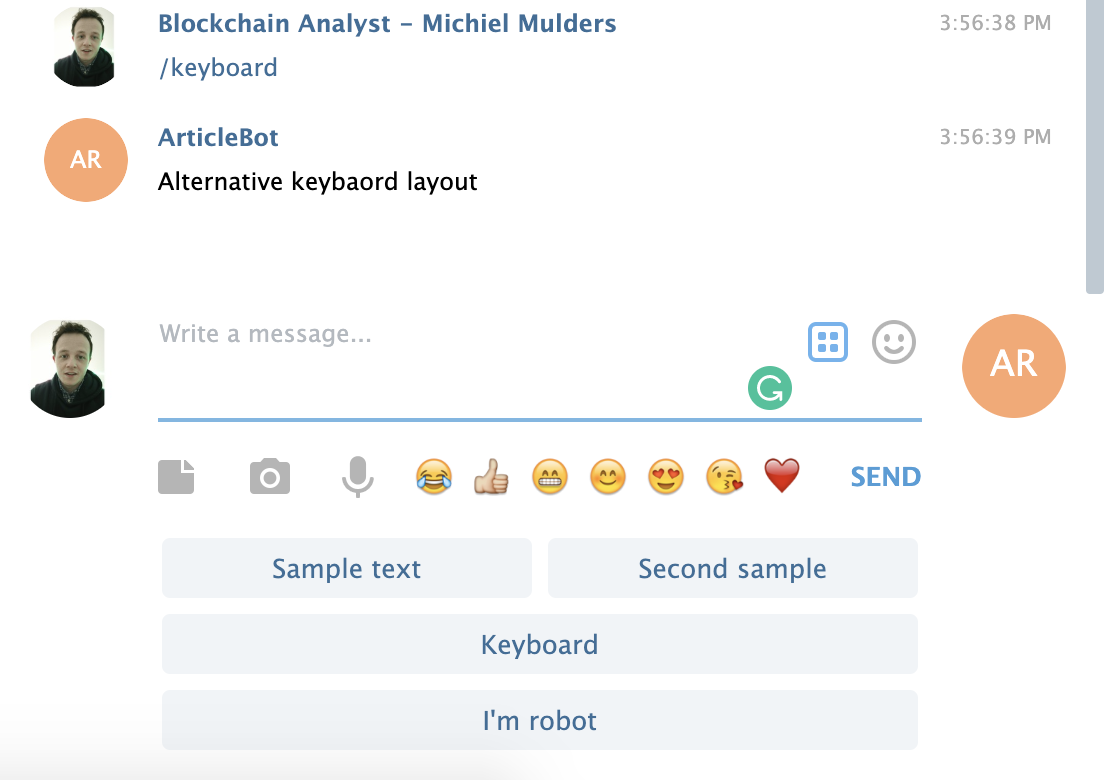
</span> <span>'keyboard': [['Sample text', 'Second sample'], ['Keyboard'], ['I\'m robot']],
</span> <span>resize_keyboard: true,
</span> <span>one_time_keyboard: true,
</span> <span>force_reply: true,
</span> <span>}
</span> <span>});
</span><span>});
</span>
This piece of code gives the following result when sending a message /keyboard to our bot.
Further, we can also define inline keyboards with extra data per option.
3.1 Inline Keyboard
An inline keyboard will be shown in the chat, and not under your message input box. As we want to label the URLs we submit, we can do this by showing the user the available categories. This is how our keyboard looks now:

Let’s take a look at the code underneath. The reply_markup now defines the property inline_keyboard. The rest of the markup remains the same. Every array represents a row. However, instead of just passing text, we can also pass an object with text and callback_data to know what option you have selected.
<span>require('dotenv').config();
</span><span>const TelegramBot = require('node-telegram-bot-api');
</span>
<span>const token = process.env.TOKEN;
</span>
<span>// Created instance of TelegramBot
</span><span>const bot = new TelegramBot(token, {
</span>   <span>polling: true
</span><span>});
</span>
The next section explains how to use the handler for receiving callback data.
3.2 Callback From Keyboard
In case we want to receive callback data, we have to listen to this type of event.
<span>// Listener (handler) for telegram's /bookmark event
</span>bot<span>.onText(<span>/<span>\/bookmark</span>/</span>, (msg<span>, match</span>) => {
</span>   <span>const chatId = msg.chat.id;
</span>   <span>const url = match.input.split(' ')[1];
</span>   <span>// 'msg' is the received Message from Telegram
</span>   <span>// 'match' is the result of executing the regexp above on the text content
</span>   <span>// of the message
</span>
   <span>if (url === undefined) {
</span>       bot<span>.sendMessage(
</span>           chatId<span>,
</span>           <span>'Please provide URL of article!',
</span>       <span>);
</span>       <span>return;
</span>   <span>}
</span>
   <span>URLs.push(url);
</span>   bot<span>.sendMessage(
</span>       chatId<span>,
</span>       <span>'URL has been successfully saved!',
</span>   <span>);
</span><span>});
</span>
The message property on callbackQuery contains the whole message from the user. The data property contains our category callback data.
You might have spotted a design error by now. What if we have two commands that send back callback data? You might get some very weird behavior or replies.
Therefore, it is recommended to send back a stringified JSON object that also holds a label to identify which command the callback data belongs to. Take a look at the following best practice:
<span>// Listener (handler) for showcasing different keyboard layout
</span>bot<span>.onText(<span>/<span>\/keyboard</span>/</span>, (msg) => {
</span>   bot<span>.sendMessage(msg.chat.id, 'Alternative keybaord layout', {
</span>       <span>'reply_markup': {
</span>           <span>'keyboard': [['Sample text', 'Second sample'], ['Keyboard'], ['I\'m robot']],
</span>           <span>resize_keyboard: true,
</span>           <span>one_time_keyboard: true,
</span>           <span>force_reply: true,
</span>       <span>}
</span>   <span>});
</span><span>});
</span>
You can use the data from the command option to switch to this command’s specific business logic.
We are well on our way to becoming Telegram Bot jedis. To become a fully-learned master, let’s explore data requests.
3.3 Data Requests – Phone Number
It is possible to request data, such as a person’s phone number or geolocation. For this tutorial, we showcase how to request a phone number with an alternative keyboard.
<span>// Listener (handler) for telegram's /label event
</span>bot<span>.onText(<span>/<span>\/label</span>/</span>, (msg<span>, match</span>) => {
</span>   <span>const chatId = msg.chat.id;
</span>   <span>const url = match.input.split(' ')[1];
</span>
   <span>if (url === undefined) {
</span>       bot<span>.sendMessage(
</span>           chatId<span>,
</span>           <span>'Please provide URL of article!',
</span>       <span>);
</span>       <span>return;
</span>   <span>}
</span>
   tempSiteURL <span>= url;
</span>   bot<span>.sendMessage(
</span>       chatId<span>,
</span>       <span>'URL has been successfully saved!',
</span>       <span>{
</span>           <span>reply_markup: {
</span>               <span>inline_keyboard: [[
</span>                   <span>{
</span>                       <span>text: 'Development',
</span>                       <span>callback_data: 'development'
</span>                   <span>}, {
</span>                       <span>text: 'Lifestyle',
</span>                       <span>callback_data: 'lifestyle'
</span>                   <span>}, {
</span>                       <span>text: 'Other',
</span>                       <span>callback_data: 'other'
</span>                   <span>}
</span>               <span>]]
</span>           <span>}
</span>       <span>}
</span>   <span>);
</span><span>});
</span>
The user will receive the following request in his chat:
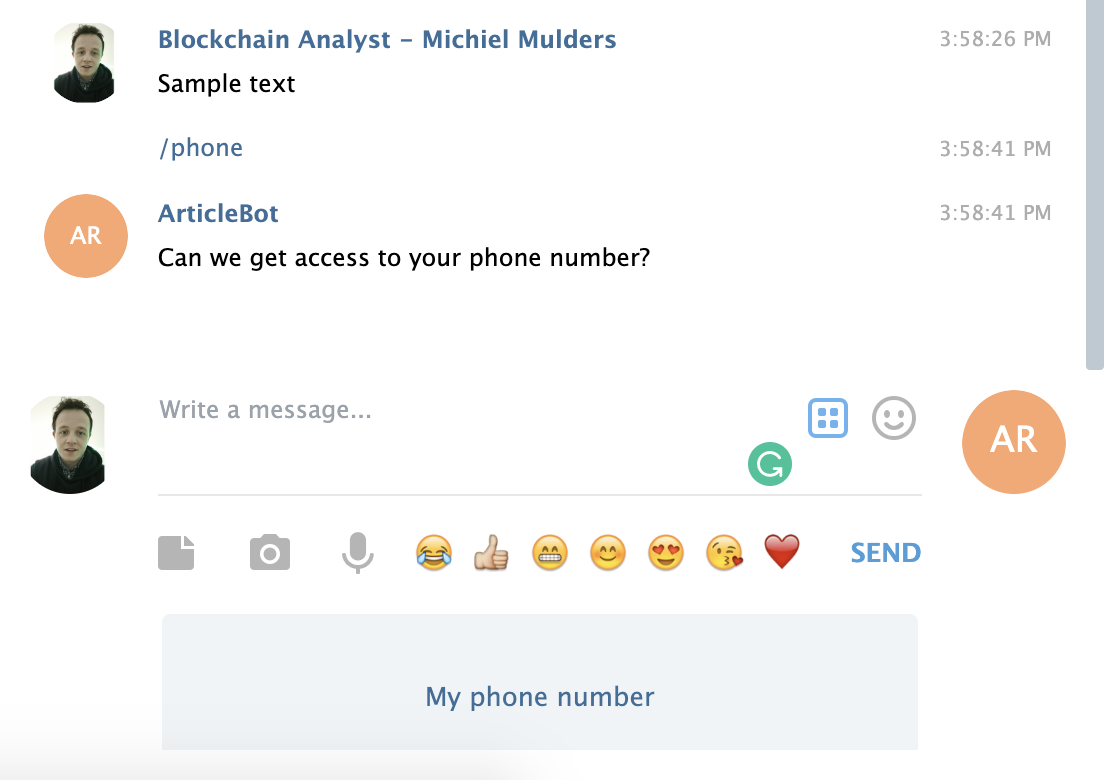
When you click the button My phone number, you get the following phone number request:

This is how it looks after we give access:

Finally! You are a fully-learned Telegram Bot jedi. For now, more information and resources can be found here:
- The difference between private and public messages
- Different types of events
- Tutorials by Hosein2398 on GitHub
Stay tuned here, too — we’ll be back next month with a tutorial that delves deeper into the Telegram API’s advanced features.
Frequently Asked Questions (FAQs) about Building Your First Telegram Chatbot with Node.js
What are the prerequisites for building a Telegram chatbot with Node.js?
To build a Telegram chatbot with Node.js, you need to have a basic understanding of JavaScript and Node.js. You also need to install Node.js and npm (Node Package Manager) on your computer. Additionally, you need to create a bot on Telegram using BotFather, which will provide you with a token that you’ll use to interact with the Telegram API.
How can I create a bot on Telegram using BotFather?
BotFather is a bot on Telegram that allows you to create new bots. To create a new bot, start a chat with BotFather, then follow the prompts. You’ll be asked to choose a name and username for your bot. Once you’ve done this, BotFather will provide you with a token, which you’ll use to interact with the Telegram API.
How can I interact with the Telegram API using Node.js?
To interact with the Telegram API using Node.js, you can use the node-telegram-bot-api package. This package provides a simple and powerful interface for the Telegram API. You can install it using npm, then require it in your code. You can then create a new bot using the token provided by BotFather, and use the methods provided by the package to interact with the API.
How can I handle messages sent to my bot?
The node-telegram-bot-api package provides an onText method, which you can use to handle text messages sent to your bot. This method takes a regular expression and a callback function as arguments. The callback function is called whenever a message that matches the regular expression is received. The message object is passed to the callback function, which you can use to respond to the message.
How can I send messages from my bot?
To send messages from your bot, you can use the sendMessage method provided by the node-telegram-bot-api package. This method takes two arguments: the chat ID of the recipient, and the text of the message. You can get the chat ID from the message object passed to the callback function of the onText method.
How can I deploy my bot?
Once you’ve built your bot, you can deploy it to a server so that it can run continuously. There are many options for this, including cloud platforms like Heroku, AWS, and Google Cloud, as well as traditional hosting providers. The exact process will depend on the platform you choose, but generally involves pushing your code to the platform, then starting the bot using the platform’s tools.
How can I handle different types of messages, like photos or stickers?
The node-telegram-bot-api package provides methods for handling different types of messages. For example, you can use the onPhoto method to handle photo messages, or the onSticker method to handle sticker messages. These methods work similarly to the onText method, taking a callback function that is called when a message of the corresponding type is received.
How can I add custom commands to my bot?
You can add custom commands to your bot using the command method provided by the node-telegram-bot-api package. This method takes a string and a callback function as arguments. The string is the name of the command, and the callback function is called when the command is received. You can use the message object passed to the callback function to respond to the command.
How can I handle inline queries?
Inline queries allow users to interact with your bot directly from the text input field of a chat. The node-telegram-bot-api package provides an onInlineQuery method, which you can use to handle inline queries. This method takes a callback function, which is called when an inline query is received. You can use the inline query object passed to the callback function to respond to the query.
How can I debug my bot?
Debugging your bot can be done in several ways. One common method is to use console.log statements in your code to print out information about the state of your bot. You can also use debugging tools like the Node.js debugger or Chrome DevTools. Additionally, the node-telegram-bot-api package provides an onError method, which you can use to handle any errors that occur while your bot is running.
The above is the detailed content of How to Build Your First Telegram Chatbot with Node.js. For more information, please follow other related articles on the PHP Chinese website!

Hot AI Tools

Undress AI Tool
Undress images for free

Undresser.AI Undress
AI-powered app for creating realistic nude photos

AI Clothes Remover
Online AI tool for removing clothes from photos.

Clothoff.io
AI clothes remover

Video Face Swap
Swap faces in any video effortlessly with our completely free AI face swap tool!

Hot Article
Hot Tools

Notepad++7.3.1
Easy-to-use and free code editor

SublimeText3 Chinese version
Chinese version, very easy to use

Zend Studio 13.0.1
Powerful PHP integrated development environment

Dreamweaver CS6
Visual web development tools

SublimeText3 Mac version
God-level code editing software (SublimeText3)


 How to make an HTTP request in Node.js?
Jul 13, 2025 am 02:18 AM
How to make an HTTP request in Node.js?
Jul 13, 2025 am 02:18 AM
There are three common ways to initiate HTTP requests in Node.js: use built-in modules, axios, and node-fetch. 1. Use the built-in http/https module without dependencies, which is suitable for basic scenarios, but requires manual processing of data stitching and error monitoring, such as using https.get() to obtain data or send POST requests through .write(); 2.axios is a third-party library based on Promise. It has concise syntax and powerful functions, supports async/await, automatic JSON conversion, interceptor, etc. It is recommended to simplify asynchronous request operations; 3.node-fetch provides a style similar to browser fetch, based on Promise and simple syntax
 JavaScript Data Types: Primitive vs Reference
Jul 13, 2025 am 02:43 AM
JavaScript Data Types: Primitive vs Reference
Jul 13, 2025 am 02:43 AM
JavaScript data types are divided into primitive types and reference types. Primitive types include string, number, boolean, null, undefined, and symbol. The values are immutable and copies are copied when assigning values, so they do not affect each other; reference types such as objects, arrays and functions store memory addresses, and variables pointing to the same object will affect each other. Typeof and instanceof can be used to determine types, but pay attention to the historical issues of typeofnull. Understanding these two types of differences can help write more stable and reliable code.
 JavaScript time object, someone builds an eactexe, faster website on Google Chrome, etc.
Jul 08, 2025 pm 02:27 PM
JavaScript time object, someone builds an eactexe, faster website on Google Chrome, etc.
Jul 08, 2025 pm 02:27 PM
Hello, JavaScript developers! Welcome to this week's JavaScript news! This week we will focus on: Oracle's trademark dispute with Deno, new JavaScript time objects are supported by browsers, Google Chrome updates, and some powerful developer tools. Let's get started! Oracle's trademark dispute with Deno Oracle's attempt to register a "JavaScript" trademark has caused controversy. Ryan Dahl, the creator of Node.js and Deno, has filed a petition to cancel the trademark, and he believes that JavaScript is an open standard and should not be used by Oracle
 Handling Promises: Chaining, Error Handling, and Promise Combinators in JavaScript
Jul 08, 2025 am 02:40 AM
Handling Promises: Chaining, Error Handling, and Promise Combinators in JavaScript
Jul 08, 2025 am 02:40 AM
Promise is the core mechanism for handling asynchronous operations in JavaScript. Understanding chain calls, error handling and combiners is the key to mastering their applications. 1. The chain call returns a new Promise through .then() to realize asynchronous process concatenation. Each .then() receives the previous result and can return a value or a Promise; 2. Error handling should use .catch() to catch exceptions to avoid silent failures, and can return the default value in catch to continue the process; 3. Combinators such as Promise.all() (successfully successful only after all success), Promise.race() (the first completion is returned) and Promise.allSettled() (waiting for all completions)
 What is the cache API and how is it used with Service Workers?
Jul 08, 2025 am 02:43 AM
What is the cache API and how is it used with Service Workers?
Jul 08, 2025 am 02:43 AM
CacheAPI is a tool provided by the browser to cache network requests, which is often used in conjunction with ServiceWorker to improve website performance and offline experience. 1. It allows developers to manually store resources such as scripts, style sheets, pictures, etc.; 2. It can match cache responses according to requests; 3. It supports deleting specific caches or clearing the entire cache; 4. It can implement cache priority or network priority strategies through ServiceWorker listening to fetch events; 5. It is often used for offline support, speed up repeated access speed, preloading key resources and background update content; 6. When using it, you need to pay attention to cache version control, storage restrictions and the difference from HTTP caching mechanism.
 JS roundup: a deep dive into the JavaScript event loop
Jul 08, 2025 am 02:24 AM
JS roundup: a deep dive into the JavaScript event loop
Jul 08, 2025 am 02:24 AM
JavaScript's event loop manages asynchronous operations by coordinating call stacks, WebAPIs, and task queues. 1. The call stack executes synchronous code, and when encountering asynchronous tasks, it is handed over to WebAPI for processing; 2. After the WebAPI completes the task in the background, it puts the callback into the corresponding queue (macro task or micro task); 3. The event loop checks whether the call stack is empty. If it is empty, the callback is taken out from the queue and pushed into the call stack for execution; 4. Micro tasks (such as Promise.then) take precedence over macro tasks (such as setTimeout); 5. Understanding the event loop helps to avoid blocking the main thread and optimize the code execution order.
 Understanding Event Bubbling and Capturing in JavaScript DOM events
Jul 08, 2025 am 02:36 AM
Understanding Event Bubbling and Capturing in JavaScript DOM events
Jul 08, 2025 am 02:36 AM
Event bubbles propagate from the target element outward to the ancestor node, while event capture propagates from the outer layer inward to the target element. 1. Event bubbles: After clicking the child element, the event triggers the listener of the parent element upwards in turn. For example, after clicking the button, it outputs Childclicked first, and then Parentclicked. 2. Event capture: Set the third parameter to true, so that the listener is executed in the capture stage, such as triggering the capture listener of the parent element before clicking the button. 3. Practical uses include unified management of child element events, interception preprocessing and performance optimization. 4. The DOM event stream is divided into three stages: capture, target and bubble, and the default listener is executed in the bubble stage.
 A JS roundup of higher-order functions beyond map and filter
Jul 10, 2025 am 11:41 AM
A JS roundup of higher-order functions beyond map and filter
Jul 10, 2025 am 11:41 AM
In JavaScript arrays, in addition to map and filter, there are other powerful and infrequently used methods. 1. Reduce can not only sum, but also count, group, flatten arrays, and build new structures; 2. Find and findIndex are used to find individual elements or indexes; 3.some and everything are used to determine whether conditions exist or all meet; 4.sort can be sorted but will change the original array; 5. Pay attention to copying the array when using it to avoid side effects. These methods make the code more concise and efficient.
