


When a Java developer asked me how to deploy their Spring Boot API on AWS ECS, I saw it as the perfect chance to dive into the latest updates on the CDKTF (Cloud Development Kit for Terraform) project.
In a previous article, I introduced CDKTF, a framework that allows you to write Infrastructure as Code (IaC) using general-purpose programming languages such as Python. Since then, CDKTF has reached its first GA release, making it the perfect time to revisit it. In this article, we’ll walk through deploying a Spring Boot API on AWS ECS using CDKTF.
Find the code of this article on my github repo.
How to deploy a SpringBoot API on AWS ECS using CDKTF? Overview
Before diving into the implementation, let’s review the architecture we aim to deploy:
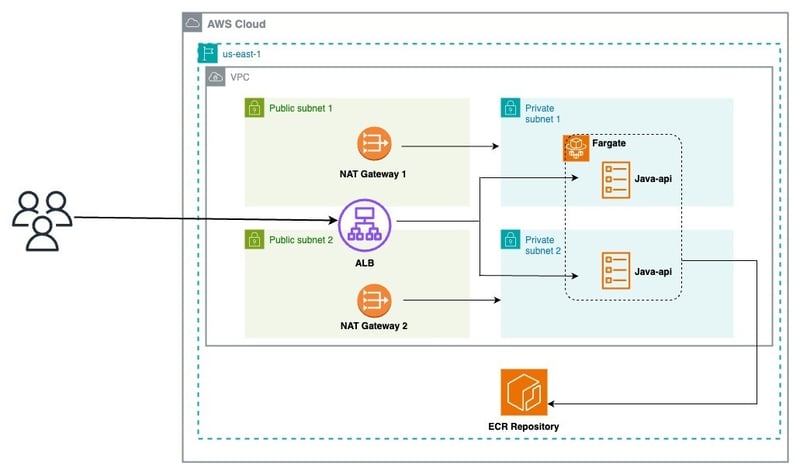
From this diagram, we can break down the architecture into 03 layers:
-
Network:
- VPC
- Public and private subnets
- Internet Gateway
- NAT Gateways
-
Infrastructure:
- Application Load Balancer (ALB)
- Listeners
- ECS Cluster
-
Service Stack:
- Target Groups
- ECS Service
- Task Definitions
Step 1: Containerize your Spring Boot Application
The Java API we’re deploying is available on GitHub.
It defines a simple REST API with three endpoints:
- /ping: Returns the string "pong". This endpoint is useful for testing the API's responsiveness. It also increments a Prometheus counter metric for monitoring.
- /healthcheck: Returns "ok", serving as a health check endpoint to ensure the application is running correctly. Like /ping, it updates a Prometheus counter for observability.
- /hello: Accepts a name query parameter (defaults to "World") and returns a personalized greeting, e.g., "Hello, [name]!". This endpoint also integrates with the Prometheus counter.
Let’s add the Dockerfile:
FROM maven:3.9-amazoncorretto-21 AS builder

WORKDIR /app

COPY pom.xml .

COPY src src

RUN mvn clean package

# amazon java distribution
FROM amazoncorretto:21-alpine

COPY --from=builder /app/target/*.jar /app/java-api.jar

EXPOSE 8080

ENTRYPOINT ["java","-jar","/app/java-api.jar"]
Our application is ready to be deployed!
Step 2: Set up AWS CDKTF
AWS CDKTF allows you to define and manage AWS resources using Python.
1. Prerequisites
- [**python (3.13)**](https://www.python.org/)
- [**pipenv**](https://pipenv.pypa.io/en/latest/)
- [**npm**](https://nodejs.org/en/)
2. Install CDKTF and Dependencies
Ensure you have the necessary tools by installing CDKTF and its dependencies:
$ npm install -g cdktf-cli@latest
This installs the cdktf CLI that allows to spin up new projects for various languages.
3. Initialize Your CDKTF Application
We can scaffold a new python project by running:
FROM maven:3.9-amazoncorretto-21 AS builder

WORKDIR /app

COPY pom.xml .

COPY src src

RUN mvn clean package

# amazon java distribution
FROM amazoncorretto:21-alpine

COPY --from=builder /app/target/*.jar /app/java-api.jar

EXPOSE 8080

ENTRYPOINT ["java","-jar","/app/java-api.jar"]
There are many files created by default and all the dependencies are installed.
Below is the initial main.pyfile:
- [**python (3.13)**](https://www.python.org/)
- [**pipenv**](https://pipenv.pypa.io/en/latest/)
- [**npm**](https://nodejs.org/en/)
Step 3: Building Layers
A stack represents a group of infrastructure resources that CDK for Terraform (CDKTF) compiles into a distinct Terraform configuration. Stacks enable separate state management for different environments within an application. To share resources across layers, we will utilize Cross-Stack references.
1. Network Layer
Add the network_stack.py file to your project
$ npm install -g cdktf-cli@latest
Add the following code to create all the network resources:
# init the project using aws provider
$ mkdir samples-fargate

$ cd samples-fargate && cdktf init --template=python --providers=aws
Then, edit the main.py file:
#!/usr/bin/env python
from constructs import Construct
from cdktf import App, TerraformStack

class MyStack(TerraformStack):
    def __init__(self, scope: Construct, id: str):
        super().__init__(scope, id)

        # define resources here

app = App()
MyStack(app, "aws-cdktf-samples-fargate")

app.synth()
Generate the terraform configuration files by running the following command:
$ mkdir infra

$ cd infra && touch network_stack.py
Deploy the network stack with this:
from constructs import Construct
from cdktf import S3Backend, TerraformStack
from cdktf_cdktf_provider_aws.provider import AwsProvider
from cdktf_cdktf_provider_aws.vpc import Vpc
from cdktf_cdktf_provider_aws.subnet import Subnet
from cdktf_cdktf_provider_aws.eip import Eip
from cdktf_cdktf_provider_aws.nat_gateway import NatGateway
from cdktf_cdktf_provider_aws.route import Route
from cdktf_cdktf_provider_aws.route_table import RouteTable
from cdktf_cdktf_provider_aws.route_table_association import RouteTableAssociation
from cdktf_cdktf_provider_aws.internet_gateway import InternetGateway

class NetworkStack(TerraformStack):
    def __init__(self, scope: Construct, ns: str, params: dict):
        super().__init__(scope, ns)

        self.region = params["region"]

        # configure the AWS provider to use the us-east-1 region
        AwsProvider(self, "AWS", region=self.region)

        # use S3 as backend
        S3Backend(
            self,
            bucket=params["backend_bucket"],
            key=params["backend_key_prefix"] + "/network.tfstate",
            region=self.region,
        )

        # create the vpc
        vpc_demo = Vpc(self, "vpc-demo", cidr_block="192.168.0.0/16")

        # create two public subnets
        public_subnet1 = Subnet(
            self,
            "public-subnet-1",
            vpc_id=vpc_demo.id,
            availability_zone=f"{self.region}a",
            cidr_block="192.168.1.0/24",
        )

        public_subnet2 = Subnet(
            self,
            "public-subnet-2",
            vpc_id=vpc_demo.id,
            availability_zone=f"{self.region}b",
            cidr_block="192.168.2.0/24",
        )

        # create. the internet gateway
        igw = InternetGateway(self, "igw", vpc_id=vpc_demo.id)

        # create the public route table
        public_rt = Route(
            self,
            "public-rt",
            route_table_id=vpc_demo.main_route_table_id,
            destination_cidr_block="0.0.0.0/0",
            gateway_id=igw.id,
        )

        # create the private subnets
        private_subnet1 = Subnet(
            self,
            "private-subnet-1",
            vpc_id=vpc_demo.id,
            availability_zone=f"{self.region}a",
            cidr_block="192.168.10.0/24",
        )

        private_subnet2 = Subnet(
            self,
            "private-subnet-2",
            vpc_id=vpc_demo.id,
            availability_zone=f"{self.region}b",
            cidr_block="192.168.20.0/24",
        )

        # create the Elastic IPs
        eip1 = Eip(self, "nat-eip-1", depends_on=[igw])
        eip2 = Eip(self, "nat-eip-2", depends_on=[igw])

        # create the NAT Gateways
        private_nat_gw1 = NatGateway(
            self,
            "private-nat-1",
            subnet_id=public_subnet1.id,
            allocation_id=eip1.id,
        )

        private_nat_gw2 = NatGateway(
            self,
            "private-nat-2",
            subnet_id=public_subnet2.id,
            allocation_id=eip2.id,
        )

        # create Route Tables
        private_rt1 = RouteTable(self, "private-rt1", vpc_id=vpc_demo.id)
        private_rt2 = RouteTable(self, "private-rt2", vpc_id=vpc_demo.id)

        # add default routes to tables
        Route(
            self,
            "private-rt1-default-route",
            route_table_id=private_rt1.id,
            destination_cidr_block="0.0.0.0/0",
            nat_gateway_id=private_nat_gw1.id,
        )

        Route(
            self,
            "private-rt2-default-route",
            route_table_id=private_rt2.id,
            destination_cidr_block="0.0.0.0/0",
            nat_gateway_id=private_nat_gw2.id,
        )

        # associate routes with subnets
        RouteTableAssociation(
            self,
            "public-rt-association",
            subnet_id=private_subnet2.id,
            route_table_id=private_rt2.id,
        )

        RouteTableAssociation(
            self,
            "private-rt1-association",
            subnet_id=private_subnet1.id,
            route_table_id=private_rt1.id,
        )

        RouteTableAssociation(
            self,
            "private-rt2-association",
            subnet_id=private_subnet2.id,
            route_table_id=private_rt2.id,
        )

        # terraform outputs
        self.vpc_id = vpc_demo.id
        self.public_subnets = [public_subnet1.id, public_subnet2.id]
        self.private_subnets = [private_subnet1.id, private_subnet2.id]

Our VPC is ready as shown in the image below:

2. Infrastructure Layer
Add the infra_stack.py file to your project
#!/usr/bin/env python
from constructs import Construct
from cdktf import App, TerraformStack
from infra.network_stack import NetworkStack

ENV = "dev"
AWS_REGION = "us-east-1"
BACKEND_S3_BUCKET = "blog.abdelfare.me"
BACKEND_S3_KEY = f"{ENV}/cdktf-samples"

class MyStack(TerraformStack):
    def __init__(self, scope: Construct, id: str):
        super().__init__(scope, id)

        # define resources here

app = App()
MyStack(app, "aws-cdktf-samples-fargate")

network = NetworkStack(
    app,
    "network",
    {
        "region": AWS_REGION,
        "backend_bucket": BACKEND_S3_BUCKET,
        "backend_key_prefix": BACKEND_S3_KEY,
    },
)

app.synth()
Add the following code to create all the infrastructure resources:
$ cdktf synth
Edit the main.py file:
$ cdktf deploy network
Deploy the infra stack with this:
$ cd infra && touch infra_stack.py
Note the DNS name of the ALB, we will use it later.

3. Service Layer
Add the service_stack.py file to your project
from constructs import Construct
from cdktf import S3Backend, TerraformStack
from cdktf_cdktf_provider_aws.provider import AwsProvider
from cdktf_cdktf_provider_aws.ecs_cluster import EcsCluster
from cdktf_cdktf_provider_aws.lb import Lb
from cdktf_cdktf_provider_aws.lb_listener import (
    LbListener,
    LbListenerDefaultAction,
    LbListenerDefaultActionFixedResponse,
)
from cdktf_cdktf_provider_aws.security_group import (
    SecurityGroup,
    SecurityGroupIngress,
    SecurityGroupEgress,
)

class InfraStack(TerraformStack):
    def __init__(self, scope: Construct, ns: str, network: dict, params: dict):
        super().__init__(scope, ns)

        self.region = params["region"]

        # Configure the AWS provider to use the us-east-1 region
        AwsProvider(self, "AWS", region=self.region)

        # use S3 as backend
        S3Backend(
            self,
            bucket=params["backend_bucket"],
            key=params["backend_key_prefix"] + "/load_balancer.tfstate",
            region=self.region,
        )

        # create the ALB security group
        alb_sg = SecurityGroup(
            self,
            "alb-sg",
            vpc_id=network["vpc_id"],
            ingress=[
                SecurityGroupIngress(
                    protocol="tcp", from_port=80, to_port=80, cidr_blocks=["0.0.0.0/0"]
                )
            ],
            egress=[
                SecurityGroupEgress(
                    protocol="-1", from_port=0, to_port=0, cidr_blocks=["0.0.0.0/0"]
                )
            ],
        )

        # create the ALB
        alb = Lb(
            self,
            "alb",
            internal=False,
            load_balancer_type="application",
            security_groups=[alb_sg.id],
            subnets=network["public_subnets"],
        )

        # create the LB Listener
        alb_listener = LbListener(
            self,
            "alb-listener",
            load_balancer_arn=alb.arn,
            port=80,
            protocol="HTTP",
            default_action=[
                LbListenerDefaultAction(
                    type="fixed-response",
                    fixed_response=LbListenerDefaultActionFixedResponse(
                        content_type="text/plain",
                        status_code="404",
                        message_body="Could not find the resource you are looking for",
                    ),
                )
            ],
        )

        # create the ECS cluster
        cluster = EcsCluster(self, "cluster", name=params["cluster_name"])

        self.alb_arn = alb.arn
        self.alb_listener = alb_listener.arn
        self.alb_sg = alb_sg.id
        self.cluster_id = cluster.id
Add the following code to create all the ECS Service resources:
...

CLUSTER_NAME = "cdktf-samples"
...

infra = InfraStack(
    app,
    "infra",
    {
        "vpc_id": network.vpc_id,
        "public_subnets": network.public_subnets,
    },
    {
        "region": AWS_REGION,
        "backend_bucket": BACKEND_S3_BUCKET,
        "backend_key_prefix": BACKEND_S3_KEY,
        "cluster_name": CLUSTER_NAME,
    },
)
...
Update the main.py (for the last time ?):
$ cdktf deploy network infra
Deploy the service stack with this:
$ mkdir apps

$ cd apps && touch service_stack.py
Here we go!
We successfully created all the resources to deploy a new service on AWS ECS Fargate.
Run the following to get the list of your stacks
from constructs import Construct
import json
from cdktf import S3Backend, TerraformStack, Token, TerraformOutput
from cdktf_cdktf_provider_aws.provider import AwsProvider
from cdktf_cdktf_provider_aws.ecs_service import (
    EcsService,
    EcsServiceLoadBalancer,
    EcsServiceNetworkConfiguration,
)
from cdktf_cdktf_provider_aws.ecr_repository import (
    EcrRepository,
    EcrRepositoryImageScanningConfiguration,
)
from cdktf_cdktf_provider_aws.ecr_lifecycle_policy import EcrLifecyclePolicy
from cdktf_cdktf_provider_aws.ecs_task_definition import (
    EcsTaskDefinition,
)
from cdktf_cdktf_provider_aws.lb_listener_rule import (
    LbListenerRule,
    LbListenerRuleAction,
    LbListenerRuleCondition,
    LbListenerRuleConditionPathPattern,
)
from cdktf_cdktf_provider_aws.lb_target_group import (
    LbTargetGroup,
    LbTargetGroupHealthCheck,
)
from cdktf_cdktf_provider_aws.security_group import (
    SecurityGroup,
    SecurityGroupIngress,
    SecurityGroupEgress,
)
from cdktf_cdktf_provider_aws.cloudwatch_log_group import CloudwatchLogGroup
from cdktf_cdktf_provider_aws.data_aws_iam_policy_document import (
    DataAwsIamPolicyDocument,
)
from cdktf_cdktf_provider_aws.iam_role import IamRole
from cdktf_cdktf_provider_aws.iam_role_policy_attachment import IamRolePolicyAttachment

class ServiceStack(TerraformStack):
    def __init__(
        self, scope: Construct, ns: str, network: dict, infra: dict, params: dict
    ):
        super().__init__(scope, ns)

        self.region = params["region"]

        # Configure the AWS provider to use the us-east-1 region
        AwsProvider(self, "AWS", region=self.region)

        # use S3 as backend
        S3Backend(
            self,
            bucket=params["backend_bucket"],
            key=params["backend_key_prefix"] + "/" + params["app_name"] + ".tfstate",
            region=self.region,
        )

        # create the service security group
        svc_sg = SecurityGroup(
            self,
            "svc-sg",
            vpc_id=network["vpc_id"],
            ingress=[
                SecurityGroupIngress(
                    protocol="tcp",
                    from_port=params["app_port"],
                    to_port=params["app_port"],
                    security_groups=[infra["alb_sg"]],
                )
            ],
            egress=[
                SecurityGroupEgress(
                    protocol="-1", from_port=0, to_port=0, cidr_blocks=["0.0.0.0/0"]
                )
            ],
        )

        # create the service target group
        svc_tg = LbTargetGroup(
            self,
            "svc-target-group",
            name="svc-tg",
            port=params["app_port"],
            protocol="HTTP",
            vpc_id=network["vpc_id"],
            target_type="ip",
            health_check=LbTargetGroupHealthCheck(path="/ping", matcher="200"),
        )

        # create the service listener rule
        LbListenerRule(
            self,
            "alb-rule",
            listener_arn=infra["alb_listener"],
            action=[LbListenerRuleAction(type="forward", target_group_arn=svc_tg.arn)],
            condition=[
                LbListenerRuleCondition(
                    path_pattern=LbListenerRuleConditionPathPattern(values=["/*"])
                )
            ],
        )

        # create the ECR repository
        repo = EcrRepository(
            self,
            params["app_name"],
            image_scanning_configuration=EcrRepositoryImageScanningConfiguration(
                scan_on_push=True
            ),
            image_tag_mutability="MUTABLE",
            name=params["app_name"],
        )

        EcrLifecyclePolicy(
            self,
            "this",
            repository=repo.name,
            policy=json.dumps(
                {
                    "rules": [
                        {
                            "rulePriority": 1,
                            "description": "Keep last 10 images",
                            "selection": {
                                "tagStatus": "tagged",
                                "tagPrefixList": ["v"],
                                "countType": "imageCountMoreThan",
                                "countNumber": 10,
                            },
                            "action": {"type": "expire"},
                        },
                        {
                            "rulePriority": 2,
                            "description": "Expire images older than 3 days",
                            "selection": {
                                "tagStatus": "untagged",
                                "countType": "sinceImagePushed",
                                "countUnit": "days",
                                "countNumber": 3,
                            },
                            "action": {"type": "expire"},
                        },
                    ]
                }
            ),
        )

        # create the service log group
        service_log_group = CloudwatchLogGroup(
            self,
            "svc_log_group",
            name=params["app_name"],
            retention_in_days=1,
        )

        ecs_assume_role = DataAwsIamPolicyDocument(
            self,
            "assume_role",
            statement=[
                {
                    "actions": ["sts:AssumeRole"],
                    "principals": [
                        {
                            "identifiers": ["ecs-tasks.amazonaws.com"],
                            "type": "Service",
                        },
                    ],
                },
            ],
        )

        # create the service execution role
        service_execution_role = IamRole(
            self,
            "service_execution_role",
            assume_role_policy=ecs_assume_role.json,
            name=params["app_name"] + "-exec-role",
        )

        IamRolePolicyAttachment(
            self,
            "ecs_role_policy",
            policy_arn="arn:aws:iam::aws:policy/service-role/AmazonECSTaskExecutionRolePolicy",
            role=service_execution_role.name,
        )

        # create the service task role
        service_task_role = IamRole(
            self,
            "service_task_role",
            assume_role_policy=ecs_assume_role.json,
            name=params["app_name"] + "-task-role",
        )

        # create the service task definition
        task = EcsTaskDefinition(
            self,
            "svc-task",
            family="service",
            network_mode="awsvpc",
            requires_compatibilities=["FARGATE"],
            cpu="256",
            memory="512",
            task_role_arn=service_task_role.arn,
            execution_role_arn=service_execution_role.arn,
            container_definitions=json.dumps(
                [
                    {
                        "name": "svc",
                        "image": f"{repo.repository_url}:latest",
                        "networkMode": "awsvpc",
                        "healthCheck": {
                            "Command": ["CMD-SHELL", "echo hello"],
                            "Interval": 5,
                            "Timeout": 2,
                            "Retries": 3,
                        },
                        "portMappings": [
                            {
                                "containerPort": params["app_port"],
                                "hostPort": params["app_port"],
                            }
                        ],
                        "logConfiguration": {
                            "logDriver": "awslogs",
                            "options": {
                                "awslogs-group": service_log_group.name,
                                "awslogs-region": params["region"],
                                "awslogs-stream-prefix": params["app_name"],
                            },
                        },
                    }
                ]
            ),
        )

        # create the ECS service
        EcsService(
            self,
            "ecs_service",
            name=params["app_name"] + "-service",
            cluster=infra["cluster_id"],
            task_definition=task.arn,
            desired_count=params["desired_count"],
            launch_type="FARGATE",
            force_new_deployment=True,
            network_configuration=EcsServiceNetworkConfiguration(
                subnets=network["private_subnets"],
                security_groups=[svc_sg.id],
            ),
            load_balancer=[
                EcsServiceLoadBalancer(
                    target_group_arn=svc_tg.id,
                    container_name="svc",
                    container_port=params["app_port"],
                )
            ],
        )

        TerraformOutput(
            self,
            "ecr_repository_url",
            description="url of the ecr repo",
            value=repo.repository_url,
        )

Step 4: Github Actions Workflow
To automate deployments, let’s integrate a GitHub Actions workflow to our java-api. After enabling Github Actions, setting the secrets and variables for your repository, create the .github/workflows/deploy.yml file and add the content below:
FROM maven:3.9-amazoncorretto-21 AS builder

WORKDIR /app

COPY pom.xml .

COPY src src

RUN mvn clean package

# amazon java distribution
FROM amazoncorretto:21-alpine

COPY --from=builder /app/target/*.jar /app/java-api.jar

EXPOSE 8080

ENTRYPOINT ["java","-jar","/app/java-api.jar"]
Our workflow is working well:

The service was successfully deployed as shown in the image below:

Step 5: Validate the Deployment
Test your deployment using the following script (replace the ALB URL with yours):
- [**python (3.13)**](https://www.python.org/)
- [**pipenv**](https://pipenv.pypa.io/en/latest/)
- [**npm**](https://nodejs.org/en/)
The ALB is now ready to serve traffic!
Final Thoughts
By leveraging AWS CDKTF, we can write clean, maintainable IaC code using Python. This approach simplifies deploying containerized applications like a Spring Boot API on AWS ECS Fargate.
CDKTF’s flexibility, combined with Terraform’s robust capabilities, makes it an excellent choice for modern cloud deployments.
While the CDKTF project offers many interesting features for infrastructure management, I have to admit that I find it somewhat too verbose at times.
Do you have any experience with CDKTF? Have you used it in production?
Feel free to share your experience with us.
The above is the detailed content of How to deploy a SpringBoot API on AWS ECS using CDKTF?. For more information, please follow other related articles on the PHP Chinese website!

Hot AI Tools

Undress AI Tool
Undress images for free

Undresser.AI Undress
AI-powered app for creating realistic nude photos

AI Clothes Remover
Online AI tool for removing clothes from photos.

Clothoff.io
AI clothes remover

Video Face Swap
Swap faces in any video effortlessly with our completely free AI face swap tool!

Hot Article
Hot Tools

Notepad++7.3.1
Easy-to-use and free code editor

SublimeText3 Chinese version
Chinese version, very easy to use

Zend Studio 13.0.1
Powerful PHP integrated development environment

Dreamweaver CS6
Visual web development tools

SublimeText3 Mac version
God-level code editing software (SublimeText3)
Hot Topics


 What are dynamic programming techniques, and how do I use them in Python?
Jun 20, 2025 am 12:57 AM
What are dynamic programming techniques, and how do I use them in Python?
Jun 20, 2025 am 12:57 AM
Dynamic programming (DP) optimizes the solution process by breaking down complex problems into simpler subproblems and storing their results to avoid repeated calculations. There are two main methods: 1. Top-down (memorization): recursively decompose the problem and use cache to store intermediate results; 2. Bottom-up (table): Iteratively build solutions from the basic situation. Suitable for scenarios where maximum/minimum values, optimal solutions or overlapping subproblems are required, such as Fibonacci sequences, backpacking problems, etc. In Python, it can be implemented through decorators or arrays, and attention should be paid to identifying recursive relationships, defining the benchmark situation, and optimizing the complexity of space.
 How do I perform network programming in Python using sockets?
Jun 20, 2025 am 12:56 AM
How do I perform network programming in Python using sockets?
Jun 20, 2025 am 12:56 AM
Python's socket module is the basis of network programming, providing low-level network communication functions, suitable for building client and server applications. To set up a basic TCP server, you need to use socket.socket() to create objects, bind addresses and ports, call .listen() to listen for connections, and accept client connections through .accept(). To build a TCP client, you need to create a socket object and call .connect() to connect to the server, then use .sendall() to send data and .recv() to receive responses. To handle multiple clients, you can use 1. Threads: start a new thread every time you connect; 2. Asynchronous I/O: For example, the asyncio library can achieve non-blocking communication. Things to note
 How do I slice a list in Python?
Jun 20, 2025 am 12:51 AM
How do I slice a list in Python?
Jun 20, 2025 am 12:51 AM
The core answer to Python list slicing is to master the [start:end:step] syntax and understand its behavior. 1. The basic format of list slicing is list[start:end:step], where start is the starting index (included), end is the end index (not included), and step is the step size; 2. Omit start by default start from 0, omit end by default to the end, omit step by default to 1; 3. Use my_list[:n] to get the first n items, and use my_list[-n:] to get the last n items; 4. Use step to skip elements, such as my_list[::2] to get even digits, and negative step values ??can invert the list; 5. Common misunderstandings include the end index not
 How do I use the datetime module for working with dates and times in Python?
Jun 20, 2025 am 12:58 AM
How do I use the datetime module for working with dates and times in Python?
Jun 20, 2025 am 12:58 AM
Python's datetime module can meet basic date and time processing requirements. 1. You can get the current date and time through datetime.now(), or you can extract .date() and .time() respectively. 2. Can manually create specific date and time objects, such as datetime(year=2025, month=12, day=25, hour=18, minute=30). 3. Use .strftime() to output strings in format. Common codes include %Y, %m, %d, %H, %M, and %S; use strptime() to parse the string into a datetime object. 4. Use timedelta for date shipping
 Polymorphism in python classes
Jul 05, 2025 am 02:58 AM
Polymorphism in python classes
Jul 05, 2025 am 02:58 AM
Polymorphism is a core concept in Python object-oriented programming, referring to "one interface, multiple implementations", allowing for unified processing of different types of objects. 1. Polymorphism is implemented through method rewriting. Subclasses can redefine parent class methods. For example, the spoke() method of Animal class has different implementations in Dog and Cat subclasses. 2. The practical uses of polymorphism include simplifying the code structure and enhancing scalability, such as calling the draw() method uniformly in the graphical drawing program, or handling the common behavior of different characters in game development. 3. Python implementation polymorphism needs to satisfy: the parent class defines a method, and the child class overrides the method, but does not require inheritance of the same parent class. As long as the object implements the same method, this is called the "duck type". 4. Things to note include the maintenance
 How do I write a simple 'Hello, World!' program in Python?
Jun 24, 2025 am 12:45 AM
How do I write a simple 'Hello, World!' program in Python?
Jun 24, 2025 am 12:45 AM
The "Hello,World!" program is the most basic example written in Python, which is used to demonstrate the basic syntax and verify that the development environment is configured correctly. 1. It is implemented through a line of code print("Hello,World!"), and after running, the specified text will be output on the console; 2. The running steps include installing Python, writing code with a text editor, saving as a .py file, and executing the file in the terminal; 3. Common errors include missing brackets or quotes, misuse of capital Print, not saving as .py format, and running environment errors; 4. Optional tools include local text editor terminal, online editor (such as replit.com)
 What are tuples in Python, and how do they differ from lists?
Jun 20, 2025 am 01:00 AM
What are tuples in Python, and how do they differ from lists?
Jun 20, 2025 am 01:00 AM
TuplesinPythonareimmutabledatastructuresusedtostorecollectionsofitems,whereaslistsaremutable.Tuplesaredefinedwithparenthesesandcommas,supportindexing,andcannotbemodifiedaftercreation,makingthemfasterandmorememory-efficientthanlists.Usetuplesfordatain
 How do I generate random strings in Python?
Jun 21, 2025 am 01:02 AM
How do I generate random strings in Python?
Jun 21, 2025 am 01:02 AM
To generate a random string, you can use Python's random and string module combination. The specific steps are: 1. Import random and string modules; 2. Define character pools such as string.ascii_letters and string.digits; 3. Set the required length; 4. Call random.choices() to generate strings. For example, the code includes importrandom and importstring, set length=10, characters=string.ascii_letters string.digits and execute ''.join(random.c
