

How to Integrate Gemini API with React.js: A Step-by-Step Guide.
Dec 18, 2024 pm 09:08 PM
Learn how to integrate Gemini API in your React.js project to create an interactive chatbot experience.
Since I won't dive deep into styling, refer to the GitHub repository for the stylesheet. You can also see the demo here.
Without further ado, let’s get started!
Getting Your Gemini API Key:
Before integrating the Gemini API into your React.js project, you need to obtain an API key. Follow these steps:
Visit Google AI Studio
Open your browser and navigate to the Google AI Studio page.Access Developer Documentation
Once you’re on the Google AI Studio homepage, locate the sidebar. From the options, select “Developer Documentation.”Request an API Key
Within the Developer Documentation page, look for a button labeled “Get a Gemini API Key.” Click on it.Authenticate and Confirm
If you’re not already signed in, log in with your Google account. You may need to complete some authentication steps or agree to terms and conditions before proceeding.Copy Your API Key
Once the key is generated, copy it. Keep it safe — this key will be required to authenticate your requests when using the Gemini API in your React.js project.
Tip: If you want to check your API key, there will be a curl command on the documentation page. Replace the YOUR_API_KEY placeholder with the API key you obtained from the Google AI Studio. Open Git Bash and paste the modified curl command. If the API key is valid and working, you should receive a response in JSON format.
Setup React.js Project:
Set up a project using CRA and install required libraries. Replace my-app with the name of your project.
npx create-react-app my-app
npm install @google/generative-ai
npm install react-markdown
npm install react-icons
Get rid of unnecessary files and make a components folder in the src folder.
Also, in the root directory, make an .env file to safely store the API key.
REACT_APP_GEMINI_API_KEY=YOUR_API_KEY_HERE
We will use this whenever we need our API Key:
process.env.REACT_APP_GEMINI_API_KEY
Setting up the Model:
Make a Model.jsx file in the components folder. This will contain the code to define a setup to interact with the Gemini API using a generateContent function.
// components/Model.jsx
const { GoogleGenerativeAI } = require("@google/generative-ai");

const genAI = new GoogleGenerativeAI(process.env.REACT_APP_GEMINI_API_KEY);
const model = genAI.getGenerativeModel({ model: "gemini-1.5-flash" });

export const generateContent = async (prompt) => {
    const result = await model.generateContent(prompt);
    console.log(result.response.text());
    return result.response.text; // return the response
}
Home.jsx:
In the components folder, make Home.jsx. This file will define the logic for:
- Getting user input and sending it to the model.
- Logic for clear and send buttons.
- Displaying chat history.
Here’s the code:
import React, { useState } from "react";
import { IoIosSend } from "react-icons/io";
import { generateContent } from './Model';
import ReactMarkdown from 'react-markdown'; // to render markdown responses
import './home.css'

export default function Home() {
  const [userInput, setUserInput] = useState('');
  const [response, setResponse] = useState([]);
  const [isLoading, setIsLoading] = useState(false);

  const handleUserInput = (e) => {
    setUserInput(e.target.value);
  };

  const handleClear = () => {
    setUserInput('');
    setResponse([]);
    setIsLoading(false);
  };

  const handleSubmit = async () => {
    if (!userInput.trim()) {
      setResponse([{ type: "system", message: "Please enter a prompt.." }]);
      return;
    }

    setIsLoading(true);
    try {
      const res = await generateContent(userInput);
      setResponse(prevResponse => [
        ...prevResponse,
        { type: "user", message: userInput },
        { type: "bot", message: res()},
      ]);
      setUserInput('');
    } catch (err) {
      console.error("Error generating response:", err);
      setResponse(prevResponse => [
        ...prevResponse,
        { type: "system", message: "Failed to generate response" },
      ]);
    } finally {
      setIsLoading(false);
    }
  };

  const handleKeyPress = (e) => {
    if (e.key === 'Enter') {
      e.preventDefault();
      handleSubmit();
    }
  };

  return (
    <div className="chat-container">
      {response.length === 0 ? (
        <h1>Got Questions? Chatty's Got Answers.</h1>
      ) : (
        <div className="chat-history">
          {response.map((msg, index) => (
            <p key={index} className={`message ${msg.type}`}>
              <ReactMarkdown>{msg.message}</ReactMarkdown>
            </p>
          ))}
          {isLoading && <p className="loading-text">Generating response...</p>}
        </div>
      )}

      <div className="input-container">
        <button onClick={handleClear} className="clear-btn">Clear</button>

        <input
          type="text"
          value={userInput}
          onChange={handleUserInput}
          onKeyDown={handleKeyPress}
          placeholder="Type your message here..."
          className="chat-input"
        />

        <button onClick={handleSubmit} className="send-btn">
          <IoIosSend />
        </button>
      </div>
    </div>
  );
}
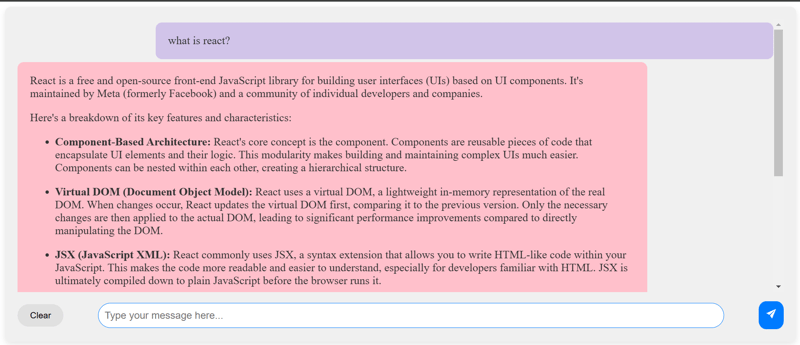
This is what we will be seeing!

Why Use React Markdown?
We use React Markdown because the Gemini API returns responses formatted in Markdown. This library helps render it correctly on the page, ensuring that any Markdown syntax, such as links or bold text, is displayed properly in the UI.
Explanation:
We created three local states: userInput, response, and isLoading.
- userInput: Stores the current value typed by the user in the input field.
- response: Stores the chat history, including messages from both the user and the bot.
- isLoading: Tracks whether the app is waiting for a response from the Gemini API.
Functions:
- handleUserInput(): Updates the userInput state whenever the user types in the input field.
- handleClear(): Resets the states when the user clicks the Clear button, effectively clearing the chat.
- handleSubmit(): Checks if the input is empty, sets the loading state, fetches the AI response, updates the chat history, handles errors, and resets the input field and loading state once done.
- handleKeyPress(): If the Enter key is pressed, it prevents the default action (form submission) and triggers the handleSubmit function.
Conclusion:
In this tutorial, we’ve learned how to integrate the Gemini API into a React.js app. We covered setting up the project, handling user input, interacting with the API, and displaying responses using React’s state management and react-markdown.
To further enhance your project, you can add additional functionality such as user authentication, saving chat history for persistence even after a page refresh, and more.
Happy Coding! ?
The above is the detailed content of How to Integrate Gemini API with React.js: A Step-by-Step Guide.. For more information, please follow other related articles on the PHP Chinese website!

Hot AI Tools

Undress AI Tool
Undress images for free

Undresser.AI Undress
AI-powered app for creating realistic nude photos

AI Clothes Remover
Online AI tool for removing clothes from photos.

Clothoff.io
AI clothes remover

Video Face Swap
Swap faces in any video effortlessly with our completely free AI face swap tool!

Hot Article
Hot Tools

Notepad++7.3.1
Easy-to-use and free code editor

SublimeText3 Chinese version
Chinese version, very easy to use

Zend Studio 13.0.1
Powerful PHP integrated development environment

Dreamweaver CS6
Visual web development tools

SublimeText3 Mac version
God-level code editing software (SublimeText3)
Hot Topics


 Java vs. JavaScript: Clearing Up the Confusion
Jun 20, 2025 am 12:27 AM
Java vs. JavaScript: Clearing Up the Confusion
Jun 20, 2025 am 12:27 AM
Java and JavaScript are different programming languages, each suitable for different application scenarios. Java is used for large enterprise and mobile application development, while JavaScript is mainly used for web page development.
 Javascript Comments: short explanation
Jun 19, 2025 am 12:40 AM
Javascript Comments: short explanation
Jun 19, 2025 am 12:40 AM
JavaScriptcommentsareessentialformaintaining,reading,andguidingcodeexecution.1)Single-linecommentsareusedforquickexplanations.2)Multi-linecommentsexplaincomplexlogicorprovidedetaileddocumentation.3)Inlinecommentsclarifyspecificpartsofcode.Bestpractic
 How to work with dates and times in js?
Jul 01, 2025 am 01:27 AM
How to work with dates and times in js?
Jul 01, 2025 am 01:27 AM
The following points should be noted when processing dates and time in JavaScript: 1. There are many ways to create Date objects. It is recommended to use ISO format strings to ensure compatibility; 2. Get and set time information can be obtained and set methods, and note that the month starts from 0; 3. Manually formatting dates requires strings, and third-party libraries can also be used; 4. It is recommended to use libraries that support time zones, such as Luxon. Mastering these key points can effectively avoid common mistakes.
 Why should you place tags at the bottom of the ?
Jul 02, 2025 am 01:22 AM
Why should you place tags at the bottom of the ?
Jul 02, 2025 am 01:22 AM
PlacingtagsatthebottomofablogpostorwebpageservespracticalpurposesforSEO,userexperience,anddesign.1.IthelpswithSEObyallowingsearchenginestoaccesskeyword-relevanttagswithoutclutteringthemaincontent.2.Itimprovesuserexperiencebykeepingthefocusonthearticl
 JavaScript vs. Java: A Comprehensive Comparison for Developers
Jun 20, 2025 am 12:21 AM
JavaScript vs. Java: A Comprehensive Comparison for Developers
Jun 20, 2025 am 12:21 AM
JavaScriptispreferredforwebdevelopment,whileJavaisbetterforlarge-scalebackendsystemsandAndroidapps.1)JavaScriptexcelsincreatinginteractivewebexperienceswithitsdynamicnatureandDOMmanipulation.2)Javaoffersstrongtypingandobject-orientedfeatures,idealfor
 What is event bubbling and capturing in the DOM?
Jul 02, 2025 am 01:19 AM
What is event bubbling and capturing in the DOM?
Jul 02, 2025 am 01:19 AM
Event capture and bubble are two stages of event propagation in DOM. Capture is from the top layer to the target element, and bubble is from the target element to the top layer. 1. Event capture is implemented by setting the useCapture parameter of addEventListener to true; 2. Event bubble is the default behavior, useCapture is set to false or omitted; 3. Event propagation can be used to prevent event propagation; 4. Event bubbling supports event delegation to improve dynamic content processing efficiency; 5. Capture can be used to intercept events in advance, such as logging or error processing. Understanding these two phases helps to accurately control the timing and how JavaScript responds to user operations.
 JavaScript: Exploring Data Types for Efficient Coding
Jun 20, 2025 am 12:46 AM
JavaScript: Exploring Data Types for Efficient Coding
Jun 20, 2025 am 12:46 AM
JavaScripthassevenfundamentaldatatypes:number,string,boolean,undefined,null,object,andsymbol.1)Numbersuseadouble-precisionformat,usefulforwidevaluerangesbutbecautiouswithfloating-pointarithmetic.2)Stringsareimmutable,useefficientconcatenationmethodsf
 How can you reduce the payload size of a JavaScript application?
Jun 26, 2025 am 12:54 AM
How can you reduce the payload size of a JavaScript application?
Jun 26, 2025 am 12:54 AM
If JavaScript applications load slowly and have poor performance, the problem is that the payload is too large. Solutions include: 1. Use code splitting (CodeSplitting), split the large bundle into multiple small files through React.lazy() or build tools, and load it as needed to reduce the first download; 2. Remove unused code (TreeShaking), use the ES6 module mechanism to clear "dead code" to ensure that the introduced libraries support this feature; 3. Compress and merge resource files, enable Gzip/Brotli and Terser to compress JS, reasonably merge files and optimize static resources; 4. Replace heavy-duty dependencies and choose lightweight libraries such as day.js and fetch
